一个最基础的 Spring 4 MVC Maven 项目
这是一个最基本的 Spring 4 MVC 的 Maven 项目,非 SpringBoot 的,SpringBoot 由于有许多自动化配置特性,会更简单些。本例全部用 Java 代码作为配置,免除了创建
本文侧重于 Spring MVC 项目提供 RESTful JSON API, 因而静态 Web 内容提及较少。创建一个 Maven 项目的方式,可以直接创建一个
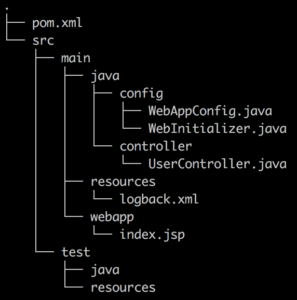 就是一个普通的 Maven 项目,稍稍不同的是 src/main 目录中除了 java 和 resources 之外,还有 webapp 目录,用于存放 web 静态文件或模板文件的。
本例使用了 slfj + logback 作为日志框架与实现,并且引入非常常用的 Google Guava 通用库。
在 IntelliJ IDEA 中如果想要修改 Java 类后自动重启 Spring 上下文的话,有两种方式
这是 Seervlet 3 才有的特性,在 Spring-Web 项目中有一个实现了 Servlet3
 并且这个
并且这个
这个类对于当前实例来说没多少内容,主要就是
此处注解没什么好说的,普通的 Spring RESTful 的 controller 的注解
因为我们在 pom.xml 中引入了 jackson, 所以 Controller 方法返回的对象被自动转换为 JSON 格式的数据
http://localhost:8080/springmvc/ 将会访问到 src/webapp/index.jsp 的内容,如果文件存在的话。
这时候不带
如果在 Controller 或请求头中没有特别说明默认输出
[版权声明] 本文采用 署名-非商业性使用-相同方式共享 4.0 国际 (CC BY-NC-SA 4.0) 进行许可。
web.xml 和如 dispatcher-servlet.xml 这样的文件。本人更倾向于 Java 配置,它的优势在于能进行编译期检查,逻辑性也强,配置文件只是改动无需重新编译,都是要重启服务的; 关于使用 XML 配置文件的方式可参考文后的链接。本文侧重于 Spring MVC 项目提供 RESTful JSON API, 因而静态 Web 内容提及较少。创建一个 Maven 项目的方式,可以直接创建一个
pom.xml 文件,然后编辑它的内容,使用 IntelliJ IDEA 的话只需要选择导入为一个 Maven 项目就成,Eclipse 的话可能还要事先运行 mvn eclipse:eclipse 初始化一下。项目结构布局
 就是一个普通的 Maven 项目,稍稍不同的是 src/main 目录中除了 java 和 resources 之外,还有 webapp 目录,用于存放 web 静态文件或模板文件的。
pom.xml 文件内容
 1<project xmlns="http://maven.apache.org/POM/4.0.0" xmlns:xsi="http://www.w3.org/2001/XMLSchema-instance"
 2         xsi:schemaLocation="http://maven.apache.org/POM/4.0.0 http://maven.apache.org/maven-v4_0_0.xsd">
 3
 4    <modelVersion>4.0.0</modelVersion>
 5    <groupId>demo</groupId>
 6    <artifactId>springmvc</artifactId>
 7    <version>1.0-SNAPSHOT</version>
 8    <packaging>war</packaging>
 9
10    <properties>
11        <jdk.version>1.8</jdk.version>
12        <maven-compiler-plugin.version>3.1</maven-compiler-plugin.version>
13
14        <project.build.sourceEncoding>UTF-8</project.build.sourceEncoding>
15        <project.reporting.outputEncoding>UTF-8</project.reporting.outputEncoding>
16
17        <spring.version>4.3.16.RELEASE</spring.version>
18        <maven-war-plugin.version>2.4</maven-war-plugin.version>
19        <tomcat7.version>2.2</tomcat7.version>
20        <servlet.version>3.0.1</servlet.version>
21        <jackson.version>2.9.5</jackson.version>
22        <logback.version>1.2.3</logback.version>
23        <guava.version>25.0-jre</guava.version>
24    </properties>
25
26    <dependencyManagement>
27        <dependencies>
28            <dependency>
29                <groupId>org.springframework</groupId>
30                <artifactId>spring-framework-bom</artifactId>
31                <version>${spring.version}</version>
32                <scope>import</scope>
33                <type>pom</type>
34            </dependency>
35        </dependencies>
36    </dependencyManagement>
37
38    <dependencies>
39        <dependency>
40            <groupId>javax.servlet</groupId>
41            <artifactId>javax.servlet-api</artifactId>
42            <version>${servlet.version}</version>
43            <scope>provided</scope>
44        </dependency>
45        <dependency>
46            <groupId>org.springframework</groupId>
47            <artifactId>spring-webmvc</artifactId>
48        </dependency>
49        <dependency>
50            <groupId>com.fasterxml.jackson.core</groupId>
51            <artifactId>jackson-databind</artifactId>
52            <version>${jackson.version}</version>
53        </dependency>
54        <dependency>
55            <groupId>ch.qos.logback</groupId>
56            <artifactId>logback-classic</artifactId>
57            <version>${logback.version}</version>
58        </dependency>
59        <dependency>
60            <groupId>com.google.guava</groupId>
61            <artifactId>guava</artifactId>
62            <version>${guava.version}</version>
63        </dependency>
64    </dependencies>
65
66    <build>
67        <plugins>
68            <plugin>
69                <groupId>org.apache.maven.plugins</groupId>
70                <artifactId>maven-compiler-plugin</artifactId>
71                <version>${maven-compiler-plugin.version}</version>
72                <configuration>
73                    <encoding>UTF-8</encoding>
74                    <source>${jdk.version}</source>
75                    <target>${jdk.version}</target>
76                </configuration>
77            </plugin>
78            <plugin>
79                <groupId>org.apache.maven.plugins</groupId>
80                <artifactId>maven-war-plugin</artifactId>
81                <version>${maven-war-plugin.version}</version>
82                <configuration>
83                    <failOnMissingWebXml>false</failOnMissingWebXml>
84                </configuration>
85            </plugin>
86
87            <plugin>
88                <groupId>org.apache.tomcat.maven</groupId>
89                <artifactId>tomcat7-maven-plugin</artifactId>
90                <version>${tomcat7.version}</version>
91                <configuration>
92                    <path>/springmvc</path>
93                    <contextReloadable>true</contextReloadable>
94                </configuration>
95            </plugin>
96
97        </plugins>
98    </build>
99</project>
本例使用了 slfj + logback 作为日志框架与实现,并且引入非常常用的 Google Guava 通用库。
- maven-war-plugin 用于创建可发布的 war 包
- tomcat7-maven-plugin 用于测试项目,它的
contextReloadable属性可在类改动重新编译后使 Spring 重新启动
在 IntelliJ IDEA 中如果想要修改 Java 类后自动重启 Spring 上下文的话,有两种方式
- 启用自动编译功能,Preferences/Build, Execution, Deployment/Compiler, 勾选上 Build project automatically
- 类修改后,从 Build 菜单中,选
Recompile...,Build Project,Build Module,Rebuild Project都会触发 Spring 上下文重启。
WebInitializer 类
 1package config;
 2
 3import org.slf4j.Logger;
 4import org.slf4j.LoggerFactory;
 5import org.springframework.web.WebApplicationInitializer;
 6import org.springframework.web.context.support.AnnotationConfigWebApplicationContext;
 7import org.springframework.web.filter.CharacterEncodingFilter;
 8import org.springframework.web.servlet.DispatcherServlet;
 9
10import javax.servlet.DispatcherType;
11import javax.servlet.FilterRegistration;
12import javax.servlet.ServletContext;
13import javax.servlet.ServletException;
14import javax.servlet.ServletRegistration;
15import java.util.EnumSet;
16
17public class WebInitializer implements WebApplicationInitializer {
18
19    private static final Logger logger = LoggerFactory.getLogger(WebInitializer.class);
20
21    @Override
22    public void onStartup(ServletContext container) throws ServletException {
23        logger.info("Starting container......");
24
25        AnnotationConfigWebApplicationContext context = new AnnotationConfigWebApplicationContext();
26        context.register(WebAppConfig.class);
27        context.setServletContext(container);
28        context.refresh();
29
30        ServletRegistration.Dynamic dispatcher = container.addServlet("dispatcher", new DispatcherServlet(context));
31        dispatcher.setLoadOnStartup(1);
32        dispatcher.addMapping("/");
33
34        FilterRegistration.Dynamic filter = container.addFilter("encoding", CharacterEncodingFilter.class);
35        filter.setInitParameter("encoding", "UTF-8");
36        filter.addMappingForServletNames(EnumSet.allOf(DispatcherType.class), true, "dispatcher");
37    }
38}
这是 Seervlet 3 才有的特性,在 Spring-Web 项目中有一个实现了 Servlet3
ServletContainerInitializer 接口的类 SpringServletContainerInitializer, 它会在 Spring 容器启动时扫描 WebApplicationInitializer 的所有实现类,并调用它们的 onStartup 文件。由此才实现了免 web.xml 文件配置 servlet 的方式。SpringServletContainerInitializer 是以 SPI 的方式加载的,定义在 spring-web 包中,见下图 并且这个
并且这个 WebInitializer 把 Spring 的上下文 AnnotationConfigWebApplicationContext 与 Servlet 容器上下文 ServletContext 关联起来了。注册了 Spring 本身的 Java 配置 WebAppConfig 类。创建了 / 到 dispatcher servlet 的映射。WebAppConfig 类
 1package config;
 2
 3import org.springframework.context.annotation.ComponentScan;
 4import org.springframework.web.servlet.config.annotation.EnableWebMvc;
 5
 6@EnableWebMvc
 7@ComponentScan(basePackages = {"controller"})
 8public class WebAppConfig {
 9
10}
这个类对于当前实例来说没多少内容,主要就是
EnableWebMvc 启用 SpringMVC 特性,并指示 Spring 上下文扫描 controller 包。因为该例只用一个 controller 来进行演示,未涉及到 service, model 等内容。UserController 类
 1package controller;
 2
 3import com.google.common.collect.ImmutableMap;
 4import org.springframework.web.bind.annotation.PathVariable;
 5import org.springframework.web.bind.annotation.RequestMapping;
 6import org.springframework.web.bind.annotation.RequestMethod;
 7import org.springframework.web.bind.annotation.RestController;
 8
 9import java.util.Map;
10
11@RestController
12@RequestMapping("/users")
13public class UserController {
14
15    @RequestMapping(value="/{userId}", method= RequestMethod.GET)
16    public Map<String, Object> getUserInfo(@PathVariable("userId") Integer userId) {
17        return ImmutableMap.of("UserId", userId, "Name", "Yanbin");
18    }
19}
此处注解没什么好说的,普通的 Spring RESTful 的 controller 的注解
测试运行 tomcat
在项目目录下,执行mvn tomcat7:run 命令[INFO] --- tomcat7-maven-plugin:2.2:run (default-cli) @ springmvc ---这样就启动了我们的 SpringMVC 项目,可以测试 http://localhost:8080/springmvc/users/1234
[INFO] Running war on http://localhost:8080/springmvc
[INFO] Creating Tomcat server configuration at /Users/yanbin/workspace/springmvc/target/tomcat
[INFO] create webapp with contextPath: /springmvc
Apr 30, 2018 7:54:04 AM org.apache.coyote.AbstractProtocol init
INFO: Initializing ProtocolHandler ["http-bio-8080"]
Apr 30, 2018 7:54:04 AM org.apache.catalina.core.StandardService startInternal
INFO: Starting service Tomcat
Apr 30, 2018 7:54:04 AM org.apache.catalina.core.StandardEngine startInternal
INFO: Starting Servlet Engine: Apache Tomcat/7.0.47
Apr 30, 2018 7:54:06 AM org.apache.catalina.core.ApplicationContext log
INFO: 1 Spring WebApplicationInitializers detected on classpath
2018-04-30 07:54:06 [localhost-startStop-1] INFO WebInitializer - Starting container......
2018-04-30 07:54:06 [localhost-startStop-1] INFO AnnotationConfigWebApplicationContext - Refreshing Root WebApplicationContext: startup date [Mon Apr 30 07:54:06 CDT 2018]; root of context hierarchy
2018-04-30 07:54:06 [localhost-startStop-1] INFO AnnotationConfigWebApplicationContext - Registering annotated classes: [class config.WebAppConfig]
2018-04-30 07:54:06 [localhost-startStop-1] INFO AutowiredAnnotationBeanPostProcessor - JSR-330 'javax.inject.Inject' annotation found and supported for autowiring
2018-04-30 07:54:07 [localhost-startStop-1] INFO RequestMappingHandlerMapping - Mapped "{[/users/{userId}],methods=[GET]}" onto public java.util.Map<java.lang.String, java.lang.Object> controller.UserController.getUserInfo(java.lang.Integer)
2018-04-30 07:54:07 [localhost-startStop-1] INFO RequestMappingHandlerAdapter - Looking for @ControllerAdvice: Root WebApplicationContext: startup date [Mon Apr 30 07:54:06 CDT 2018]; root of context hierarchy
Apr 30, 2018 7:54:07 AM org.apache.catalina.core.ApplicationContext log
INFO: Initializing Spring FrameworkServlet 'dispatcher'
2018-04-30 07:54:07 [localhost-startStop-1] INFO DispatcherServlet - FrameworkServlet 'dispatcher': initialization started
2018-04-30 07:54:07 [localhost-startStop-1] INFO DispatcherServlet - FrameworkServlet 'dispatcher': initialization completed in 19 ms
Apr 30, 2018 7:54:07 AM org.apache.coyote.AbstractProtocol start
INFO: Starting ProtocolHandler ["http-bio-8080"]
➜ / curl -v http://localhost:8080/springmvc/users/1234
* Trying ::1...
* TCP_NODELAY set
* Connected to localhost (::1) port 8080 (#0)
> GET /springmvc/users/1234 HTTP/1.1
> Host: localhost:8080
> User-Agent: curl/7.54.0
> Accept: */*
>
< HTTP/1.1 200 OK
< Server: Apache-Coyote/1.1
< Content-Type: application/json;charset=UTF-8
< Transfer-Encoding: chunked
< Date: Mon, 30 Apr 2018 13:04:52 GMT
<
* Connection #0 to host localhost left intact
{"UserId":1234,"Name":"Yanbin"}
因为我们在 pom.xml 中引入了 jackson, 所以 Controller 方法返回的对象被自动转换为 JSON 格式的数据
http://localhost:8080/springmvc/ 将会访问到 src/webapp/index.jsp 的内容,如果文件存在的话。
关于响应格式
如果在项目中还引入了 Jackson 的另一个 xml 包1<dependency>
2 <groupId>com.fasterxml.jackson.dataformat</groupId>
3 <artifactId>jackson-dataformat-xml</artifactId>
4 <version>${jackson.version}</version>
5</dependency>mvn tomcat7:run 重启 Tomcat, 访问 http://localhost:8080/springmvc/users/1234, 这时候看到输出的是 xml 格式➜ / curl -v http://localhost:8080/springmvc/users/1234那么在这种情况下如何再次获得 JSON 的响应数据呢?有三种办法
.......
>
< HTTP/1.1 200 OK
< Server: Apache-Coyote/1.1
< Content-Type: application/xml;charset=UTF-8
< Transfer-Encoding: chunked
< Date: Mon, 30 Apr 2018 13:06:47 GMT
<
* Connection #0 to host localhost left intact
<Map><UserId>1234</UserId><Name>Yanbin</Name></Map>
请求时指定响应头
➜ / curl -H "Accept:application/json" http://localhost:8080/springmvc/users/1234
{"UserId":1234,"Name":"Yanbin"}
@RequestMapping 指定 produces
Controller 类或方法上指定 @RequestMapping 的 produces 属性为 json, 例如@RequestMapping(value = "/users", produces = "application/json")
//或
@RequestMapping(value="/{userId}", method=RequestMethod.GET, produces = "application/json")
这时候不带
Accept 头默认的响应就是 JSON 了借助于 WebMvcConfigurerAdapter 设置默认的响应类型
修改前面的WebAppConfig 类的内容如下 1@EnableWebMvc
2@ComponentScan(basePackages = {"controller"})
3public class WebAppConfig extends WebMvcConfigurerAdapter {
4
5 @Override
6 public void configureContentNegotiation(ContentNegotiationConfigurer configurer) {
7 configurer.defaultContentType(MediaType.APPLICATION_JSON_UTF8);
8 }
9
10}如果在 Controller 或请求头中没有特别说明默认输出
JSON 格式响应。也就是说这时候请求头中如果要求得到 XML 格式的数据还是没问题的。➜ / curl -H "Accept:text/xml" http://localhost:8080/springmvc/users/1234链接:
<Map><UserId>1234</UserId><Name>Yanbin</Name></Map>
- Spring MVC Hello World 例子(web.xml 和 dispatcher-servlet.xml 方式)
- Spring 4 MVC Tutorial Maven Example - Spring Java Configuration
[版权声明]
本文采用 署名-非商业性使用-相同方式共享 4.0 国际 (CC BY-NC-SA 4.0) 进行许可。