命令行下创建 Android 工程,用 Ant 进行编译部署
安装完 Android SDK 后可以在命令行下 Android.bat 命令创建一个示例项目,有 Ant 的话还可直接用 Ant 来编译部署到模拟器上运行。
环境准备:
告诉 path 要指向到 Android SDK 目录的 tools 子目录中,如 d:\android-sdk-windows\tools
要用 ant 编译部署的话,再把 ant 的 bin 目录加入到 path 上,如 D:\apache-ant-1.8.2\bin
CMD 进到命令行下,执行:
android create project -k cc.unmi.android.test -n Hello -a HelloAndroid -t 5 -p c:\TestAndroid
注:以上各参数的意义,可参考:http://developer.android.com/guide/developing/projects/projects-cmdline.html
-k 工程包名: cc.unmi.android.test
-n 工程名 : Hello
-a Activity子类名: HelloAndroid
-t 工程使用的平台 Target: 5 ( 基于Android SDK1.6),是执行 android list targets 显示出的 target id 值
-p 工程存储路径: c:\TestAndroid
控制台下输出:
Created project directory: c:\TestAndroid
Created directory C:\TestAndroid\src\cc\unmi\android\test
Added file c:\TestAndroid\src\cc\unmi\android\test\HelloAndroid.java
Created directory C:\TestAndroid\res
Created directory C:\TestAndroid\bin
Created directory C:\TestAndroid\libs
Created directory C:\TestAndroid\res\values
Added file c:\TestAndroid\res\values\strings.xml
Created directory C:\TestAndroid\res\layout
Added file c:\TestAndroid\res\layout\main.xml
Created directory C:\TestAndroid\res\drawable-hdpi
Created directory C:\TestAndroid\res\drawable-mdpi
Created directory C:\TestAndroid\res\drawable-ldpi
Added file c:\TestAndroid\AndroidManifest.xml
Added file c:\TestAndroid\build.xml
Added file c:\TestAndroid\proguard.cfg
我们知道生成了什么文件,目录下存在 build.xml 文件。这时候,还没 gen 目录,bin 目录是空的。
现在如果已配置好了 ant,就可以进到 c:\TestAndroid 目录下,执行 ant help, 显示出可以使用的 ant 的 target 选项:
help:
[echo] Android Ant Build. Available targets:
[echo] help: Displays this help.
[echo] clean: Removes output files created by other targets.
[echo] compile: Compiles project's .java files into .class files.
[echo] debug: Builds the application and signs it with a debug key.
[echo] release: Builds the application. The generated apk file must be
[echo] signed before it is published.
[echo] install: Installs/reinstalls the debug package onto a running
[echo] emulator or device.
[echo] If the application was previously installed, the
[echo] signatures must match.
[echo] uninstall: Uninstalls the application from a running emulator or
[echo] device.
也就是可以用 ant compile, ant release, ant install 等进行编译,打包,部署等。
ant compile 在 bin 下编译出 class 文件,生成 gen 目录及 R.java。
ant release 在 bin 下生成 classes.dex, Hello.ap_ 和 Hello-unsigned.apk。
要是你现在启动了 Android 模拟器,启动模拟器的命令是 emulator -avd avd名。关于创建 avd 的做法这里略去。
那现在可以执行 ant install
ant install 指令最后的过程是:
-package-debug-sign:
[apkbuilder] Creating Hello-debug-unaligned.apk and signing it with a debug key...
debug:
[echo] Running zip align on final apk...
[echo] Debug Package: C:\TestAndroid\bin\Hello-debug.apk
install:
[echo] Installing C:\TestAndroid\bin\Hello-debug.apk onto default emulator or device...
[exec] pkg: /data/local/tmp/Hello-debug.apk
[exec] Success
[exec] 35 KB/s (13235 bytes in 0.359s)
BUILD SUCCESSFUL
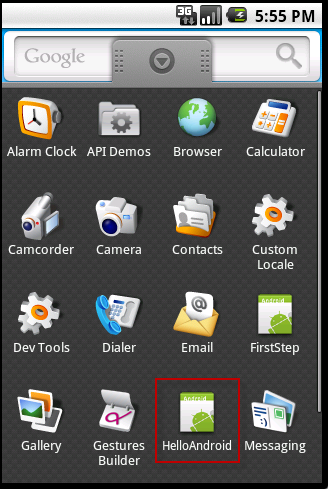
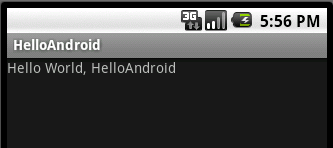
在 c:\TestAndroid 下新生成了 Hello-debug-unaligned.apk 和 Hello-debug.apk, 然后部署到模拟器上的是 Hello-debug.apk。当然有了 apk,你也可以直接使用 adb install Hello-debug.apk 来安装到模拟器上。
来到模拟器下就可以看到这个 HelloAndroid 的运行效果了,见下面两图:
参考:1. 用Ant编译Android项目工程
2. android 命令行编译 ant
3. 如何使用ant编译Android工程
4. Creating an Android Project 永久链接 https://yanbin.blog/cmd-android-ant-project/, 来自 隔叶黄莺 Yanbin's Blog
[版权声明] 本文采用 署名-非商业性使用-相同方式共享 4.0 国际 (CC BY-NC-SA 4.0) 进行许可。
环境准备:
告诉 path 要指向到 Android SDK 目录的 tools 子目录中,如 d:\android-sdk-windows\tools
要用 ant 编译部署的话,再把 ant 的 bin 目录加入到 path 上,如 D:\apache-ant-1.8.2\bin
CMD 进到命令行下,执行:
android create project -k cc.unmi.android.test -n Hello -a HelloAndroid -t 5 -p c:\TestAndroid
注:以上各参数的意义,可参考:http://developer.android.com/guide/developing/projects/projects-cmdline.html
-k 工程包名: cc.unmi.android.test
-n 工程名 : Hello
-a Activity子类名: HelloAndroid
-t 工程使用的平台 Target: 5 ( 基于Android SDK1.6),是执行 android list targets 显示出的 target id 值
-p 工程存储路径: c:\TestAndroid
控制台下输出:
Created project directory: c:\TestAndroid
Created directory C:\TestAndroid\src\cc\unmi\android\test
Added file c:\TestAndroid\src\cc\unmi\android\test\HelloAndroid.java
Created directory C:\TestAndroid\res
Created directory C:\TestAndroid\bin
Created directory C:\TestAndroid\libs
Created directory C:\TestAndroid\res\values
Added file c:\TestAndroid\res\values\strings.xml
Created directory C:\TestAndroid\res\layout
Added file c:\TestAndroid\res\layout\main.xml
Created directory C:\TestAndroid\res\drawable-hdpi
Created directory C:\TestAndroid\res\drawable-mdpi
Created directory C:\TestAndroid\res\drawable-ldpi
Added file c:\TestAndroid\AndroidManifest.xml
Added file c:\TestAndroid\build.xml
Added file c:\TestAndroid\proguard.cfg
我们知道生成了什么文件,目录下存在 build.xml 文件。这时候,还没 gen 目录,bin 目录是空的。
现在如果已配置好了 ant,就可以进到 c:\TestAndroid 目录下,执行 ant help, 显示出可以使用的 ant 的 target 选项:
help:
[echo] Android Ant Build. Available targets:
[echo] help: Displays this help.
[echo] clean: Removes output files created by other targets.
[echo] compile: Compiles project's .java files into .class files.
[echo] debug: Builds the application and signs it with a debug key.
[echo] release: Builds the application. The generated apk file must be
[echo] signed before it is published.
[echo] install: Installs/reinstalls the debug package onto a running
[echo] emulator or device.
[echo] If the application was previously installed, the
[echo] signatures must match.
[echo] uninstall: Uninstalls the application from a running emulator or
[echo] device.
也就是可以用 ant compile, ant release, ant install 等进行编译,打包,部署等。
ant compile 在 bin 下编译出 class 文件,生成 gen 目录及 R.java。
ant release 在 bin 下生成 classes.dex, Hello.ap_ 和 Hello-unsigned.apk。
要是你现在启动了 Android 模拟器,启动模拟器的命令是 emulator -avd avd名。关于创建 avd 的做法这里略去。
那现在可以执行 ant install
ant install 指令最后的过程是:
-package-debug-sign:
[apkbuilder] Creating Hello-debug-unaligned.apk and signing it with a debug key...
debug:
[echo] Running zip align on final apk...
[echo] Debug Package: C:\TestAndroid\bin\Hello-debug.apk
install:
[echo] Installing C:\TestAndroid\bin\Hello-debug.apk onto default emulator or device...
[exec] pkg: /data/local/tmp/Hello-debug.apk
[exec] Success
[exec] 35 KB/s (13235 bytes in 0.359s)
BUILD SUCCESSFUL
在 c:\TestAndroid 下新生成了 Hello-debug-unaligned.apk 和 Hello-debug.apk, 然后部署到模拟器上的是 Hello-debug.apk。当然有了 apk,你也可以直接使用 adb install Hello-debug.apk 来安装到模拟器上。
来到模拟器下就可以看到这个 HelloAndroid 的运行效果了,见下面两图:
参考:1. 用Ant编译Android项目工程
2. android 命令行编译 ant
3. 如何使用ant编译Android工程
4. Creating an Android Project 永久链接 https://yanbin.blog/cmd-android-ant-project/, 来自 隔叶黄莺 Yanbin's Blog
[版权声明]
本文采用 署名-非商业性使用-相同方式共享 4.0 国际 (CC BY-NC-SA 4.0) 进行许可。