Grunt - 基于 node.js 构建工具之初体验
自动化构建工具真是缭乱纷呈,最早的 make, nmake, 到 Ant, NAnt, 进化到面向对象的 Maven, Gradle,由 Scala 而起的 SBT, SBuild,再就是今天要说的由 node.js 建立起的生态
Grunt。
Grunt 可以做什么呢,理论上只要有相应的插件支持,它可以应对任何构建任务,但它更为有力的表现是在前端方面。
Grunt 是运行在 node.js 环境,由 npm 来安装,所以首先要安装 node.js, npm, 它们俩的安装不多说,我这里的版本分别是:
作为一个 Grunt 项目至少要两个文件
package.json -- 配置项目信息,及 Grunt 插件依赖
Gruntfile.js -- 任务配置文件
再加实际的项目文件,我们这里来演示 Grunt 怎么把 test.less 格式的样式文件编译成 test.css 标准格式,并压缩成 test-min.css 文件的。
所以现在要演示的最最简单的几乎无功能的工程的目录结构为:
Gruntfile.js 内容如下:
test.less 文件内容如下:
至此,文件都已准备妥当,开始运行命令了,先确保当前目录是在工程的根目录
 如果直接运行 grunt, 则是跑的 default 任务,它会启动 watch, 一直观察 css/ 目录下文件的任何的每一次改动, 进而运行 less 任务。
我们体验了一个完整的 Grunt 之旅,其余就要步步为营的挺进,点点滴滴的累积了。上面我们用的 JavaScript 写的 Gruntfile.js, 也可以换成 Gruntfile.coffee 文件,即 CoffeeScript 脚本文件。
上面
基本上你需要什么样的功能就到 http://gruntjs.com/plugins 这里来找插件,有了需要插件可以运行
安装了模块(这里模块和插件好像就一个概念)后,需要在 Gruntfile.js 中用
再懒点 Gruntfile.js 也可以用 grunt-init 来创建,先要几步:
有了对 Grunt 基本的了解后,比如当我们拿到别人的一个 Grunt 项目,首先就要运行
参考:1. Getting started 永久链接 https://yanbin.blog/grunt-nodejs-based-build-tool/, 来自 隔叶黄莺 Yanbin's Blog
[版权声明] 本文采用 署名-非商业性使用-相同方式共享 4.0 国际 (CC BY-NC-SA 4.0) 进行许可。
Grunt 是运行在 node.js 环境,由 npm 来安装,所以首先要安装 node.js, npm, 它们俩的安装不多说,我这里的版本分别是:
unmi@localhost ~> node --version运行 Grunt 还要安装 grunt-cli, 使用命令 npm install -g grunt-cli,安装后我机器上 Grunt 的版本是
v0.10.24
unmi@localhost ~> npm --version
1.3.21
unmi@localhost ~> grunt --version在这里就算安装成功了。
grunt-cli v0.1.13
grunt v0.4.4
作为一个 Grunt 项目至少要两个文件
package.json -- 配置项目信息,及 Grunt 插件依赖
Gruntfile.js -- 任务配置文件
再加实际的项目文件,我们这里来演示 Grunt 怎么把 test.less 格式的样式文件编译成 test.css 标准格式,并压缩成 test-min.css 文件的。
所以现在要演示的最最简单的几乎无功能的工程的目录结构为:
unmi@localhost ~> tree testgruntpackage.json 内容如下:
testgrunt
├── Gruntfile.js
├── css
│ └── test.less
└── package.json
1{
2  "name": "TestGrunt",
3  "version": "0.1.0",
4  "devDependencies": {
5    "grunt": "~0.4.2",
6    "grunt-contrib-less": "*",
7    "grunt-contrib-watch": "~0.5.3"
8  }
9} 1module.exports = function (grunt) {
2
3 grunt.initConfig({
4 less: {
5 compile: {
6 files: {
7 'css/test.css': 'css/test.less'
8 }
9 },
10 compress: {
11 files: {
12 'css/test-min.css': 'css/test.css'
13 },
14 options: {
15 compress: true
16 }
17 }
18 },
19 watch: {
20 scripts: {
21 files: ['css/*.less'],
22 tasks: ['less']
23 }
24 }
25 });
26
27 grunt.loadNpmTasks('grunt-contrib-less');
28 grunt.loadNpmTasks('grunt-contrib-watch');
29
30 grunt.registerTask('default', ['less', 'watch']);
31}; 1@base: #f938ab;
2
3.box-shadow(@style, @c) when (iscolor(@c)) {
4 -webkit-box-shadow: @style @c;
5 box-shadow: @style @c;
6}
7.box-shadow(@style, @alpha: 50%) when (isnumber(@alpha)) {
8 .box-shadow(@style, rgba(0, 0, 0, @alpha));
9}
10.box {
11 color: saturate(@base, 5%);
12 border-color: lighten(@base, 30%);
13 div { .box-shadow(0 0 5px, 30%) }
14}npm install会把 package.json 中配置的依赖从网络上下载到 node_modules 目录中去。再运行
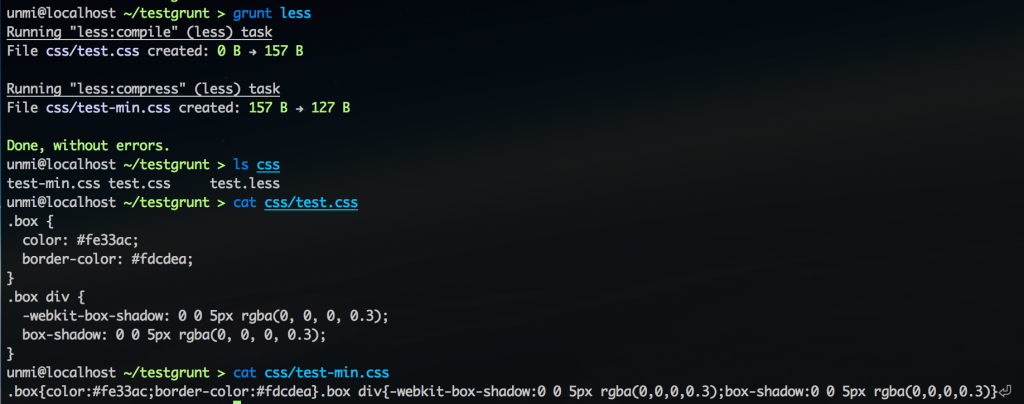
grunt less 就能生成 test.css 和 test-min.css 文件,看命令: 如果直接运行 grunt, 则是跑的 default 任务,它会启动 watch, 一直观察 css/ 目录下文件的任何的每一次改动, 进而运行 less 任务。
我们体验了一个完整的 Grunt 之旅,其余就要步步为营的挺进,点点滴滴的累积了。上面我们用的 JavaScript 写的 Gruntfile.js, 也可以换成 Gruntfile.coffee 文件,即 CoffeeScript 脚本文件。
上面
grunt less 是运行了其中一个任务,可用 grunt --help 查看所有任务,直接 grunt 是运行默认的任务,这与 ant 基本一样的。基本上你需要什么样的功能就到 http://gruntjs.com/plugins 这里来找插件,有了需要插件可以运行
npm install <module> --save-dev 命令把依赖写到 package.json 文件中去,这和 PlayFramework 安装模块类似的。可用命令 npm init 来创建默认的 package.json 文件,命令 npm install 是用来下载安装在 package.json 中指定的依赖。安装了模块(这里模块和插件好像就一个概念)后,需要在 Gruntfile.js 中用
grunt.loadNpmTasks() 方法加载进来,并可参照插件的帮助页面来配置使用它。再懒点 Gruntfile.js 也可以用 grunt-init 来创建,先要几步:
npm install -g grunt-init以后就可以
git clone https://github.com/gruntjs/grunt-init-gruntfile.git ~/.grunt-init/gruntfile
grunt-init gruntfile 向导式创建 Gruntfile.js 文件,它也可以创建 package.json 文件。不过可能这样产生的 Gruntfile.js 文件真心不是你想要的,还不如纯手工打照,或者 Copy 以前的。有了对 Grunt 基本的了解后,比如当我们拿到别人的一个 Grunt 项目,首先就要运行
npm install 下载安装 package.json 中涉及的依赖,然后 grunt --help 看看有什么任务可执行,再执行相应的任务。参考:1. Getting started 永久链接 https://yanbin.blog/grunt-nodejs-based-build-tool/, 来自 隔叶黄莺 Yanbin's Blog
[版权声明]
 本文采用 署名-非商业性使用-相同方式共享 4.0 国际 (CC BY-NC-SA 4.0) 进行许可。