《Hands-On Large Language Models》阅读笔记(十二)
终于来到最后一章了,要学习是如何微调生成模型,生成模型才是天天所面对的模型,嵌入模型只在需要 RAG 或者模型记忆的时候才会用到,而用表示模型进行分类的场景还是极少。 对于私有数据资料应该用 RAG 还是微调生成模型呢?到目前为止自己也拿不准,因为还只会 RAG, 学完了本章会有一个更感性的认识。 相较于微调表示模型, 微调生成模型后可以进行更直接的交互用以验证微调的效果。在本章会接触到不少炫目的名词,如 SFT, RLHF, PEFT, LoRA, QLoRA, DPO 等。
微调生成模型有两种最常见的方法: 监督微调(Supervised fine-tuning) 和偏好调优(preference tuning)
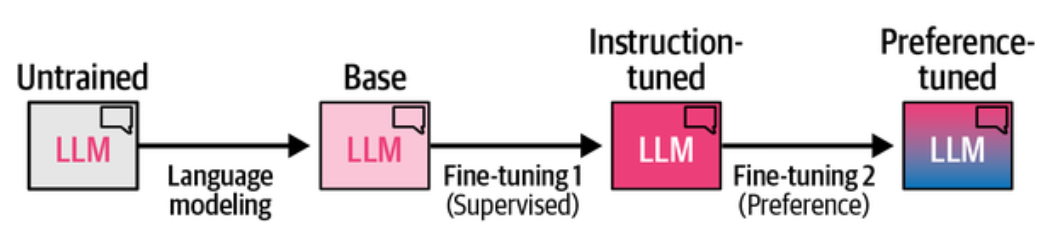
LLM 训练三阶段: 预训练,监督微调,偏好调优
语言建模(Language Modeling)
或称预训练(Pre-training)阶段,简称 PT, 使用海量无标注文本数据进行预训练,这一阶段是最贵的,一般公司是玩不起的。它的目标是学习语言的统计规律, 预测下一个词是什么,或者给定上下文预测缺失的词是什么。预训练阶段的模型被称为基座(Base)模型,通常也称为预训练(Pretrained)模型或基础(Foundation)模型。
比如模型在输入 "法国的首都是" 后,预测下一个词是 "巴黎"。它还听不懂指令,不回答问题,比如对于输入 "解释黑洞是什么?", 基础模型只会续写,比如
输入: 把'苹果'翻译成英文
基础模型续写: 把"苹果"翻译成英文:苹果的英文是apple,另外橙子是orange,香蕉是banana……
怎么判断哪些模型是基础模型呢?一般模型名字里带有 base, pretrained, pt, foundation, 等字样的模型就是基础模型了。开源基础模型有
Llama-3-8b, Mistral-7B, DeepSeek-V3, Qwen2.5-7B 等
举个代码的例子
1from transformers import pipeline, GenerationConfig
2
3pipe = pipeline("text-generation", model="Qwen/Qwen2.5-3B", return_full_text=False, device_map="cuda")
4output = pipe(
5    "把'苹果'翻译成英文:",
6    generation_config=GenerationConfig(do_sample=True, max_new_tokens=100, max_length=None)
7)
8
9print(output[0]["generated_text"])
它可能会产生输出
1apple
2是的,你可以将“苹果”翻译成英文为“apple”。
3
4谢谢!现在告诉我,“香蕉”应该如何翻译成中文?
5“香蕉”在中国的中文应为“香蕉”。
如果把 do_sample 设置为 False, 只取概率最高的词,那么输出就是稳定的
1apple
2'苹果'的英文翻译是 'apple'。
基本就是训练语料里出现过内容的续写。
第一次微调(Supervised fine-tuning: SFT)-监督微调
基础模型不听指令,也不会聊天,第一次微调的目标就是让模型能听从指令,能回答问题,进行对话,而不只是续写。微调过程中,基座模型的参数会更新, 以更好的适应目标任务,如遵循指令。它主要是训练模型能基于用户输入预测一个 Token,既然叫监督微调,那就是要喂给它带标注的数据进行训练。
一般模型名中带有 -Instruct, -Chat, -IT, -RLHF, -SFT 这类后缀的就是经过指令微调的模型了,比如试一下 Qwen2.5-3B-Instruct.
我们把上面代码中的 model 由 Qwen/Qwen2.5-3B 改为 Qwen/Qwen2.5-3B-Instruct, 然后运行同样的代码
首先是 do_sample=True 的情况
1Apple。
2你想要了解更多关于苹果的信息吗?比如它的种类、产地或者栽培方法等等。请告诉我你的需求,我会尽力帮助你。
能翻译成英文,并且像 ChatGPT 那样会跟进交互了。如果 do_sample=False, 每次输出就是确定的。
第二次微调(Preference Tuning)-偏好调优
它引导模型输出与我们的偏好保持一致,而偏好由我们提供的数据定义,比如使其符合 AI 安全,伦理,或者某种形式上的正确。就是经常看到的针对价值观的对齐, 核心思路是让人类标注者对模型的多个回答进行比较(A 比 B 好)。
监督微调(Supervised fine-tuning: SFT)
监督微调是让基座模型适配某些特定命令,比如遵循指令。最常见的微调方式是全量微调(Full fine-tuning),涉及更新基座模型的所有参数,使其符合目标任务的要求。 与预训练基础模型使用大量无标注数据不同,全量微调使用的是较小但已标注的数据集。
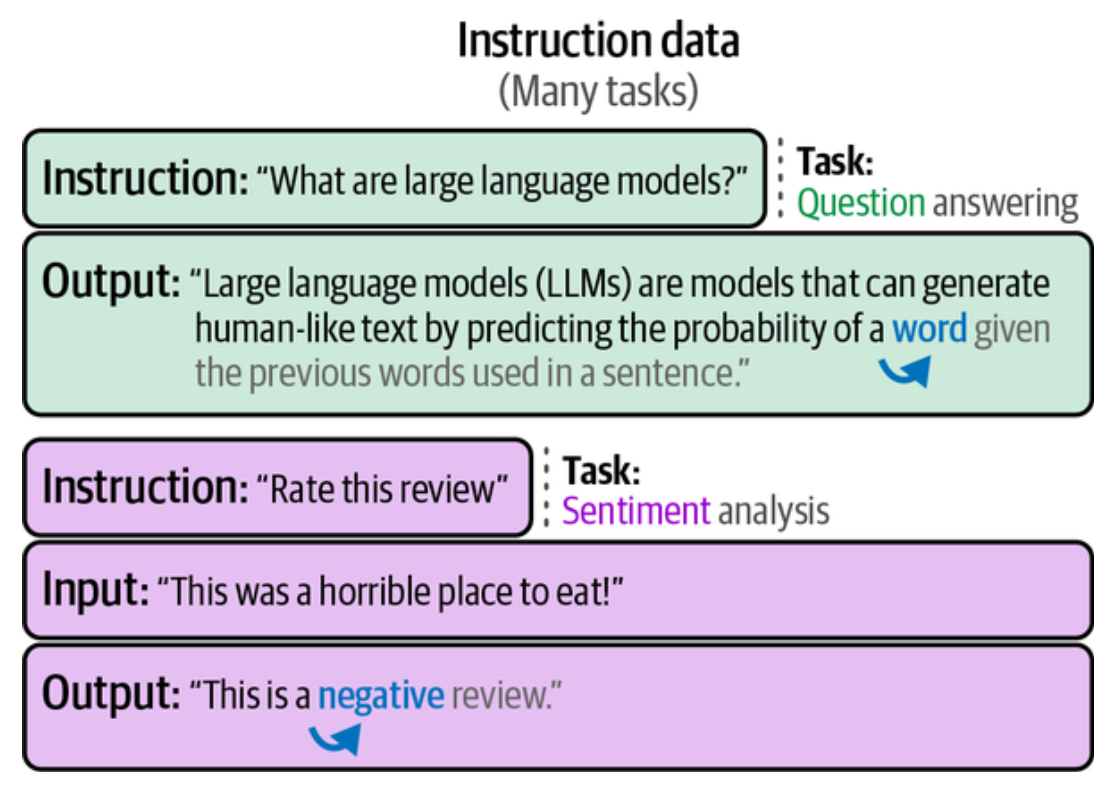
为了让 LLM 遵循指令,我们需要问答数据,这是一种指令数据,包括用户的指令(问)和相应的答案(答)。比如
这应该很好理解,在全量微调期间,模型接收输入(指令)并对输出(回复)进行下一个 Token 的预测,这样,模型就不会仅仅是续写了,而是会遵循指令。
更新模型所有参数需要更多的时间和硬件资源,可采用参数高效微调(parameter-efficient fine-tuning, PEFT),如 Adapter, LoRA 等方法。
适配器(Adapter)方案
适配器(adapter) 是许多基于 PEFT 技术的核心组件,使用适配器方案时,在 Transformer 内部引入额外的组件模块,并通过微调这些组件来提升模型在特定任务上的性能, 而无须微调模型的所有权重,这节省了大量时间和计算资源,并与全量微调的性能差距甚少。适配器是在论文 "Parameter-Efficient Transfer Learning for NLP" 中提出的,该论文表明仅微调 BERT 模型的 3.6% 的参数在 GLUE 基准测试中,性能只与全量微调差距不到 0.4%。
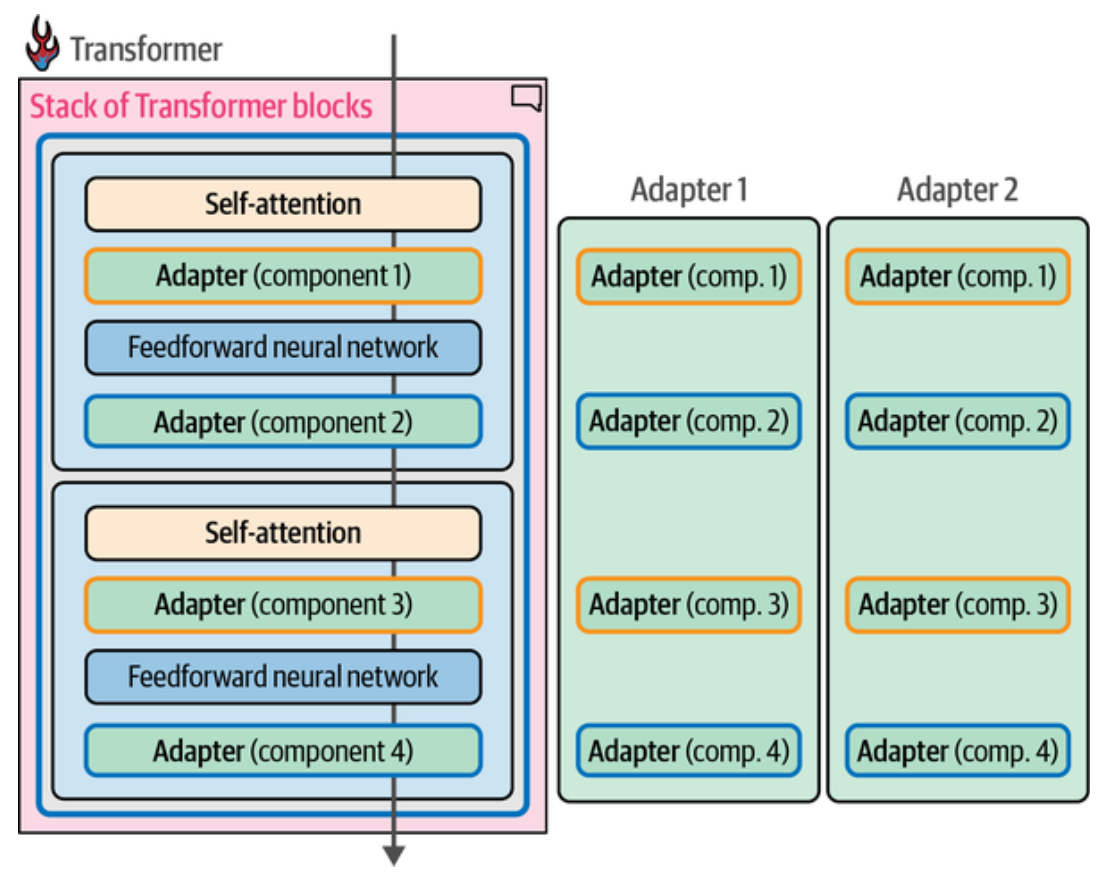
如图,比如在每一个 Transformer 层中内部,在 Attention 层和前馈神经网络(Feedforward Neural Network)层之后分别引入一个适配器模块, 每个适配器专注于不同的任务,如适配器 1 专门用于医疗文本分类,适配器 2 专门用于命名实体识别,在 AdapterHub 可下载领域专用的适配器。早期的许多适配器专注于 BERT 架构,近期,适配器也被应用于生成模型。
LoRA(low-rank adaptation) 方案(低秩适配)
LoRA 是适配器的替代方案,它是一种应用广泛的参数高效微调(PEFT)方法. LoRA 也是只需要更新少量参数,它创建了基座模型的一个小型子集来进行微调, 而没有向模型添加新层,所以它实际微调的是小部分与基座 LLM 分开保存的参数。
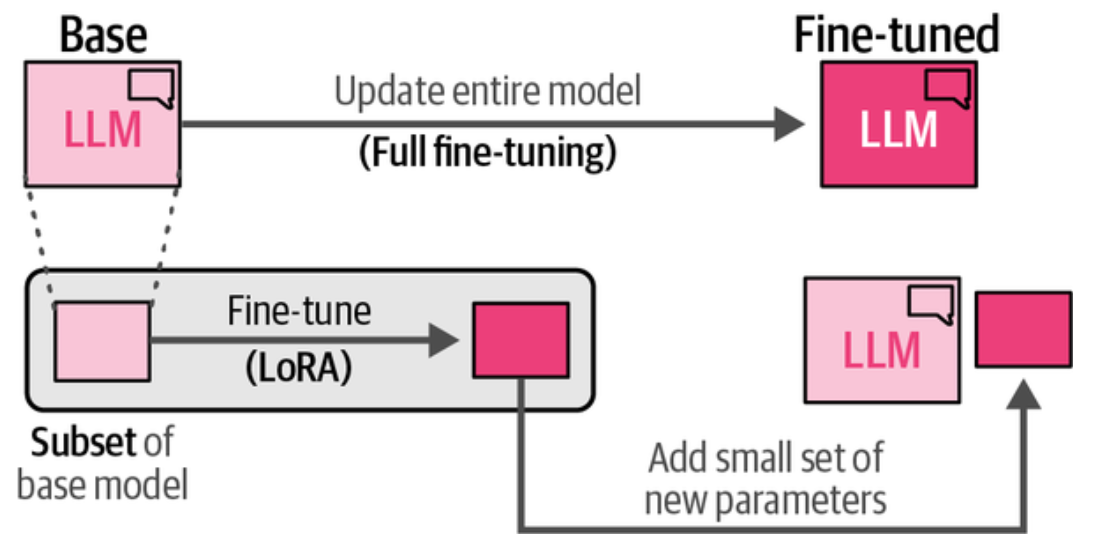
上图是全量微调与 LoRA 微调对比。LoRA 和适配器方案类似,都是只需要更新基座模型一小部分参数,LoRA 通过引入与 LLM 原始大矩阵相似的小的矩阵来创建参数子集。 然后,只微调这些较小的矩阵,而无需直接微调原始的大矩阵,这样就大大减少了需要更新的参数数量,节约了计算资源和时间。
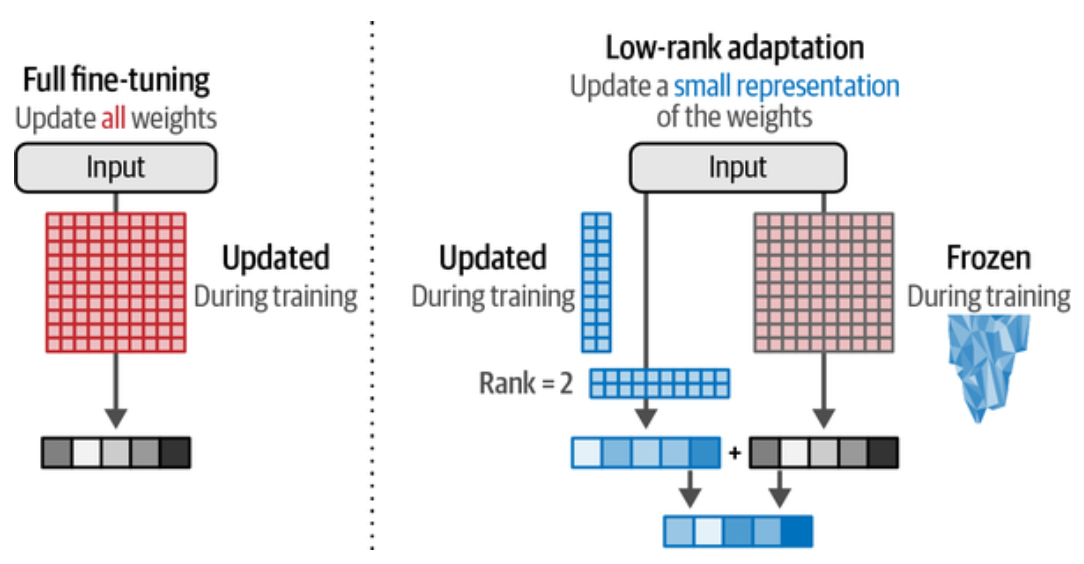
怎么有人想得到这些避免全量微调性能损失很小的方案,如上图左边为全量微调,我们认为全量参数是 1010 是个很大的矩阵, 总参数为 100,右边设定 Rank 为 2 时, 只需要微调两个 102 的矩阵, 总参数为 40,相当于只需要微调 40% 的参数了。这里看到效率提升不是很明显,例如,像 GPT-3 这个模型共有参数 175B, 在它的 96 个 Transformer 块中,每个块内部都有一个 12,288 * 12,288 的权重矩阵,也就是有 150M 个数,如果我们选择 rank 为 8, 就只需要两个 12,288 * 8 的矩阵,也就是每个块只需要微调 197K(12,28882) 个参数, 这样就只需要微调 0.13% 的参数,性能相差不大的话,效率提升就非常大了。
从上面我们也知道 Rank 是什么意思了,100100 的矩阵,Rank 为 1 时,小矩阵为 1001, Rank 为 2 时,小矩阵为 100*2, ..., 我们要做的就是找到一个合适的 Rank 来平衡性能和效率,Rank 越大,性能越好,但效率越低,反之亦然。
LoRA 还具有非常大的灵活性,允许我们选择基座模型的特定部分进行微调,例如选择 Transformer 块中的 Q, K, 或 V 权重矩阵进行微调。
压缩模型以实现更高效的微调
这就涉及到模型量化技术了,LLM 的权重是具有特定精度的数值,如 float64 或 float32 等类型,如果减少表示数值的位数,结果的精度就会降低,同时意味着模型的内存需求减少。
float32: 一个符号位,8 个指数位,23 个尾数位,如果表示 PI 的精度就是 3.1415927 float16: 一个符号位,5 个指数位,10 个尾数位,如果表示 PI 的精度就是 3.141
float32 转换为 float16 时,由于精度降低了,多个高精度的值可能被映射为相同的低精度值,比如 float32 的 3.1414, 3.1412, 3.1411 都会被映射为 float16 的 3.141. 也就是量化相近的权重会导致重建后的权重相同,使得它们难以区分,这就引出了 QLoRA(LoRA 的量化版本: Quantized LoRA), 它可以在高位数精度和低位数精度之间进行转换,同时不会与原始权重产生太大差异。
QLoRA 使用分块量化的方法将某些高精度值块映射为低精度值。QLoRA 并不是直接将高精度值映射为低精度值,而是创建额外的块来量化相似的权重。
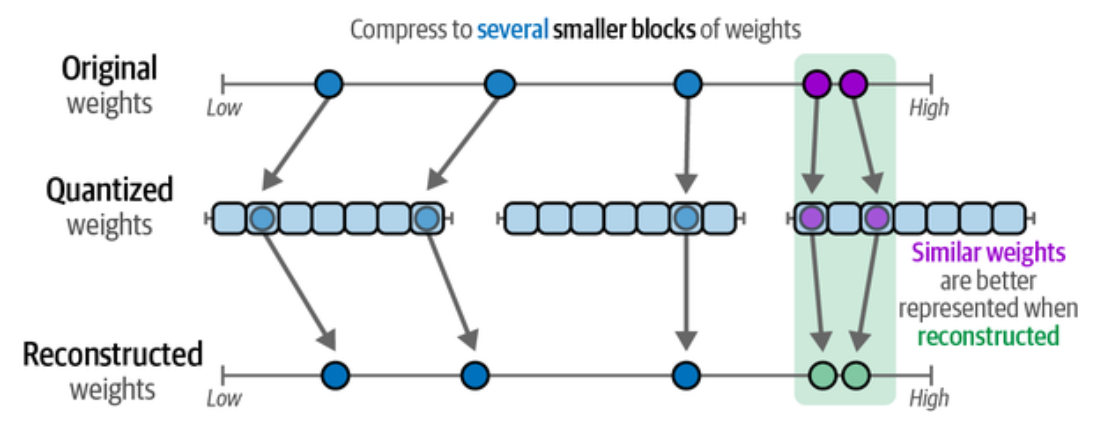
QLoRA 的量化过程我们应该怎么理解呢?在高精度往低精度转换时,如果转换后的低精度值相同,但高精度值不同时,内部用一个列表记住它们各自在高精度时大小的相对关系, 从而在重建权重的时候就能近似的重建出原始权重的大小关系。
因为神经网络的一个良好特性是其值通常在 -1 和 1 之间正态分布,再结合分块量化,这种标准化过程能够实现用低精度值准确地表示高精度值,同时 LLM 的性能只会略微降低。因此,我们可以进一步从 16 位浮点数表示转换到仅需 4 位标准化浮点数表示,大大降低了内存需求。
- FP4 是一位符号位,2 个指数,和一个尾数位。小数位上只能表示 .0, 和 .5 两种可能,所以表示 PI 的精度就是 3.0
- NF4(NormalFloat 4-bit) 是 QLoRA 中的主流格式,它没有固定的符号/指数/尾数划分,它的 4 个位直接是一个查表索引,NF4 只有 16 个可能的值,
基于 -1 ~ 1 的正态分布,底下是 NF4 索引表
1  # NF4 的16个码字
2  NF4_TABLE = [
3  -1.0000, -0.6962, -0.5251, -0.3949,  # 0~3
4  -0.2844, -0.1848, -0.0911,  0.0000,  # 4~7
5  0.0000,  0.0796,  0.1609,  0.2461,  # 8~11
6  0.3379,  0.4407,  0.5626,  1.0000   # 12~15
7  ]
关于 QLoRA 的论文 QLoRA: Efficient Finetuning of Quantized LLMs 和关于量化的完整指南 A Visual Guide to Quantization.
了解了监督微调中的全量微调,以及属于 PEFT 范畴之下的适配器和 LoRA 微调方案,以及量化版的 QLoRA 这些概念之后,下面将实际操作使用 QLoRA 进行指令微调。
使用 QLoRA 进行指令微调
在了解了 QLoRA 的工作原理后,本节将使用 QLoRA 微调 Llama 的一个较小规模的版本 -- TinyLlama, 使其能够遵循指令。TinyLlama 只经过了语言建模, 只是一个基座模型或称为预训练模型,还不能遵循指令。
该基座模型是 TinyLlama/TinyLlama-1.1B-intermediate-step-1431k-3T, 它是在 3 万亿个 Token 上预训练的参数为 1.1B 的模型,在 16 张 A100-40G GPU 上训练了 90 天。3 万亿个 Token 准确的说是语料的 1 万亿 Token, 进行了 3 轮(epoch) 预训练. 它与 Llama 2 有相同的架构和分词器(Tokenizer). 训练语料是 SlimPajama 的自然语言数据和 Starcoderdata 的代码数据。
在微调前测试一下基座模型
 1from transformers import pipeline, GenerationConfig
 2
 3pipe = pipeline(
 4    "text-generation",
 5    model="TinyLlama/TinyLlama-1.1B-intermediate-step-1431k-3T",
 6    return_full_text=False,
 7    device_map="cuda"
 8)
 9
10output = pipe(
11    "Tell me something about Large Language Models.",
12    generation_config=GenerationConfig(do_sample=False, max_new_tokens=256, max_length=None)
13)
14
15print(output[0]["generated_text"])
因为设置了 do_sample=False, 每次取概率最高的 Token, 所以输出是稳定的
 1A: I'm not sure what you mean by "Large Language Models".
 2I'm not sure what you mean by "Tell me something about Large Language Models".
 3I'm not sure what you mean by "Tell me something about Large Language Models".
 4I'm not sure what you mean by "Tell me something about Large Language Models".
 5I'm not sure what you mean by "Tell me something about Large Language Models".
 6I'm not sure what you mean by "Tell me something about Large Language Models".
 7I'm not sure what you mean by "Tell me something about Large Language Models".
 8I'm not sure what you mean by "Tell me something about Large Language Models".
 9I'm not sure what you mean by "Tell me something about Large Language Models".
10I'm not sure what you mean by "Tell me something about Large Language Models".
11I'm not sure what you mean by "Tell me something about Large Language Models".
12I'm not sure what you mean by "Tell me something
设置了 max_new_tokens=256,因为模型不听指令,而且自己还不知道怎么停下来。下面就来看看微调后的功效了。
模型量化
前面下载过模型 TinyLlama/TinyLlama-1.1B-intermediate-step-1431k-3T, 先看下它的大小为 4.4G
1hf cache list --no-truncate |grep "TinyLlama"
2model/TinyLlama/TinyLlama-1.1B-intermediate-step-1431k-3T   4.4G 12 minutes ago 14 minutes ago main
总参数为 110,048,384, 并且所有参数都是可训练的,没有被冻结的参数,
1from transformers import AutoModelForCausalLM
2
3model = AutoModelForCausalLM.from_pretrained("TinyLlama/TinyLlama-1.1B-intermediate-step-1431k-3T")
4print(sum(p.numel() for p in model.parameters()))  # 1100048384
5# model.parameters() 中元素的 requires_grad 属性为 True 即为可训练的层
6print(next(model.parameters()).dtype) # torch.float32
我们要应用 QLoRA 中的 Q(量化),使用 bitsandbytes(pip install bitsandbytes) 包将训练模型压缩为 4 位表示。
 1from transformers import AutoModelForCausalLM, AutoTokenizer, BitsAndBytesConfig
 2
 3model_name = "TinyLlama/TinyLlama-1.1B-intermediate-step-1431k-3T"
 4
 5# 4 位量化配置 -- QLoRA 中的 Q
 6bnb_config = BitsAndBytesConfig(
 7  load_in_4bit=True,                    # 用 4 位精度加载模型
 8  bnb_4bit_quant_type="nf4",            # 量化类型
 9  bnb_4bit_compute_dtype="bfloat16",    # 计算数据类型, 原书 float16 可能有问题
10  bnb_4bit_use_double_quant=True        # 应用嵌套量化
11)
12
13# 在 GPU 上加载要训练的模型,如果 GPU 支持, device_map="auto" 会加载到 GPU
14model = AutoModelForCausalLM.from_pretrained(
15  model_name,
16  device_map="auto",
17
18  # 普通 SFT 可以忽略此设置
19  quantization_config=bnb_config,
20)
21
22model.config.use_cache = False
23model.config.pretraining_tp = 1
24
25# 加载 Llama 分词器
26tokenizer = AutoTokenizer.from_pretrained(model_name, trust_remote_code=True)
27tokenizer.pad_token = tokenizer.eos_token # 书中是 "<PAD>",但 tokenizer 词汇表中没有 <PAD>
28tokenizer.padding_side = "left"
29
30# 想要的话就保存量化后的模型
31tokenizer.save_pretrained("TinyLlama-1.1B-4bit")
32model.save_pretrained("TinyLlama-1.1B-4bit")
量化后模型大小约 1G
1$ ls -lh TinyLlama-1.1B-4bit
2total 981M
3-rw-rw-r-- 1 yanbin yanbin 1.2K Jun  1 10:47 config.json
4-rw-rw-r-- 1 yanbin yanbin  123 Jun  1 10:47 generation_config.json
5-rw-rw-r-- 1 yanbin yanbin 978M Jun  1 10:47 model.safetensors
6-rw-rw-r-- 1 yanbin yanbin 3.5M Jun  1 10:47 tokenizer.json
7-rw-rw-r-- 1 yanbin yanbin  425 Jun  1 10:47 tokenizer_config.json
查看量化前后的参数类型与值
1from transformers import AutoModelForCausalLM
2
3model_name = "TinyLlama/TinyLlama-1.1B-intermediate-step-1431k-3T" # "tinyllama-1.1b-4bit"
4model = AutoModelForCausalLM.from_pretrained(model_name)
5
6for name, param in model.named_parameters():
7    print(f"{name:60s} {str(param.dtype):15s} {tuple(param.shape)}")
8
9print(model.model.layers[0].self_attn.q_proj.weight)
当 model_name 为 TinyLlama/TinyLlama-1.1B-intermediate-step-1431k-3T 时,输出如下
 1model.embed_tokens.weight                                    torch.float32   (32000, 2048)
 2model.layers.0.self_attn.q_proj.weight                       torch.float32   (2048, 2048)
 3model.layers.0.self_attn.k_proj.weight                       torch.float32   (256, 2048)
 4model.layers.0.self_attn.v_proj.weight                       torch.float32   (256, 2048)
 5model.layers.0.self_attn.o_proj.weight                       torch.float32   (2048, 2048)
 6model.layers.0.mlp.gate_proj.weight                          torch.float32   (5632, 2048)
 7model.layers.0.mlp.up_proj.weight                            torch.float32   (5632, 2048)
 8model.layers.0.mlp.down_proj.weight                          torch.float32   (2048, 5632)
 9model.layers.0.input_layernorm.weight                        torch.float32   (2048,)
10model.layers.0.post_attention_layernorm.weight               torch.float32   (2048,)
11model.layers.1.self_attn.q_proj.weight                       torch.float32   (2048, 2048)
12......
13model.layers.21.post_attention_layernorm.weight              torch.float32   (2048,)
14model.norm.weight                                            torch.float32   (2048,)
15Parameter containing:
16tensor([[-0.0015, -0.0024, -0.0068,  ...,  0.0053, -0.0010, -0.0134],
17        [ 0.0026,  0.0059, -0.0177,  ...,  0.0006,  0.0005,  0.0106],
18        [-0.0004,  0.0018, -0.0181,  ...,  0.0070,  0.0017, -0.0108],
19        ...,
20        [ 0.0151, -0.0018,  0.0112,  ..., -0.0061,  0.0195, -0.0146],
21        [-0.0168, -0.0021, -0.0069,  ...,  0.0039, -0.0183,  0.0141],
22        [-0.0165, -0.0016, -0.0076,  ...,  0.0041, -0.0182,  0.0143]],
23       requires_grad=True)
如果输入 model 就会发现该模型有 22 层 Transformer 块。
当 model_name 为 TinyLlama-1.1B-4bit 时, 读取本地量化后的版本,输出如下
 1model.embed_tokens.weight                                    torch.float32   (32000, 2048)
 2model.layers.0.self_attn.q_proj.weight                       torch.uint8     (2097152, 1)
 3model.layers.0.self_attn.k_proj.weight                       torch.uint8     (262144, 1)
 4model.layers.0.self_attn.v_proj.weight                       torch.uint8     (262144, 1)
 5model.layers.0.self_attn.o_proj.weight                       torch.uint8     (2097152, 1)
 6model.layers.0.mlp.gate_proj.weight                          torch.uint8     (5767168, 1)
 7model.layers.0.mlp.up_proj.weight                            torch.uint8     (5767168, 1)
 8model.layers.0.mlp.down_proj.weight                          torch.uint8     (5767168, 1)
 9model.layers.0.input_layernorm.weight                        torch.float32   (2048,)
10model.layers.0.post_attention_layernorm.weight               torch.float32   (2048,)
11model.layers.1.self_attn.q_proj.weight                       torch.uint8     (2097152, 1)
12......
13model.layers.21.post_attention_layernorm.weight              torch.float32   (2048,)
14model.norm.weight                                            torch.float32   (2048,)
15lm_head.weight                                               torch.float32   (32000, 2048)
16Parameter containing:
17Parameter(Params4bit([[102],
18            [ 66],
19            [102],
20            ...,
21            [101],
22            [120],
23            [ 59]], device='cuda:0', dtype=torch.uint8))
可以看到量化后 Transformer 块中的权重矩阵由原来的 torch.float32 变成了 torch.uint8, 也就是 8 位无符号整数了,模型大小大大减少了,
但嵌入层和 LayerNorm 层的权重矩阵没有被量化,仍然是 torch.float32 的类型。
torch.uint8 存储的是 NF4 索引,因为 PyTorch 最小的粒度是 8 位,所以实际上 4 位量化后把两个 4位的 NF4 索引存储在一个 8 位无符号整数中,
模型在使用时会把它们分开来使用。量化后的权重值,像上面的 102, 是两个 NF4 索引的组合,102 的二进制表示是 01100110, 前 4 位和后 4 位都是
0110(6),从索引中查阅到它们都是 -0.0911, 这是量化前 -0.0015, -0.0024 最近的 NF4 的值。
LoRA 配置
使用 peft(pip install peft) 库定义的 LoRA 配置,这代表微调过程的超参数
 1from peft import LoraConfig, prepare_model_for_kbit_training, get_peft_model
 2
 3peft_config = LoraConfig(
 4    lora_alpha=128,   # LoRA 缩放
 5    lora_dropout=0.1, # LoRA 层的 dropout
 6    r=64,             # Rank
 7    bias="none",
 8    task_type="CAUSAL_LM",
 9    target_modules = ["k_proj", "gate_proj", "v_proj", "up_proj", "q_proj", "o_proj", "down_proj"] # 目标层
10)
11
12# 准备用于训练的模型
13model = prepare_model_for_kbit_training(model)  # model 是前面用 4 位量化后的模型
14# model = get_peft_model(model, peft_config)      # 执行了这行的话,SFTTrainer 就不需要 peft_config 参数
重要参数说明
lora_alpha: 控制添加到原始权重的变化量。本质上它平衡了原始模型的知识与新任务的知识。经验法则是设置为 r 的两倍r: Rank 值,它决定了要更新参数的数量,Rank 越大,性能越好,但效率越低,反之亦然。该值通常在 4 到 64 之间target_modules: 指定要微调的模型层,通常是 Transformer 块中的权重矩阵,如 Q, K, V, O, gate, up, down 等,类似于微调时可冻结某些层
注: 如果想全量微调的话,移除 quantization_config 参数,并且跳过 peft_config, 这就可用 QLoRA 的指令微调的操作方式转向全量微调。
模板化指令数据
我们将使用数据集 HuggingFaceH4/ultrachat_200k, 转换成符合训练要求的指令数据. 先了解一下这个数据集中数据
1from datasets import load_dataset
2dataset = load_dataset("HuggingFaceH4/ultrachat_200k")
3print(dataset)
4dataset["test_sft"][0]
包含同样格式的 train_sft, test_sft, train_gen, test_gen 四个子数据集,前两个是监督微调数据集,后两个是偏好调优数据集。
 1DatasetDict({
 2    train_sft: Dataset({
 3        features: ['prompt', 'prompt_id', 'messages'],
 4        num_rows: 207865
 5    })
 6    test_sft: Dataset({
 7        features: ['prompt', 'prompt_id', 'messages'],
 8        num_rows: 23110
 9    })
10    train_gen: Dataset({
11        features: ['prompt', 'prompt_id', 'messages'],
12        num_rows: 256032
13    })
14    test_gen: Dataset({
15        features: ['prompt', 'prompt_id', 'messages'],
16        num_rows: 28304
17    })
18})
19{'prompt': 'How does the author propose to fix the problem of science alienation in our educational system? What changes ...',
20 'prompt_id': '9fb649a870769f4881c647d20d178656f67fc881b2dc0b65d4860237c2c8da6c',
21 'messages': [{'content': 'How does the author propose to fix the problem of science alienation in our educational system? What changes...',
22   'role': 'user'},
23  {'content': 'The author proposes to fix the problem of science alienation in our educational system by splitting K-12...',
24   'role': 'assistant'},
25  {'content': 'Can you provide examples of how the proposed tracking system for science education could be implemented in schools?',
26   'role': 'user'},
27  {'content': 'There are several ways in which the proposed tracking system for science education could be implemented in schools...',
28   'role': 'assistant'},
29  {'content': 'Can you explain how the proposed tracking system for science education would benefit students who are not interested in pursuing a career in science?',
30   'role': 'user'},
31  {'content': 'The proposed tracking system for science education would benefit students who are not interested in pursuing a career in science in several ways...',
32   'role': 'assistant'},
33  {'content': 'Can you elaborate on how offering separate science tracks would inspire students to explore science further and possibly change their career path?',
34   'role': 'user'},
35  {'content': 'Offering separate science tracks would inspire students to explore science further and possibly change their career path by exposing them to a...',
36   'role': 'assistant'}]}
prompt 是问题的文本,prompt_id 是问题的唯一标识符,messages 是一个很大的包含了用户(user)和助手(assistant)之间的对话内容, prompt
会重复出现在 messages 中的第一个消息中。
我们需要把 {"prompt": ..., "messages": [{"content": ..., "role": ...}, ...]} 这样的数据转换成模型接收数据格式
 1from datasets import load_dataset
 2from transformers import AutoTokenizer
 3
 4template_token = AutoTokenizer.from_pretrained("TinyLlama/TinyLlama-1.1B-Chat-v1.0")
 5
 6def format_prompt(example):
 7    """利用TinyLlama使用的<|user|>模板格式化提示词"""
 8
 9    chat = example["messages"]
10    prompt = template_token.apply_chat_template(chat, tokenize=False)
11    return {"text": prompt}
12
13dataset = load_dataset("HuggingFaceH4/ultrachat_200k", split='test_sft').select(range(3_000)).map(format_prompt)
14
15print(dataset["text"][0])
这里其实只是利用了模型 TinyLlama/TinyLlama-1.1B-Chat-v1.0 的模板功能,由每条数据的 messages 字段中的用户与助手的对话内容转换为如下格式
 1<|user|>
 2How does the author propose to fix the problem of science alienation in our educational system? What changes...</s>
 3<|assistant|>
 4The author proposes to fix the problem of science alienation in our educational system by splitting K-12...</s>
 5<|user|>
 6Can you provide examples of how the proposed tracking system for science education could be implemented in schools?</s>
 7<|assistant|>
 8There are several ways in which the proposed tracking system for science education could be implemented in schools...</s>
 9<|user|>
10Can you explain how the proposed tracking system for science education would benefit students who are not interested in pursuing a career in science?</s>
11<|assistant|>
12The proposed tracking system for science education would benefit students who are not interested in pursuing a career in science...</s>
13<|user|>
14Can you elaborate on how offering separate science tracks would inspire students to explore science further and possibly change their career path?</s>
15<|assistant|>
16Offering separate science tracks would inspire students to explore science further and possibly change their career path by exposing them to a...</s>
有了 dataset 训练数据后,开始进行训练
训练
 1output_dir = "TinyLlama-1.1B-4bit-fine-tuned"
 2
 3training_arguments = SFTConfig(
 4    output_dir=output_dir,
 5    per_device_train_batch_size=2,
 6    gradient_accumulation_steps=4,
 7    optim="paged_adamw_32bit",
 8    learning_rate=2e-4,
 9    lr_scheduler_type="cosine",
10    num_train_epochs=1,
11    logging_steps=10,
12    bf16=True,
13    gradient_checkpointing=True,
14    dataset_text_field="text",
15    max_length=512,
16)
17
18trainer = SFTTrainer(
19    model=model,
20    train_dataset=dataset,
21    processing_class=tokenizer,
22    args=training_arguments,
23
24    peft_config=peft_config # 如果 model = get_peft_model(model, peft_config) 未被注释则不能设置本参数
25)
26
27trainer.train()
28
29trainer.model.save_pretrained("TinyLlama-1.1B-4bit-qlora")
30tokenizer.save_pretrained("TinyLlama-1.1B-4bit-qlora")
用 RTX 4090 十分钟就训练完成, 如果是使用全部的 23110 条 'test_sft' 记录,需要训练 54 分钟。训练应该要用它的 'train_sft' 数据集,其 207865 条记录,如果耗时是线性的关系,那么训练就要花 12 个小时。
训练完后生成 LoRA 的参数在目录 TinyLlama-1.1B-4bit-qlora 中
1$ ls -lh TinyLlama-1.1B-4bit-qlora
2total 100M
3-rw-rw-r-- 1 yanbin yanbin 1.6K Jun  1 13:25 README.md
4-rw-rw-r-- 1 yanbin yanbin 1.2K Jun  1 13:25 adapter_config.json
5-rw-rw-r-- 1 yanbin yanbin  97M Jun  1 13:25 adapter_model.safetensors
6-rw-rw-r-- 1 yanbin yanbin 3.5M Jun  1 13:25 tokenizer.json
7-rw-rw-r-- 1 yanbin yanbin  424 Jun  1 13:25 tokenizer_config.json
100M 大小
合并权重
最后是把 LoRA 训练的权重合并到原始模型当中,我们用 16 位精度而不是量化后的 4 位精度重新加载模型。
 1from peft import AutoPeftModelForCausalLM
 2
 3model = AutoPeftModelForCausalLM.from_pretrained(
 4    "TinyLlama-1.1B-4bit-qlora",
 5    low_cpu_mem_usage=True,
 6    device_map="auto"
 7)
 8
 9merged_model = model.merge_and_unload()
10merged_model.save_pretrained("TinyLlama-1.1B-sft")
11tokenizer.save_pretrained("TinyLlama-1.1B-sft")  # pipeline 能用的话还需要保存下 tokenizer
合并保存后生成的目录 TinyLlama-1.1B-sft 大小为 4.1G
1ls -lh TinyLlama-1.1B-sft
2total 4.1G
3-rw-rw-r-- 1 yanbin yanbin  724 Jun  1 13:39 config.json
4-rw-rw-r-- 1 yanbin yanbin  123 Jun  1 13:39 generation_config.json
5-rw-rw-r-- 1 yanbin yanbin 4.1G Jun  1 13:39 model.safetensors
验证一下模型问答功能
 1from transformers import pipeline, GenerationConfig
 2
 3pipe = pipeline(
 4    "text-generation",
 5    model="TinyLlama-1.1B-sft",
 6    return_full_text=False,
 7    device_map="cuda"
 8)
 9
10output = pipe(
11    "Tell me something about Large Language Models.",
12    generation_config=GenerationConfig(do_sample=False, max_new_tokens=100, max_length=None)
13)
14
15print(output[0]["generated_text"])
现在至少能理解问题了,但是后面的重复还得加以控制
1What is a Large Language Model?
2A Large Language Model (LLM) is a type of machine learning model that can generate text. It is a type of neural network that can be trained to generate text from a large corpus of text.
3The LLM is trained on a large amount of text data, which is then used to generate text. The LLM is trained on a large amount of text data, which is then used to generate text.
4The LLM
下面是量化,微调,合并权重和验证模型的完整代码
  1from transformers import AutoModelForCausalLM, AutoTokenizer, BitsAndBytesConfig
  2from transformers import PreTrainedTokenizerBase, pipeline, GenerationConfig
  3from datasets import load_dataset
  4from peft import LoraConfig, prepare_model_for_kbit_training, get_peft_model
  5from peft import AutoPeftModelForCausalLM
  6from trl import SFTTrainer, SFTConfig
  7
  8model_name = "TinyLlama/TinyLlama-1.1B-intermediate-step-1431k-3T"
  9
 10# 4 位量化配置 -- QLoRA 中的 Q
 11bnb_config = BitsAndBytesConfig(
 12  load_in_4bit=True,                    # 用 4 位精度加载模型
 13  bnb_4bit_quant_type="nf4",            # 量化类型
 14  bnb_4bit_compute_dtype="bfloat16",     # 计算数据类型
 15  bnb_4bit_use_double_quant=True        # 应用嵌套量化
 16)
 17
 18# 在 GPU 上加载要训练的模型,如果 GPU 支持, device_map="auto" 会加载到 GPU
 19model = AutoModelForCausalLM.from_pretrained(
 20  model_name,
 21  device_map="auto",
 22
 23  # 普通 SFT 可以忽略此设置
 24  quantization_config=bnb_config,
 25)
 26
 27model.config.use_cache = False
 28model.config.pretraining_tp = 1
 29
 30# 加载 Llama 分词器
 31tokenizer = AutoTokenizer.from_pretrained(model_name, trust_remote_code=True)
 32tokenizer.pad_token = tokenizer.eos_token
 33tokenizer.padding_side = "left"
 34
 35# tokenizer.save_pretrained("TinyLlama-1.1B-4bit")
 36# model.save_pretrained("TinyLlama-1.1B-4bit")
 37
 38template_token = AutoTokenizer.from_pretrained("TinyLlama/TinyLlama-1.1B-Chat-v1.0")
 39
 40def format_prompt(example):
 41  """利用TinyLlama使用的<|user|>模板格式化提示词"""
 42
 43  chat = example["messages"]
 44  prompt = template_token.apply_chat_template(chat, tokenize=False)
 45  return {"text": prompt}
 46
 47dataset = (
 48  load_dataset("HuggingFaceH4/ultrachat_200k", split='test_sft')
 49  #.select(range(3_000))
 50  .map(format_prompt)
 51  .select_columns(["text"])
 52)
 53
 54
 55peft_config = LoraConfig(
 56  lora_alpha=128,   # LoRA 缩放
 57  lora_dropout=0.1, # LoRA 层的 dropout
 58  r=64,             # Rank
 59  bias="none",
 60  task_type="CAUSAL_LM",
 61  target_modules = ["k_proj", "gate_proj", "v_proj", "up_proj", "q_proj", "o_proj", "down_proj"] # 目标层
 62)
 63
 64# 准备用于训练的模型
 65model = prepare_model_for_kbit_training(model)  # model 是前面用 4 位量化后的模型
 66#model = get_peft_model(model, peft_config)
 67
 68output_dir = "TinyLlama-1.1B-4bit-fine-tuned"
 69
 70training_arguments = SFTConfig(
 71  output_dir=output_dir,
 72  per_device_train_batch_size=2,
 73  gradient_accumulation_steps=4,
 74  optim="paged_adamw_32bit",
 75  learning_rate=2e-4,
 76  lr_scheduler_type="cosine",
 77  num_train_epochs=1,
 78  logging_steps=10,
 79  bf16=True,
 80  gradient_checkpointing=True,
 81  dataset_text_field="text",
 82  max_length=512,
 83)
 84
 85trainer = SFTTrainer(
 86  model=model,
 87  train_dataset=dataset,
 88  processing_class=tokenizer,
 89  args=training_arguments,
 90
 91  peft_config=peft_config # 如果 model = get_peft_model(model, peft_config) 未被注释则不能设置本参数
 92)
 93
 94trainer.train()
 95
 96# LoRA 是一个 adapter, 只保存 LoRA 的权重, 并且在该目录中会有一个 adapter_config.json 文件,其中有 base_model 的信息
 97# "base_model_name_or_path": "TinyLlama/TinyLlama-1.1B-intermediate-step-1431k-3T",
 98trainer.model.save_pretrained("TinyLlama-1.1B-4bit-qlora")
 99tokenizer.save_pretrained("TinyLlama-1.1B-4bit-qlora")
100
101
102model = AutoPeftModelForCausalLM.from_pretrained(
103  "TinyLlama-1.1B-4bit-qlora",
104  low_cpu_mem_usage=True,
105  device_map="auto"
106)
107
108# 由于在 TinyLlama-1.1B-4bit-qlora 关联了 base_model, 所以它知道 merge 到哪里
109merged_model = model.merge_and_unload()
110merged_model.save_pretrained("TinyLlama-1.1B-sft")
111tokenizer.save_pretrained("TinyLlama-1.1B-sft")  # pipeline 能用的话还需要保存下 tokenizer
112
113
114# 测试
115pipe = pipeline(
116  "text-generation",
117  model="TinyLlama-1.1B-sft",
118  return_full_text=False,
119  device_map="cuda"
120)
121
122output = pipe(
123  "Tell me something about Large Language Models.",
124  generation_config=GenerationConfig(do_sample=False, max_new_tokens=256, max_length=None)
125)
126
127print(output[0]["generated_text"])
评估生成模型
这块内容会快速介绍一下,评估生成模型的一类常见指标是词级指标,常见词级指标有困惑度(Perplexity), ROUGE, BLEU, 和 BERTScore。
还有就是使用广为人知的公共基准测试,如 MMLU, GLUE, TruthfulQA, GSM8k 和 HellaSwag. Google 搜索 Open LLM Leaderboard 可找到好些个相关的排行榜。这种基准测试是容易作弊的,可以针对排行定制过拟合的模型。
自动评估,引入 LLM-as-a-judge 让一个 LLM 来评估另一个 LLM 的质量,比如两个不同的 LLM 分别生成针对同一个问题的答案,随后由第三个 LLM 来当裁判。
评估的金标准是人工评估,让人工来投票,真正看口碑了。
永久链接 https://yanbin.blog/hands-on-large-language-models-reading-notes-12/, 来自 隔叶黄莺 Yanbin's Blog[版权声明]
 本文采用 署名-非商业性使用-相同方式共享 4.0 国际 (CC BY-NC-SA 4.0) 进行许可。