如何定义 Copilot 斜线命令
各种 AI 编程工具,如 Codex, Claude Code, Gemini 等提供了一些类似的斜线命令,每个斜线命令大约也是对应着一段特定的提示词。由于工作中更方便的使用
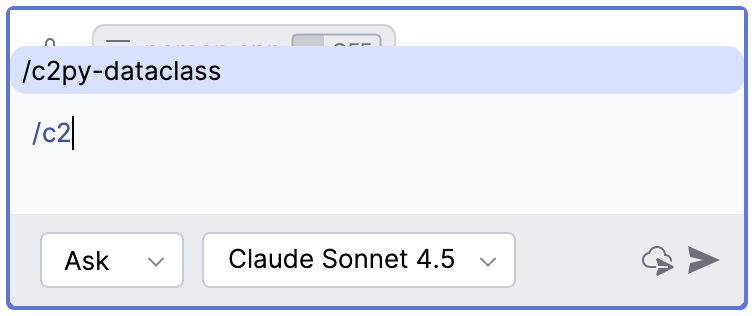
Copilot, 所以本文来探讨如何定义自己的 Copilot 斜线命令。比如想要定义一个命令 /c2py-dataclass 用于实现把 C/C++ 的类或结构转换成 Python
的 @dataclass 类,并遵循 Python 的命名规则和设置默认字段值, 也就是采用如下提示词
Covert following C/C++ class/struct to Python dataclass, following Python naming convention, and set default field values.
<C/C++ source code goes here>
有了自定义的 /c2py-dataclass 命令的话,就不需要每次重复上面的描述,而只用输入 /c2py-dataclass 然后指定某个 C++ 代码文件或粘贴 C/C++
代码就能实现转换需求。
实现方式可以借鉴几天前写的一篇 准备迎接 Vibe Coding - 相关工具与资源 中关于 Spec Kit 一节。
实现方法
开门见山吧,想要添加一个自定义的命令,如 /c2py-dataclass, 仅需在项目目录中添加 .github/prompts/c2py-dataclass.prompt.md 文件,
立马就会在 Copilot 中出现一个 /c2py-dataclass 命令,在 .github/prompts/c2py-dataclass.prompt.md 添加所需的提示词即可。
要像 Spec Kit 那样的话可以使用两个文件 .github/agents/c2py-dataclass.agent.md 和 .github/prompts/c2py-dataclass.prompt.md
来配合。
下面的内容可以不用看了,主要是没看 Copilot 官方文档的情况下,灵感来自于 Spec Kit 的自定义命令的方式。
首先从 Colipot 内置命令开始
Copilot CLI 与 VS Code 和 JetBrains 的插件 GitHub Copilot Your AI pair programmer 显示的斜线命令还有所不同.
Copilot CLI 的命令列表如下(当前版本 0.0.353)
 1   Available commands:
 2     /add-dir <directory> - Add a directory to the allowed list for file access
 3     /agent - Browse and select from available agents (if any)
 4     /clear - Clear the conversation history
 5     /cwd [directory] - Change working directory or show current directory
 6     /delegate <prompt> - Delegate changes to remote repository with AI-generated PR
 7     /exit, /quit - Exit the CLI
 8     /feedback - Provide feedback about the CLI
 9     /help - Show help for interactive commands
10     /list-dirs - Display all allowed directories for file access
11     /login - Log in to Copilot
12     /logout - Log out of Copilot
13     /mcp [show|add|edit|delete|disable|enable] [server-name] - Manage MCP server configuration
14     /model [model] - Select AI model to use
15     /reset-allowed-tools - Reset the list of allowed tools
16     /session - Show information about the current CLI session
17     /terminal-setup - Configure terminal for multiline input support (Shift+Enter and Ctrl+Enter)
18     /theme [show|set|list] [auto|dark|light] - View or configure terminal theme
19     /usage - Display session usage metrics and statistics
20     /user [show|list|switch] - Manage GitHub user list
以下是 Copilot 插件分别在 IntelliJ IDEA 和 VS Code 中的命令列表
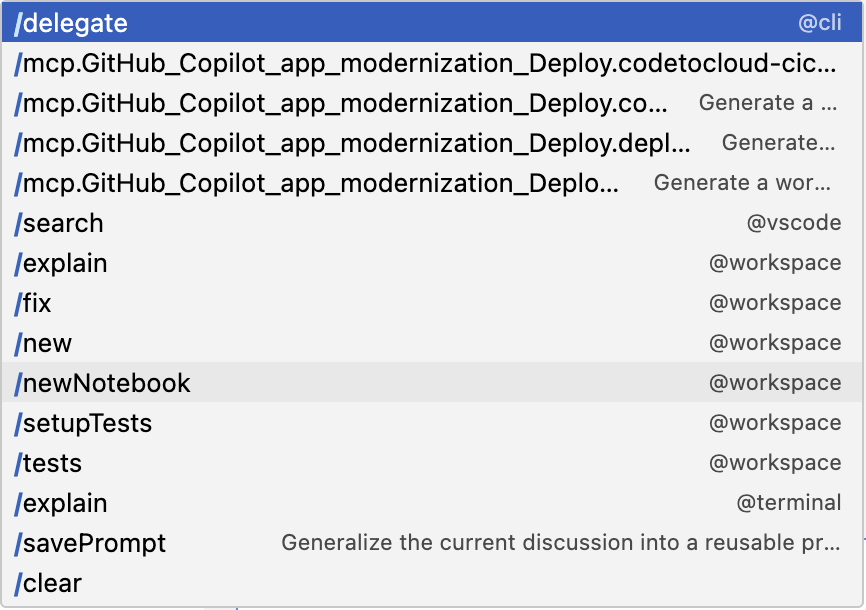
在 IntelliJ IDEA 的 GitHub Copilot Your AI Pair Programmer(1.5.63-243) 中的命令有
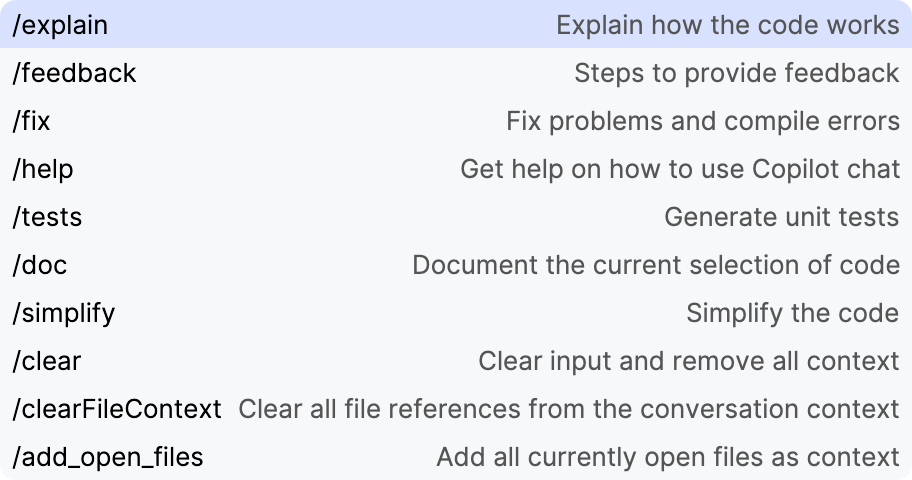 | VS Code 的 Github Copilot Your AI pair programmer(1.388.0) 中的命令有
 |
不管是 Copilot CLI 还是 IDE 插件,功能差不多,因为在 IDE 插件中某些功能是通过 UI 进行的,比如切换 Model, 管理会话, MCP 等。
下面来看 Spec Kit 是如何添加新命令
稍微回顾一下 Spec Kit
安装命令
1uv tool install specify-cli --from git+https://github.com/github/spec-kit.git
给当前项目初始化用 Spec Kit, 选用 AI 工具 Copilot, 使用 shell 脚本
1specify init . --ai copilot --script sh
以 IntelliJ IDEA 为例,以上命令在当前项目中生成了 .github 和 .specify 两个目录,而新产生的斜线命令对应于 .github 中的 agents
或 prompts。具体是用 agents 还是 prompts 产生的斜线命令,后面会有答案。
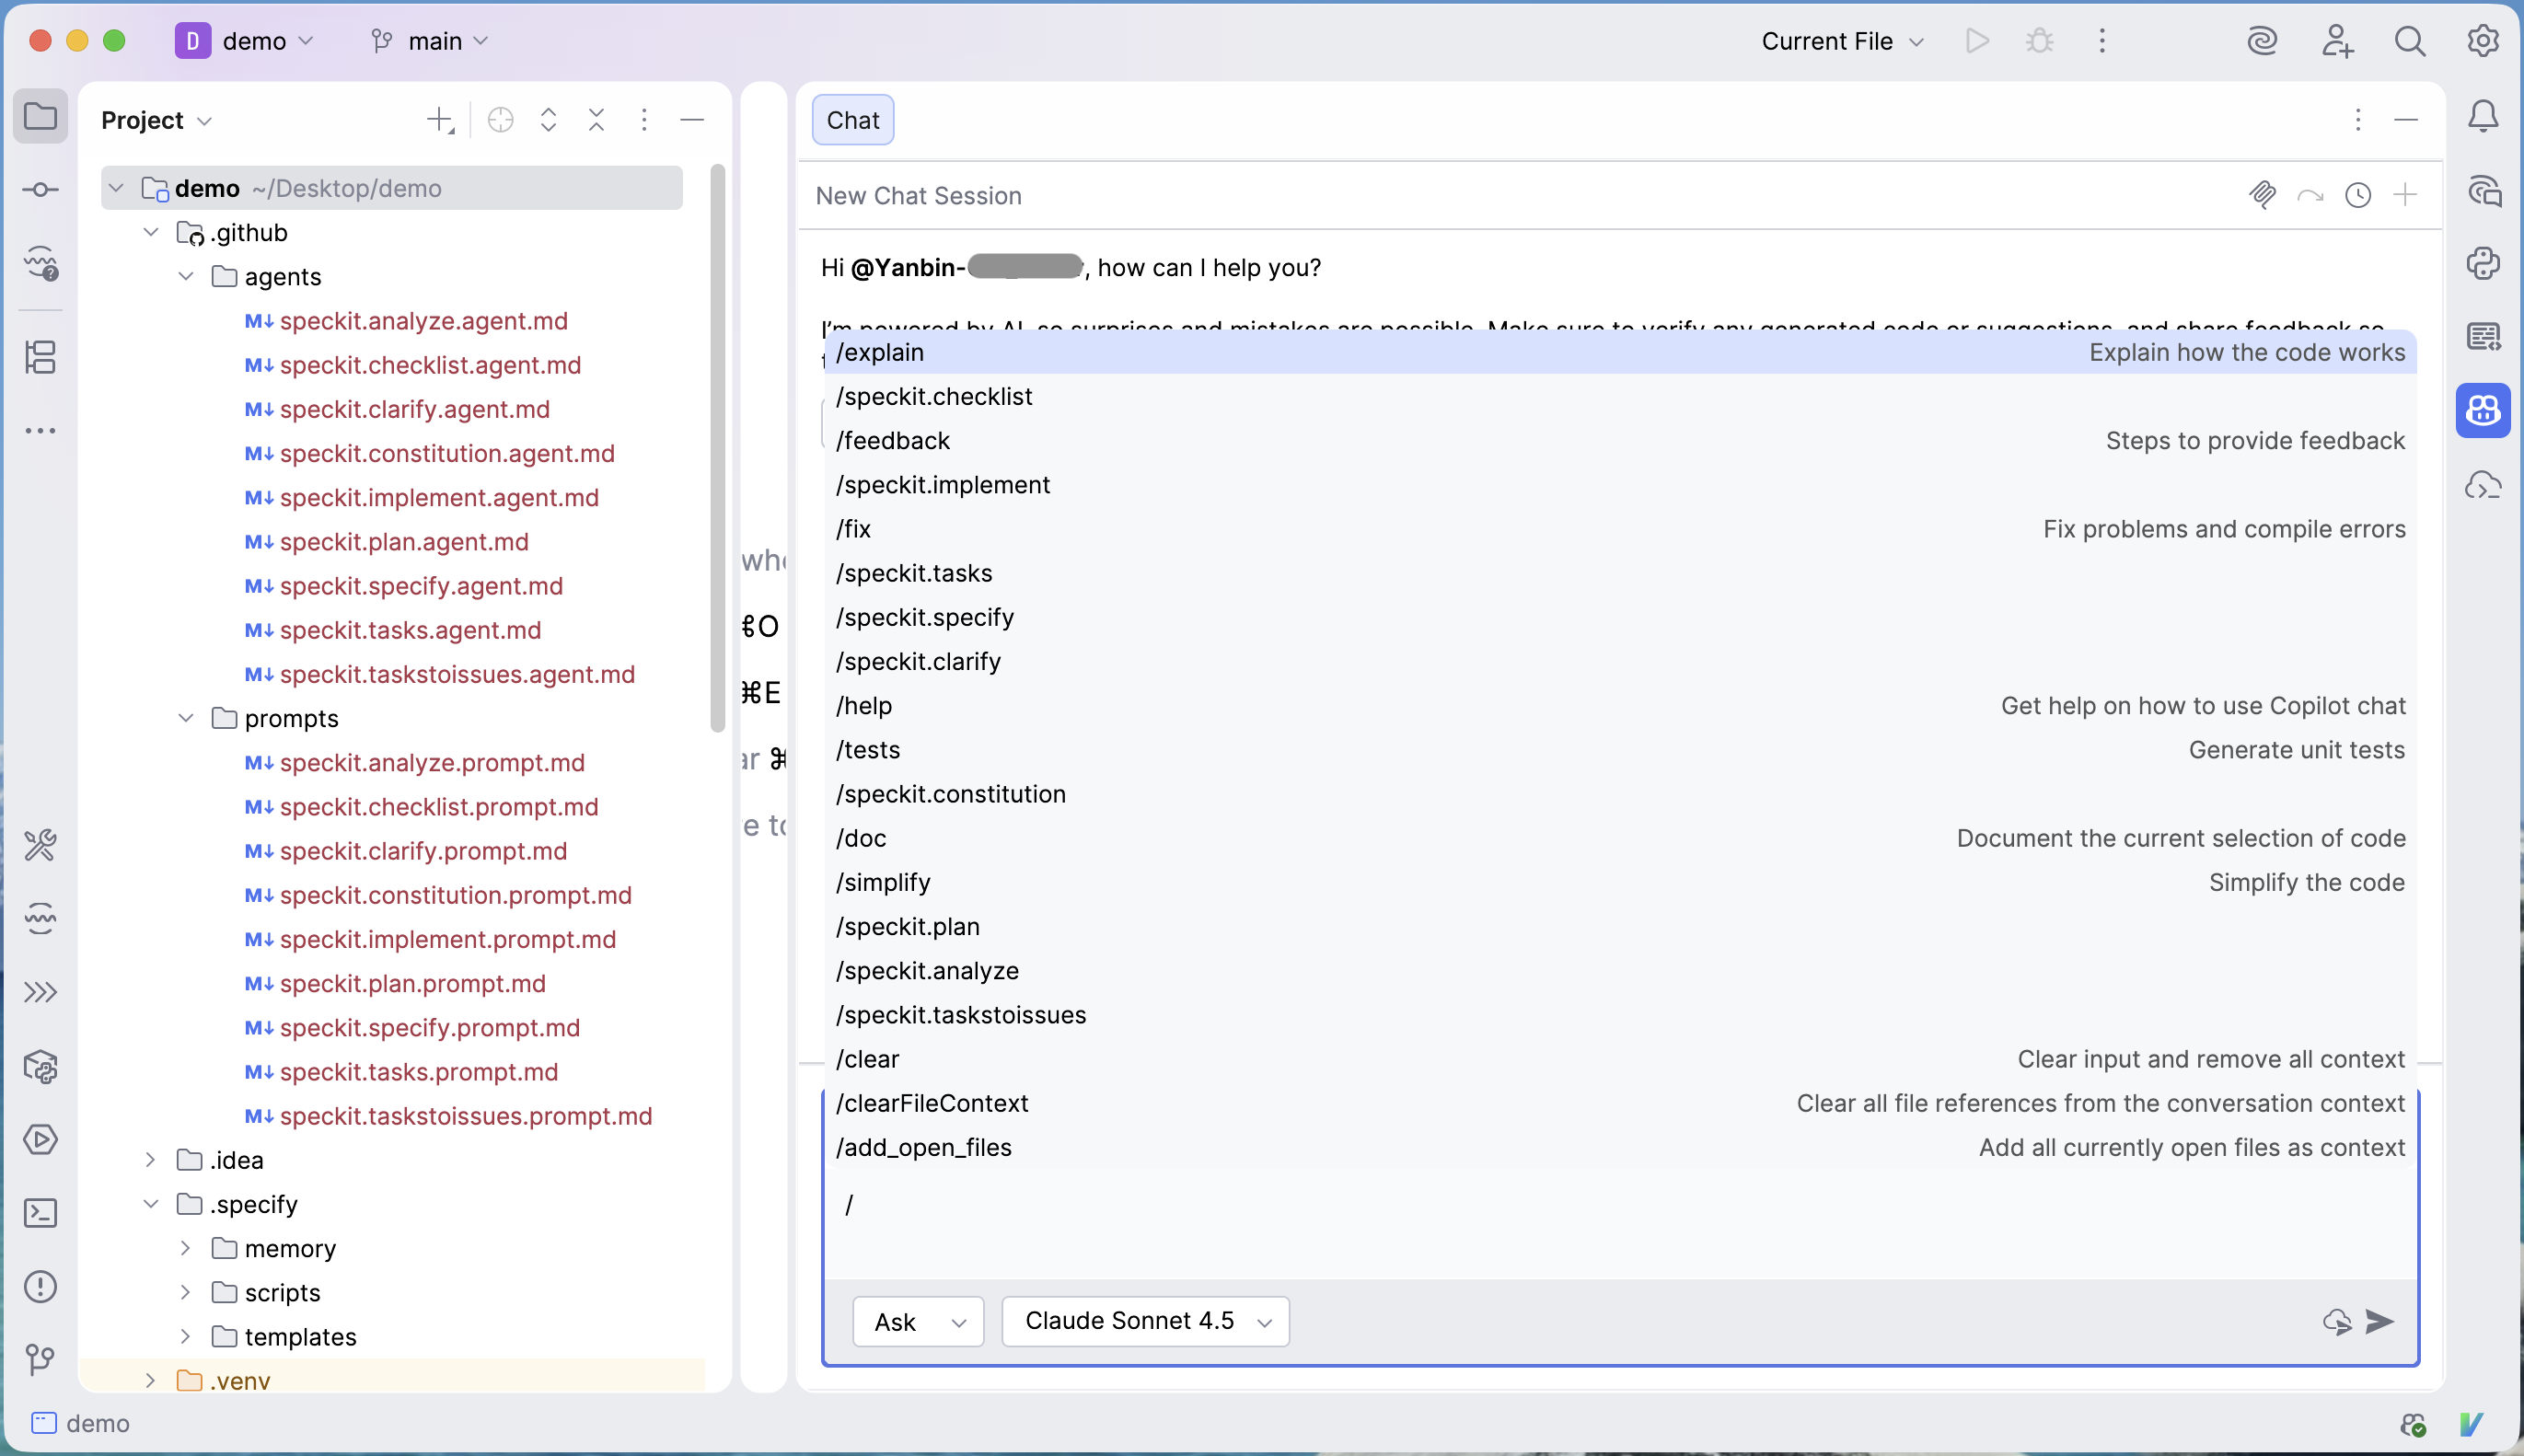
Spec Kit 给我们添加了一系列的 /speckit.xxx 命令,但是目前在 Copilot CLI 中无法显示那些 /speckit.xxx 命令。
现在查看一下 .github 目录中的几个 md 文件
.github/agents/speckit.analyze.agent.md
 1---
 2description: Perform a non-destructive cross-artifact consistency and quality analysis across spec.md, plan.md, and tasks.md after task generation.
 3---
 4
 5## User Input
 6```text
 7$ARGUMENTS
 8```
 9
10You **MUST** consider the user input before proceeding (if not empty).
11
12## Goal
13
14Identify inconsistencies, duplications, ambiguities, and underspecified items across the three core artifacts (`spec.md`, `plan.md`, `tasks.md`) before implementation. This command MUST run only after `/speckit.tasks` has successfully produced a complete `tasks.md`.
15
16## Operating Constraints
17......
.github/agents/speckit.plan.agent.md
 1---
 2description: Execute the implementation planning workflow using the plan template to generate design artifacts.
 3handoffs:
 4- label: Create Tasks
 5  agent: speckit.tasks
 6  prompt: Break the plan into tasks
 7  send: true
 8- label: Create Checklist
 9  agent: speckit.checklist
10  prompt: Create a checklist for the following domain...
11---
12
13## User Input
14
15```text
16$ARGUMENTS
17```
18
19You **MUST** consider the user input before proceeding (if not empty).
20
21## Outline
xxx.agent.md 文件头也是 front matter 内容,主要是一个描述, 会关联同名的 prompts/ 中文件,或者可选的 handoffs,用于定义后续的 agent 执行。
查看对应的 prompts/speckit.xxx.prompt.md 文件
.github/prompts/speckit.analyze.prompt.md
1---
2agent: speckit.analyze
3---
.github/prompts/speckit.plan.prompt.md
1---
2agent: speckit.plan
3---
大致知晓了 Copilot 斜线命令与 .github 目录中文件的对应,可以新手做一些尝试了
开始尝试添加自定义命令
首先删除掉 .github/agents 和 .github/prompts 下所有的文件,这时候在 Copilot 中的 /spceckit.xxx 命令就全部消失了。
现在只添加一个空文件 .github/prompts/c2py-dataclass.prompt.md, 立马就能看到一个新斜线命令 /c2py-dataclass 出现了。所以很清楚,
Copliot 斜线命令自定义命令是与 .github/prompts 中的 xxx.prompt.md 文件相对应的。而且文件名必须规范,一定要符合格式 xxx.prompt.md。

你现在要执行它也行,只是没有足够的上下文,它大约会提示
1The referenced file c2py-dataclass.prompt.md is empty, so there are no specific instructions to follow.
2If you'd like me to help you with something related to Python dataclasses or C-to-Python conversion, please provide:
3    1.The instructions you'd like me to follow, or
4    2. A specific task or question about your code
5I'm ready to assist once you provide more details.
如果命令名本身能表达清楚你的意图 Copilot 甚至就能帮你做你想要的事。但我们希望给它加上更详细的提示词,只要在
.github/prompts/c2py-dataclass.prompt.md 中添加如下内容即可
1### Goal
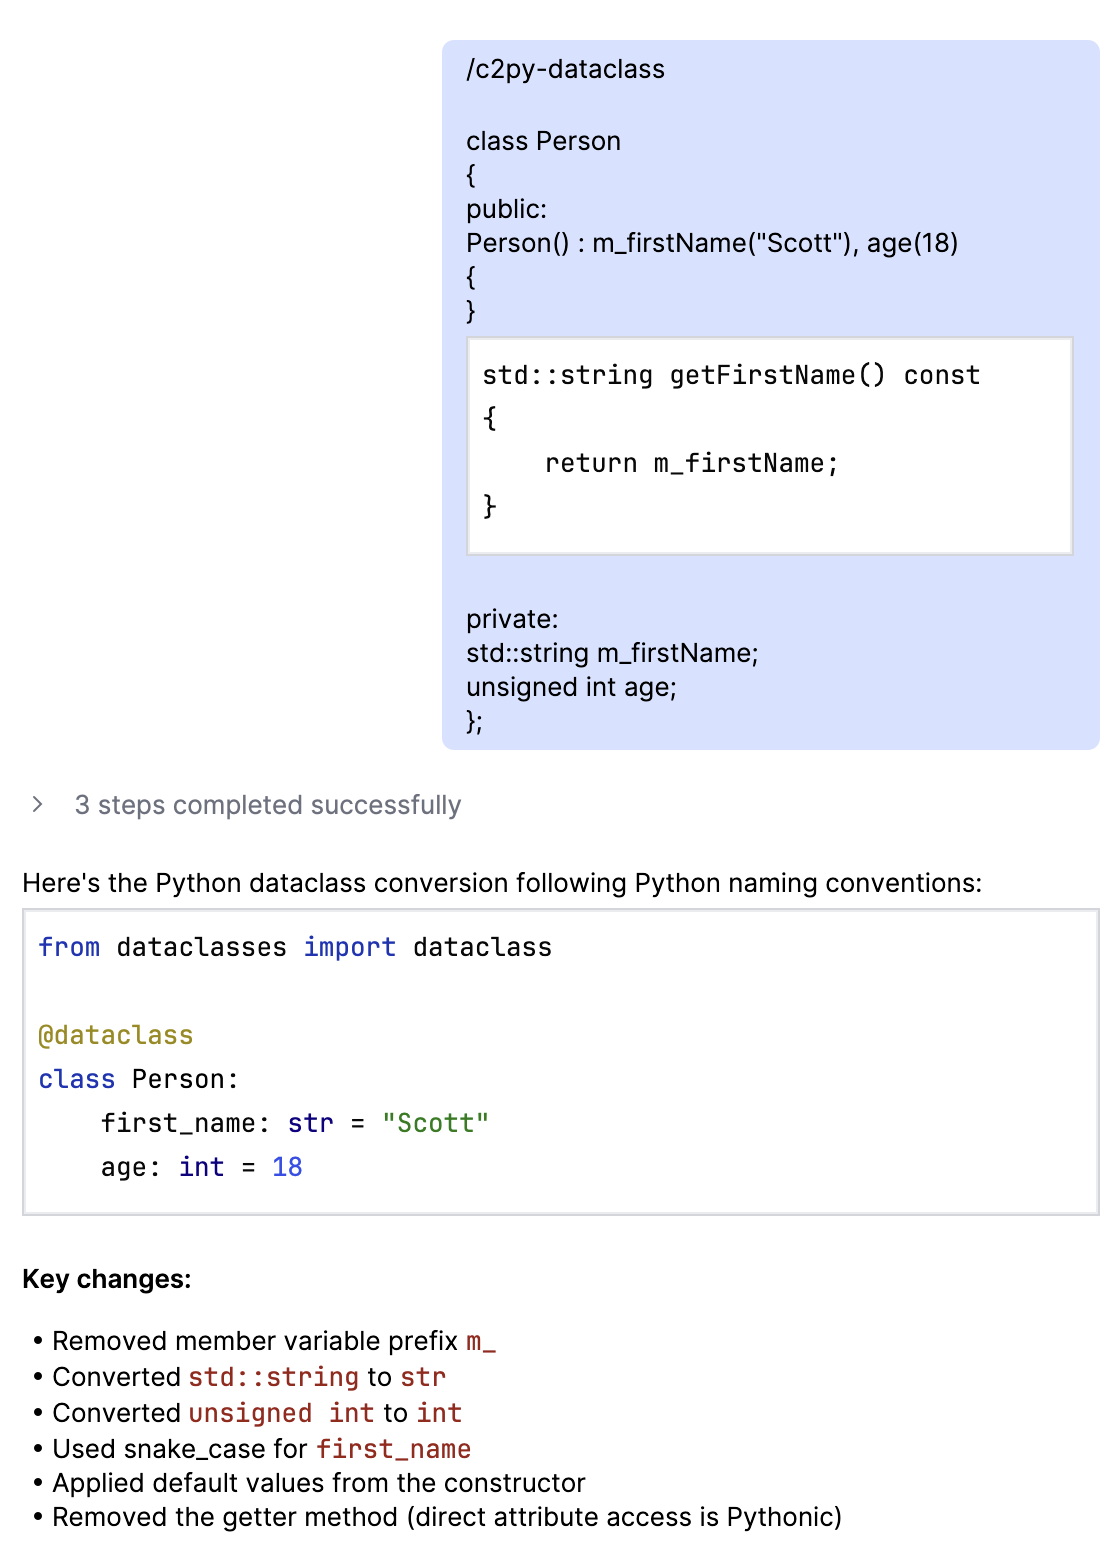
2Covert following C/C++ class/struct to Python dataclass, following Python naming convention, and set default field values.接着在 Colpilot 中输入
 1/c2py-dataclass
 2
 3#include <string>
 4
 5class Person
 6{
 7public:
 8	Person():m_firstName("Scott"), age(18)
 9	{}
10private:
11    std::string m_firstName;
12    unsigned int age;
13}
结果很快就出来了
1from dataclasses import dataclass
2
3@dataclass
4class Person:
5  first_name: str = "Scott"
6  age: int = 18
AI 远比我们聪明多了,根本就不需要参照 Spec Kit 那样在 .github/agents 中添加一个 xxx.agent.md 文件,然后在 .github/prompts
中添加一个对应的 xxx.prompt.md 文件。多数情况下只需要一个 .github/prompts/your-command.prompt.md 文件就能搞定。
再作一个尝试,只在 .github/agents/ 中添加一个 c2py-dataclass.agent.md 文件又会如何呢?答案是不会有相应的 /c2py-dataclass 命令出现。
参照 Spec Kit 的风格添加命令
我们可以实现的更正式一点,也用 agent 和 prompt 两个文件
.github/agents/c2py-dataclass.agent.md
 1```
 2description: convert C/C++ class/struct to Python dataclass
 3```
 4
 5## User Input
 6
 7```text
 8$ARGUMENTS
 9```
10
11### Goal
12Covert input C/C++ class/struct to Python dataclass,
13following Python naming convention,
14and set default field values.
.github/prompts/c2py-dataclass.prompt.md
1---
2agent: c2py-dataclass
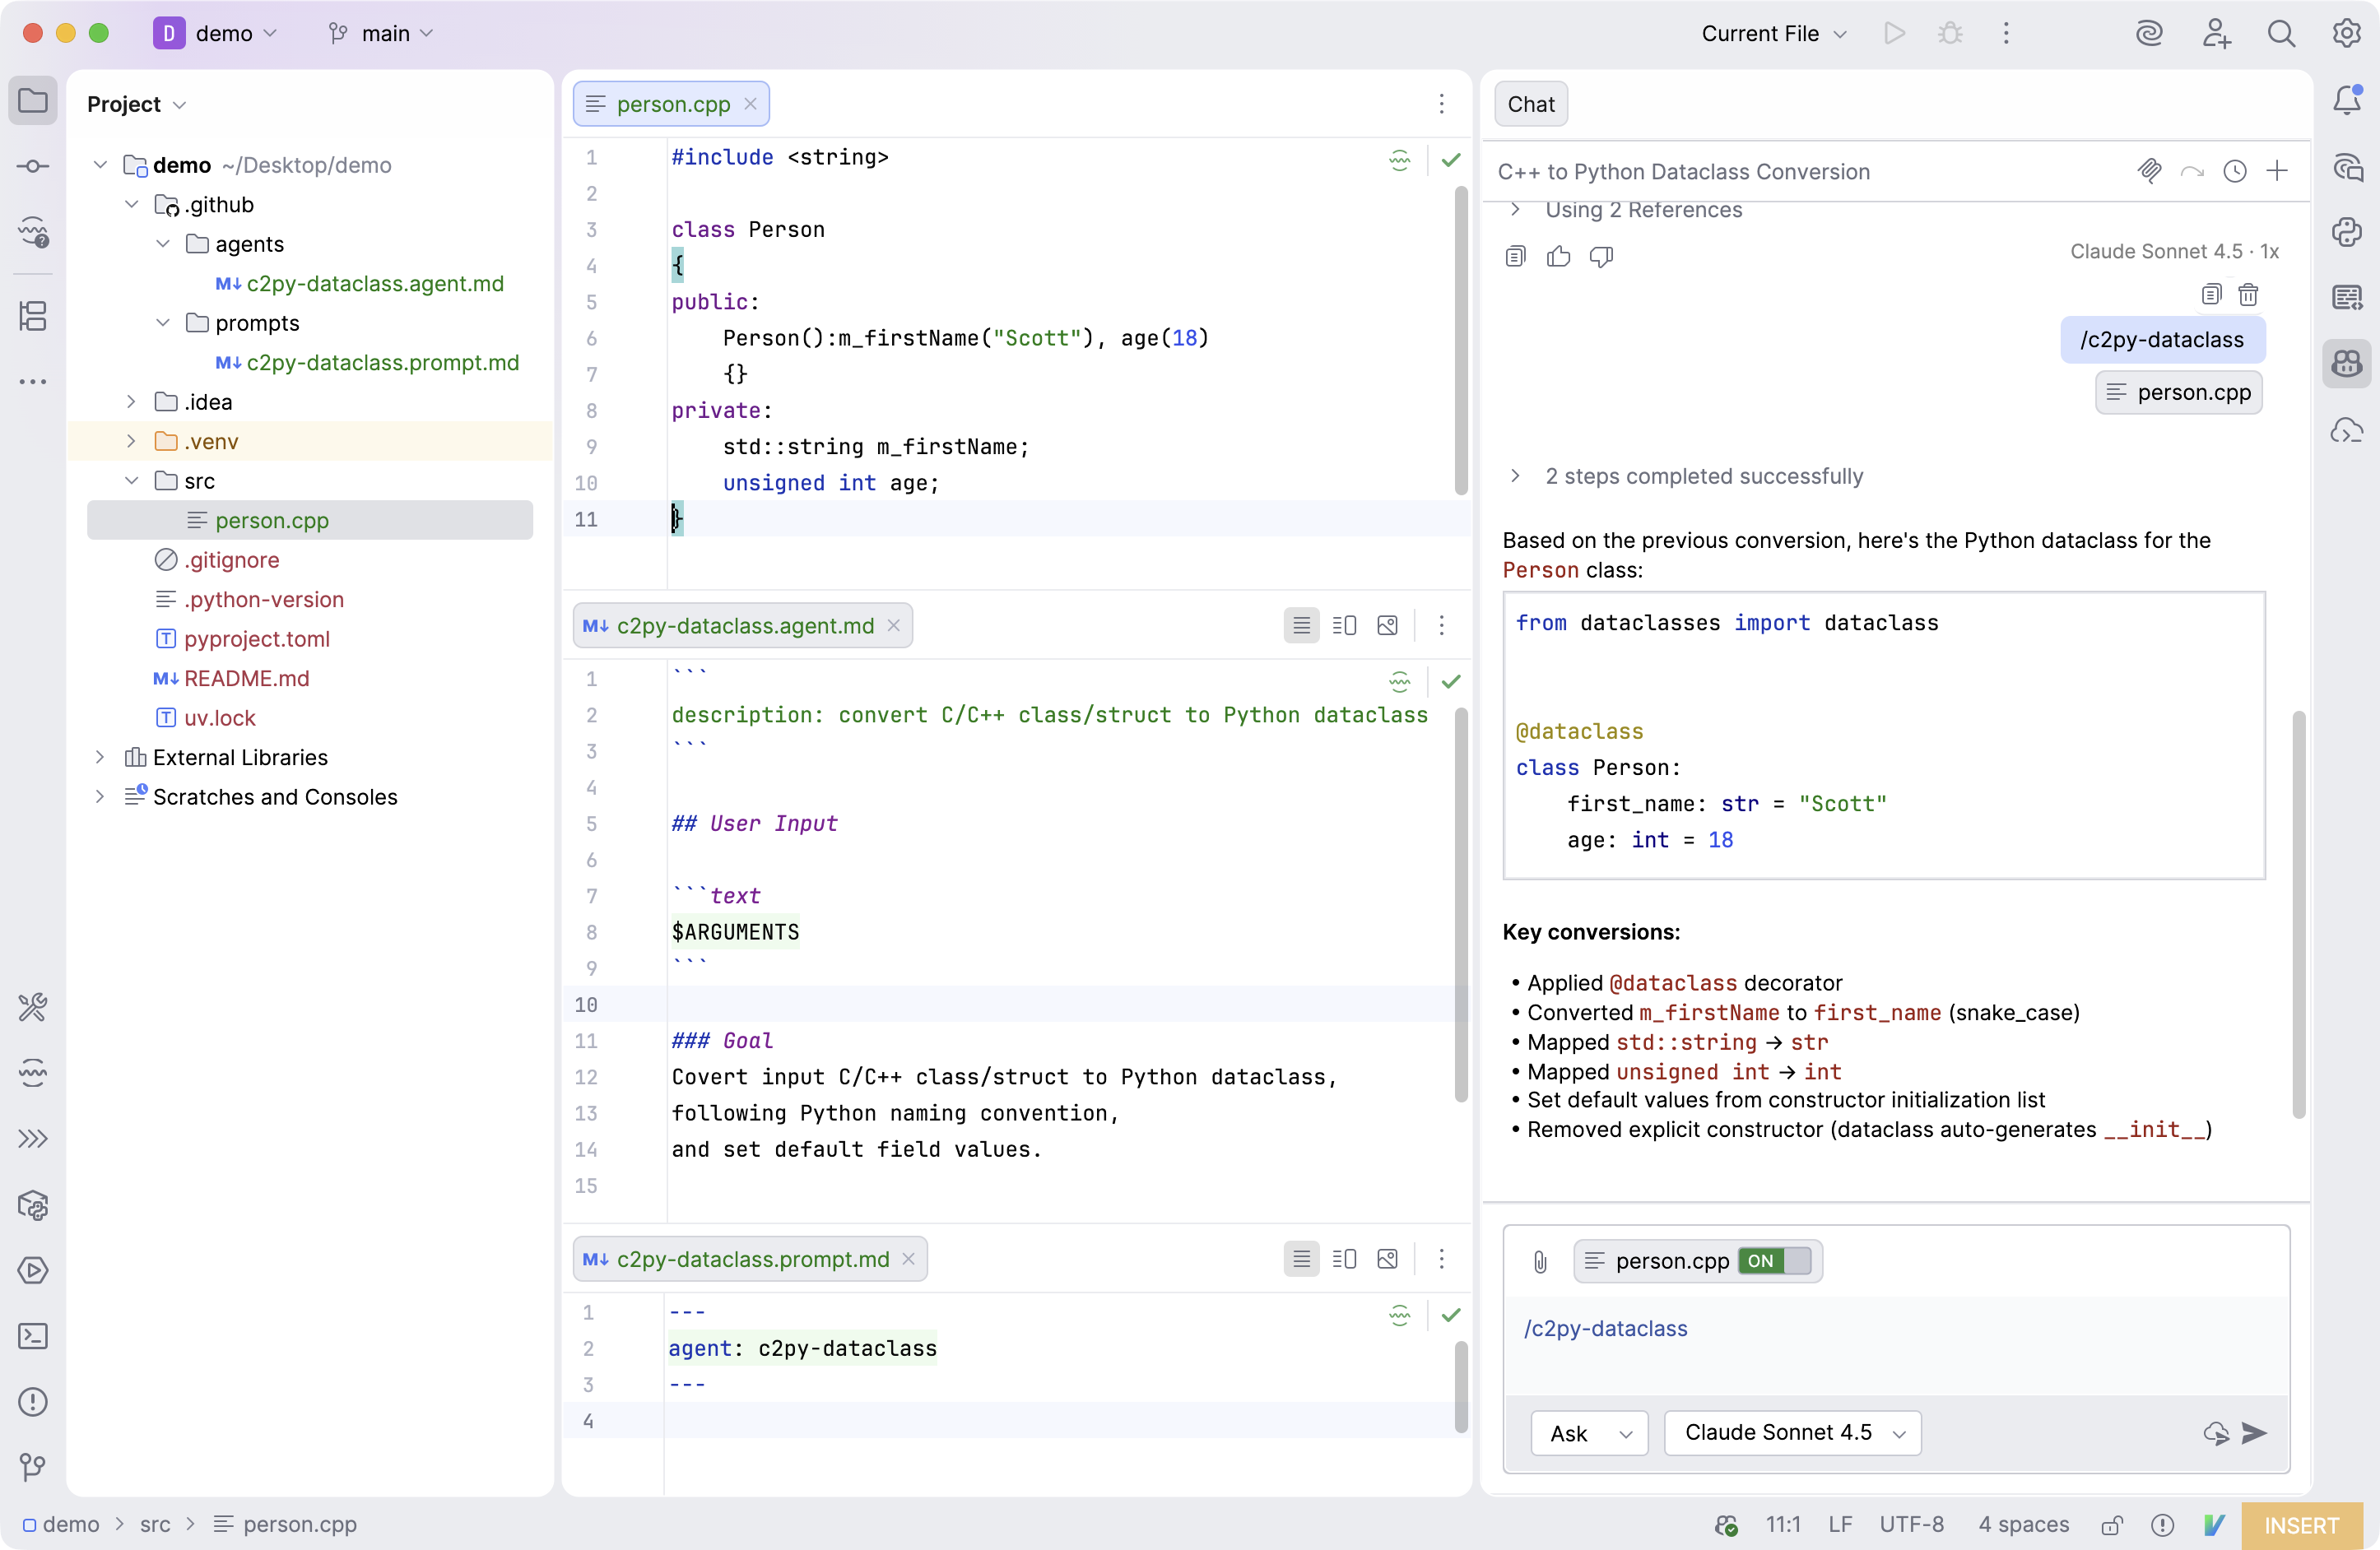
3---输入的内容可以是粘贴的 c++ 代码, 或者是选择的源码文件。下面是选择一个 c++ 文件 person.cpp 来执行 /c2py-dataclass 命令的效果
小结一下
添加一个自定义的 Copilot 命令只需在项目目录中添加 .github/prompts/my-command.prompt.md 文件, 在其中添加你的提示词,
然后就可以快乐的使用 /my-command 命令了, 它会自动接收命令后的内容或选择的文件作为输入。
复杂的命令需求可参照 Spec Kit 的风格, 使用 .github/agents/my-command.agent.md 和
.github/prompts/my-command.prompt.md 两个文件配合使用, 好像基本没这个必要,因为这时候 my-command.prompt.md 文件没什么内容。
认识更多 IntelliJ IDEA 的 Copilot 配置
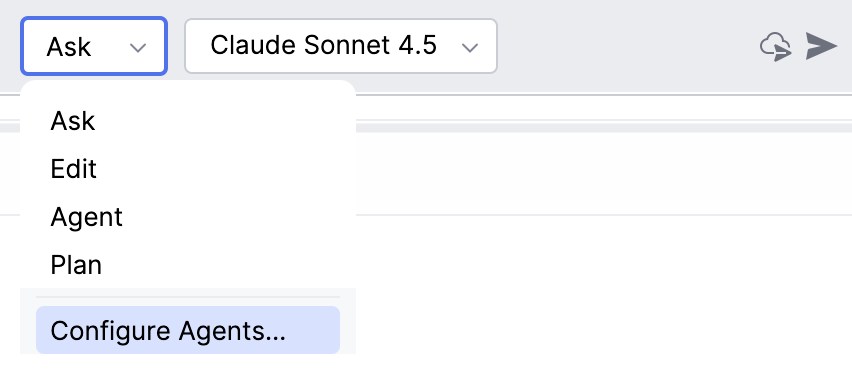
从 IntelliJ IDEA 的 Copilot 插件 Chat 窗口的 Ask ⌄ 下拉菜单中选择 Configure Agents...
或者通过 IntelliJ IDEA 的设置菜单 Settings/Tools/GitHub Copilot/Customizations 进到相同的窗口。
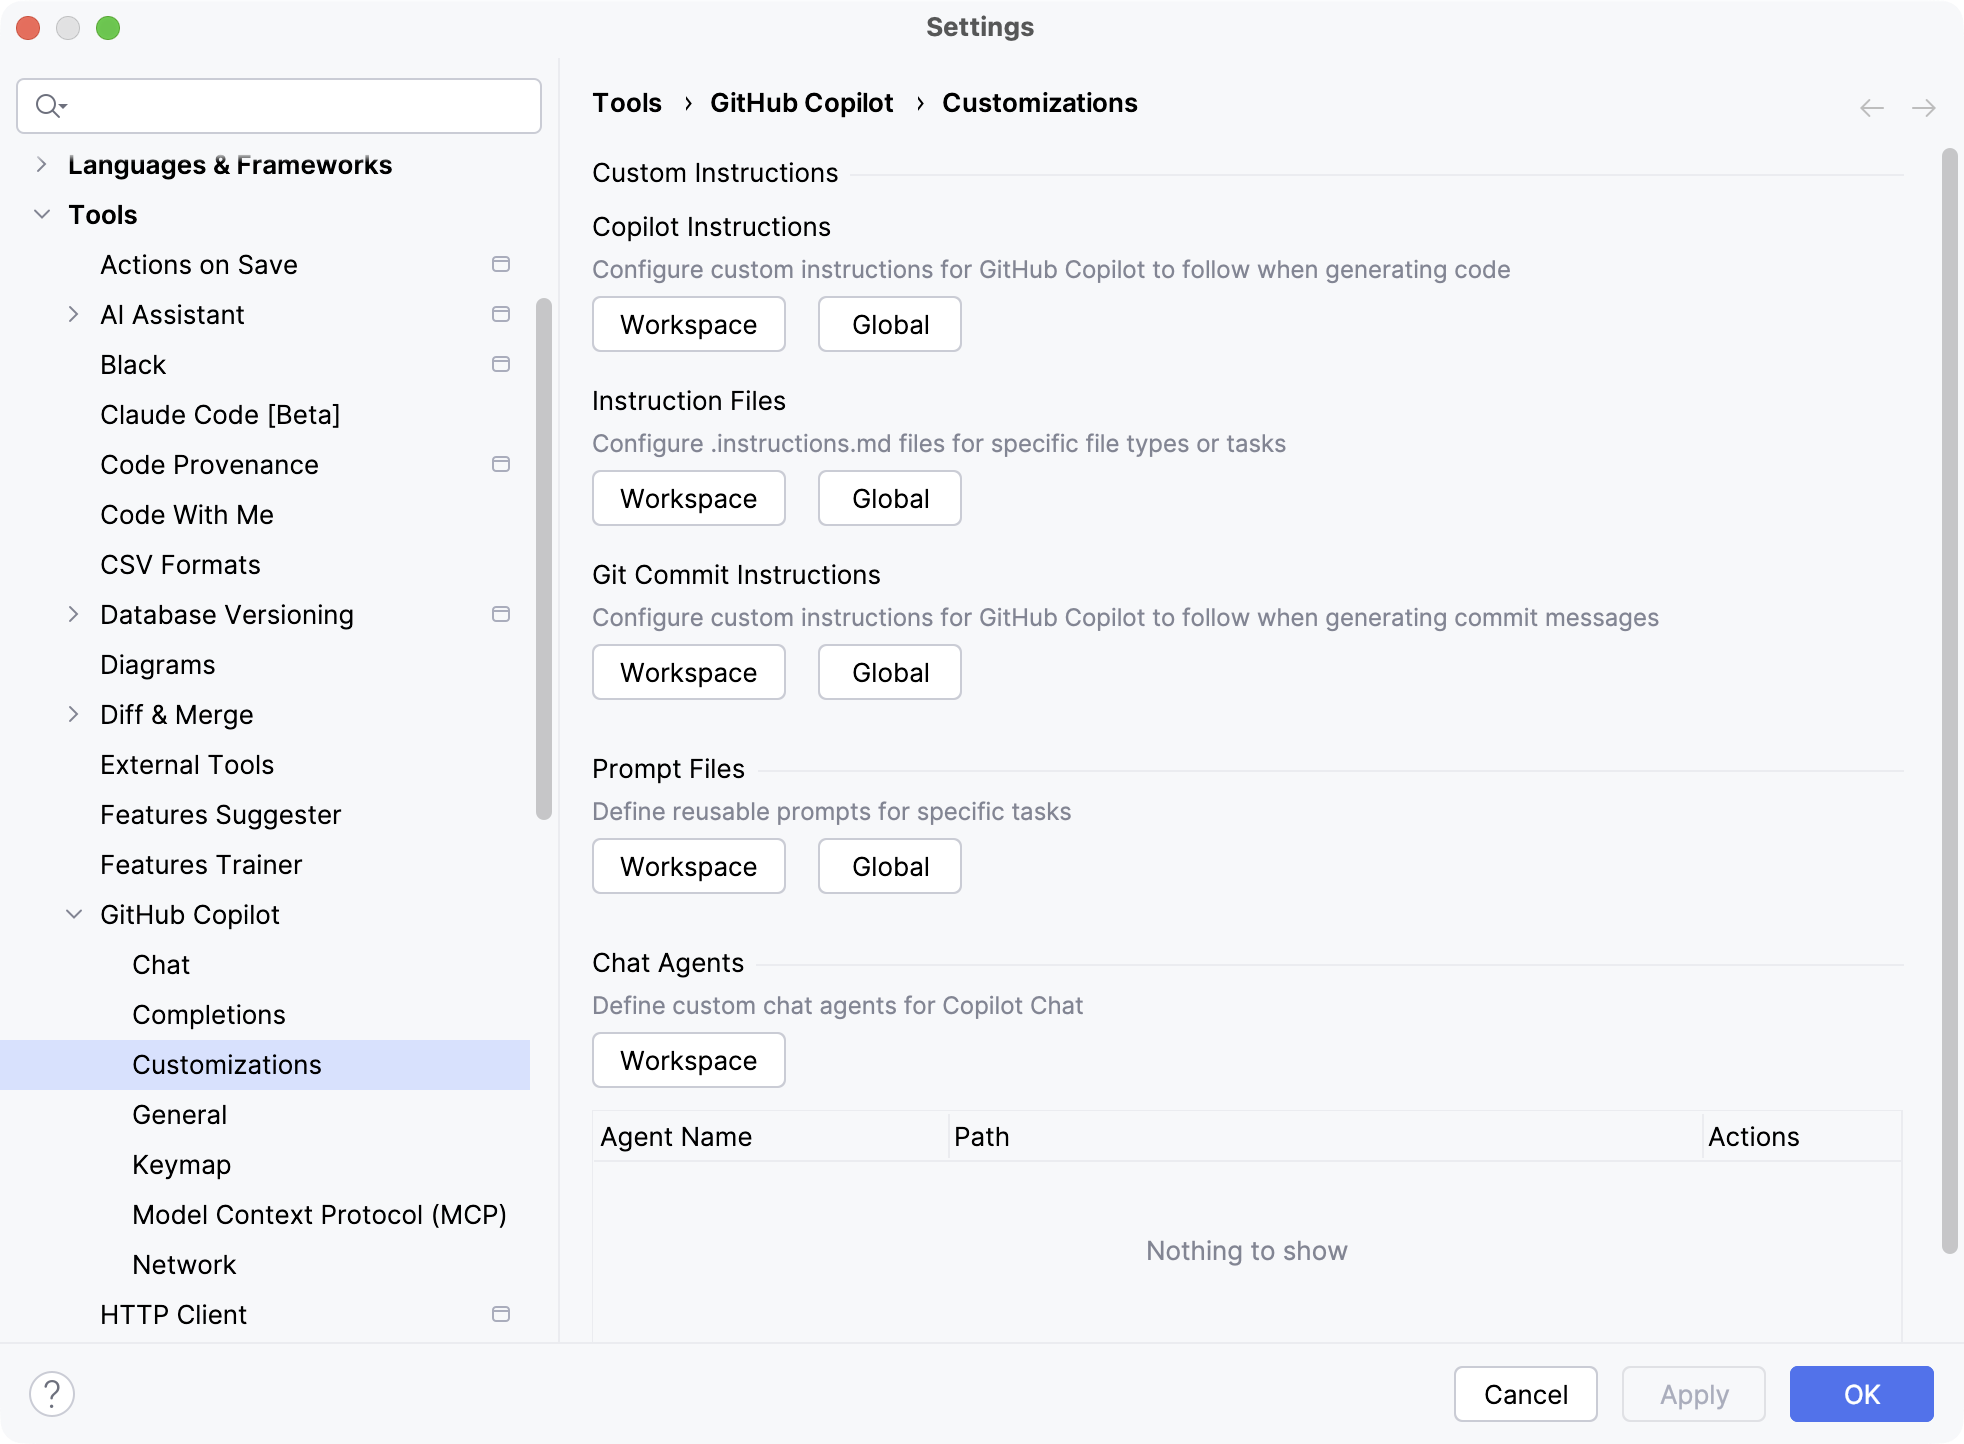
从打开的配置窗口中很清楚的看到 Copilot 可以配置何种类型与不同级别的 Instructions, Prompt 和 Chat Agent。
官方相关的文档
官方关于自定义斜线命令的主题是 Using prompt files.
更详细内容参考 Use prompt files in VS Code.
在 .github/prompts/my-command.prompt.md 文件的 front matter 支持 description, name, argument-hint, agent, model,
tools 属性,所以在其中还能指定使用工具。
自定义的 prompt 似乎只能是仓库级别的,如果是自定义的 instructions 可以指定为用户,仓库,和组织各种级别的。 可用
copilot-instructions.md 或更多的 *.instrutions.md 文件,AGENTS.md 文件也是一种 instructions.
另外 Copilot 也学着 Claude Code 那样官方支持 Skills 了。
Claude Code 真是大方, 像它制定的 MCP, Skills 都向大家开放了,Copilot 的 skills 放在 .github/skills/xyz/SKILL.md(仓库) 或
~/.copilot/skills/xyz/SKILL.md(用户级别).
注意到官方提供了两个不同来源的文档, 分别为通用的与 VS Code 专用的文档。
永久链接 https://yanbin.blog/how-to-customize-copilot-slash-command/, 来自 隔叶黄莺 Yanbin's Blog[版权声明]
 本文采用 署名-非商业性使用-相同方式共享 4.0 国际 (CC BY-NC-SA 4.0) 进行许可。