Java 的多行字符串 Here Document 的实现
寻求了很久关于如何在 Java 中实现多行字符串,即 Here Document。因为在测试中准备大的字符串数据是不得不用加号去拼接,甚至是麻烦。稍好就是用 http://www.htmlescape.net/javaescape_tool.html 把你输入的大段文字生成 Java 的字符串。
找过一些介绍 Java 实现 Here Document 的方法,首先大家无一不是把这个多行字符串塞在注释里,有些实现在运行还在依赖于 Java 源文件中的注释,这不太可取。聪明的做法应该要去打编译器的主意,让编译后体现在 Class 文件中,变量就被赋上了多行字符串值,这就是 JDK1.5 引入的 APT(Annotation Processing Tool),到 JDK1.6 后可操作性更强了,可以 javac 的时候带上 -processor 参数。
单单从语法特性上来讲,我觉得 Java 与现今流行的语言还是有差距,不过它一直在成长,像 JDK 1.5 和 1.7 这两个版本就带来了不少好东西。想要见识一下其他些个语言,如 Perl, PHP, Ruby, C++11 怎么实现 Here Document 还是请看 http://en.wikipedia.org/wiki/Here_document。
就连 Java 最亲密的战友 C# 都早实现了 Here Document,用 @ 符号:
现在正式来看 Java 应用 APT 如何实现 Here Document 的,会建立两个项目,分别是 HereDocument 和 HereDocumentTest,前者是实现,后者是对它的测试,必须分成两个项目,因为编译后者的时候,前者的 Class 文件必须先存在。
为方便起见,都做成 Maven 项目,下面来展示它们。
1. HereDocument 项目:
1) pom.xml:
代码中要用到 tools.jar 中的实现类,所以必须引入,Mac OS 下的相应的类可能在
2) HereDocument 注解
3) HereDocumentProcessor
上面代码完成后运行 mvn clean install 把生成的 jar 包安装到本地库中,下面的 HereDocumentTest 要依赖于它。
2. HereDocumentTest 项目
1) pom.xml:
本项目引入了 HereDocument 生成的 jar 包,在插件中配置了 annotationProcessor 就是前面的 cc.unmi.apt.HereDocumentProcessor。
2) Client.java
3) HereDocumentTest.java
现在来看用 Maven 运行 HereDocumentTest 项目的效果,先命令行进到 HereDocumentTest 所在目录,为确保 Class 文件是由 Maven 编译出来的,先运行:
mvn clean compile
然后执行
mvn exec:java, 输出:
也可以运行
mvn test
执行的是 cc.unmi.apt.HereDocumentTest 中的测试用例,也看效果:
那到底应用了 HereDocumentProcessor 发生了什么,查看一下生成的 Client.class 文件:
只截了个屏,不完整,但发生的事情很简单,就是 HereDocumentProcessor 把代码中对 html 变量用它上头的注解内容给赋了值。
因为使用 APT 使你瞄上了 Java 编译器,所以有些时候用起来会麻烦些,特别是在使用 IDE 的时候。
像命令行编译时
javac -processor <annotation processor class1>, [<annotation processor class2>] -processorpath <path, processor 的 classpath>
比如说以上的 HereDocument.class 和 HereDocumentProcessor.class 打包在 c:\heredoc.jar 包中,编译 Client.java 就用命令:
javac -processor cc.unmi.apt.HereDocumentProcessor -processorpath c:\heredoc.jar -classpath .;c:\heredoc.jar Client.java
然后执行
java Client
在 Eclipse 中配置 Project Properties 里的 Java compiler / Annotation Processing
注:如果按照上面的方法在 Eclipse IDE 中配置来使用 Processor,那么 init() 方法中的 procEnv 的类型是 org.eclipse.jdt.internal.apt.pluggable.core.dispatch.IdeBuildProcessingEnvImpl,而不是 JavacProcessingEnvironment,并且它们之间不存在父子关系,无法进行转型,会有异常。
在 NetBeans 配置 Project Properties / Build / Compiling / Annotation Processors
参考: 1. Java Multiline String
2. Using Java 6 processors in Eclipse
3. Annotation Processors Support in the NetBeans IDE 永久链接 https://yanbin.blog/java-implement-here-document/, 来自 隔叶黄莺 Yanbin's Blog
[版权声明] 本文采用 署名-非商业性使用-相同方式共享 4.0 国际 (CC BY-NC-SA 4.0) 进行许可。
找过一些介绍 Java 实现 Here Document 的方法,首先大家无一不是把这个多行字符串塞在注释里,有些实现在运行还在依赖于 Java 源文件中的注释,这不太可取。聪明的做法应该要去打编译器的主意,让编译后体现在 Class 文件中,变量就被赋上了多行字符串值,这就是 JDK1.5 引入的 APT(Annotation Processing Tool),到 JDK1.6 后可操作性更强了,可以 javac 的时候带上 -processor 参数。
单单从语法特性上来讲,我觉得 Java 与现今流行的语言还是有差距,不过它一直在成长,像 JDK 1.5 和 1.7 这两个版本就带来了不少好东西。想要见识一下其他些个语言,如 Perl, PHP, Ruby, C++11 怎么实现 Here Document 还是请看 http://en.wikipedia.org/wiki/Here_document。
就连 Java 最亲密的战友 C# 都早实现了 Here Document,用 @ 符号:
1string miniTemplate = @"
2  Hello ""{0}"",
3  Your friend {1} sent you this message:
4     {2}
5  That's all!";
现在正式来看 Java 应用 APT 如何实现 Here Document 的,会建立两个项目,分别是 HereDocument 和 HereDocumentTest,前者是实现,后者是对它的测试,必须分成两个项目,因为编译后者的时候,前者的 Class 文件必须先存在。
为方便起见,都做成 Maven 项目,下面来展示它们。
1. HereDocument 项目:
1) pom.xml:
 1<project xmlns="http://maven.apache.org/POM/4.0.0" xmlns:xsi="http://www.w3.org/2001/XMLSchema-instance"
 2    xsi:schemaLocation="http://maven.apache.org/POM/4.0.0 http://maven.apache.org/xsd/maven-4.0.0.xsd">
 3    <modelVersion>4.0.0</modelVersion>
 4    <groupId>cc.unmi.apt</groupId>
 5    <artifactId>HereDocument</artifactId>
 6    <version>0.0.1-SNAPSHOT</version>
 7    <profiles>
 8        <profile>
 9            <id>default-tools.jar</id>
10            <activation>
11                <property>
12                    <name>java.vendor</name>
13                    <value>Sun Microsystems Inc.</value>
14                </property>
15            </activation>
16            <dependencies>
17                <dependency>
18                    <groupId>com.sun</groupId>
19                    <artifactId>tools</artifactId>
20                    <version>1.6.0</version>
21                    <scope>system</scope>
22                    <systemPath>${java.home}/../lib/tools.jar</systemPath>
23                </dependency>
24            </dependencies>
25        </profile>
26    </profiles>
27</project>
代码中要用到 tools.jar 中的实现类,所以必须引入,Mac OS 下的相应的类可能在
${java.home}/../Classes/classes.jar 中。2) HereDocument 注解
 1package cc.unmi.apt;
 2
 3import java.lang.annotation.ElementType;
 4import java.lang.annotation.Retention;
 5import java.lang.annotation.RetentionPolicy;
 6import java.lang.annotation.Target;
 7
 8@Target(ElementType.FIELD)
 9@Retention(RetentionPolicy.SOURCE)
10public @interface HereDocument {
11}
3) HereDocumentProcessor
 1package cc.unmi.apt;
 2
 3import java.util.Set;
 4
 5import javax.annotation.processing.AbstractProcessor;
 6import javax.annotation.processing.ProcessingEnvironment;
 7import javax.annotation.processing.RoundEnvironment;
 8import javax.annotation.processing.SupportedAnnotationTypes;
 9import javax.annotation.processing.SupportedSourceVersion;
10import javax.lang.model.SourceVersion;
11import javax.lang.model.element.Element;
12import javax.lang.model.element.TypeElement;
13
14import com.sun.tools.javac.model.JavacElements;
15import com.sun.tools.javac.processing.JavacProcessingEnvironment;
16import com.sun.tools.javac.tree.JCTree;
17import com.sun.tools.javac.tree.TreeMaker;
18
19@SupportedAnnotationTypes({"cc.unmi.apt.HereDocument"})
20@SupportedSourceVersion(SourceVersion.RELEASE_6)
21public final class HereDocumentProcessor extends AbstractProcessor {
22
23  private JavacElements elementUtils;
24  private TreeMaker maker;
25
26  @Override
27  public void init(final ProcessingEnvironment procEnv) {
28    super.init(procEnv);
29    JavacProcessingEnvironment javacProcessingEnv = (JavacProcessingEnvironment) procEnv;
30    this.elementUtils = javacProcessingEnv.getElementUtils();
31    this.maker = TreeMaker.instance(javacProcessingEnv.getContext());
32  }
33
34  @Override
35  public boolean process(final Set<? extends TypeElement> annotations, final RoundEnvironment roundEnv) {
36
37    Set<? extends Element> fields = roundEnv.getElementsAnnotatedWith(HereDocument.class);
38    for (Element field : fields) {
39      String docComment = elementUtils.getDocComment(field);
40      if (null != docComment) {
41        JCTree.JCVariableDecl fieldNode = (JCTree.JCVariableDecl) elementUtils.getTree(field);
42        fieldNode.init = maker.Literal(docComment);
43      }
44    }
45
46    return true;
47  }
48}
上面代码完成后运行 mvn clean install 把生成的 jar 包安装到本地库中,下面的 HereDocumentTest 要依赖于它。
2. HereDocumentTest 项目
1) pom.xml:
 1<project xmlns="http://maven.apache.org/POM/4.0.0" xmlns:xsi="http://www.w3.org/2001/XMLSchema-instance"
 2    xsi:schemaLocation="http://maven.apache.org/POM/4.0.0 http://maven.apache.org/xsd/maven-4.0.0.xsd">
 3    <modelVersion>4.0.0</modelVersion>
 4    <groupId>cc.unmi.apt</groupId>
 5    <artifactId>HereDocumentTest</artifactId>
 6    <version>0.0.1-SNAPSHOT</version>
 7    <dependencies>
 8        <dependency>
 9            <groupId>junit</groupId>
10            <artifactId>junit</artifactId>
11            <version>4.7</version>
12        </dependency>
13        <dependency>
14            <groupId>cc.unmi.apt</groupId>
15            <artifactId>HereDocument</artifactId>
16            <version>0.0.1-SNAPSHOT</version>
17        </dependency>
18    </dependencies>
19    <build>
20        <plugins>
21            <plugin>
22                <groupId>org.apache.maven.plugins</groupId>
23                <artifactId>maven-compiler-plugin</artifactId>
24                <version>2.3.2</version>
25                <configuration>
26                    <source>1.6</source>
27                    <target>1.6</target>
28                    <annotationProcessors>
29                        <annotationProcessor>cc.unmi.apt.HereDocumentProcessor</annotationProcessor>
30                    </annotationProcessors>
31                </configuration>
32            </plugin>
33            <plugin>
34                <groupId>org.codehaus.mojo</groupId>
35                <artifactId>exec-maven-plugin</artifactId>
36                <version>1.2.1</version>
37                <configuration>
38                    <mainClass>cc.unmi.apt.Client</mainClass>
39                </configuration>
40            </plugin>
41        </plugins>
42    </build>
43</project>
本项目引入了 HereDocument 生成的 jar 包,在插件中配置了 annotationProcessor 就是前面的 cc.unmi.apt.HereDocumentProcessor。
2) Client.java
 1package cc.unmi.apt;
 2
 3public class Client {
 4
 5    /**
 6    <html>
 7      <head/>
 8      <body>
 9        <p>
10          Hello
11          HereDocument
12          World
13        </p>
14      </body>
15    </html>
16    */
17    @HereDocument
18    private static String html;
19
20    public static void main(final String[] args) {
21        System.out.println(html);
22    }
23}
3) HereDocumentTest.java
 1package cc.unmi.apt;
 2
 3import org.junit.Test;
 4
 5public class HereDocumentTest {
 6
 7    /**
 8    <html>
 9      <head/>
10      <body>
11        <p>
12          Hello
13          HereDocument
14          World
15        </p>
16      </body>
17    </html>
18    */
19    @HereDocument
20    private static String html;
21
22    @Test
23    public void testHereDocument(){
24        System.out.println(html);
25    }
26}
现在来看用 Maven 运行 HereDocumentTest 项目的效果,先命令行进到 HereDocumentTest 所在目录,为确保 Class 文件是由 Maven 编译出来的,先运行:
mvn clean compile
然后执行
mvn exec:java, 输出:
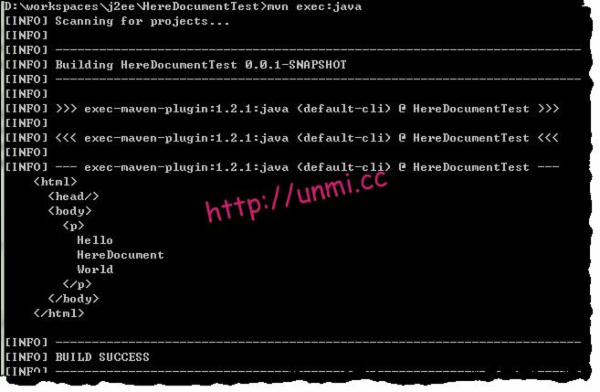 用 mvn exec:java 运行的是 cc.unmi.apt.Client 代码,因为用到了 Maven 的 exec-maven-plugin 插件。
也可以运行
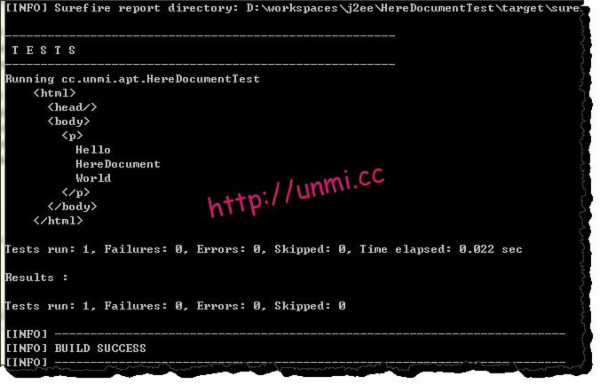
mvn test
执行的是 cc.unmi.apt.HereDocumentTest 中的测试用例,也看效果:
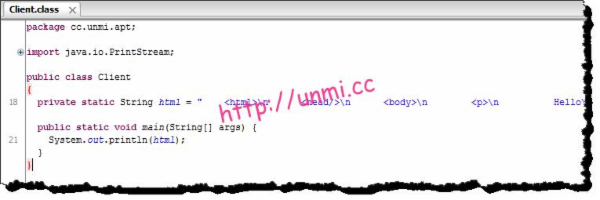
那到底应用了 HereDocumentProcessor 发生了什么,查看一下生成的 Client.class 文件:
只截了个屏,不完整,但发生的事情很简单,就是 HereDocumentProcessor 把代码中对 html 变量用它上头的注解内容给赋了值。
因为使用 APT 使你瞄上了 Java 编译器,所以有些时候用起来会麻烦些,特别是在使用 IDE 的时候。
像命令行编译时
javac -processor <annotation processor class1>, [<annotation processor class2>] -processorpath <path, processor 的 classpath>
比如说以上的 HereDocument.class 和 HereDocumentProcessor.class 打包在 c:\heredoc.jar 包中,编译 Client.java 就用命令:
javac -processor cc.unmi.apt.HereDocumentProcessor -processorpath c:\heredoc.jar -classpath .;c:\heredoc.jar Client.java
然后执行
java Client
在 Eclipse 中配置 Project Properties 里的 Java compiler / Annotation Processing
注:如果按照上面的方法在 Eclipse IDE 中配置来使用 Processor,那么 init() 方法中的 procEnv 的类型是 org.eclipse.jdt.internal.apt.pluggable.core.dispatch.IdeBuildProcessingEnvImpl,而不是 JavacProcessingEnvironment,并且它们之间不存在父子关系,无法进行转型,会有异常。
在 NetBeans 配置 Project Properties / Build / Compiling / Annotation Processors
参考: 1. Java Multiline String
2. Using Java 6 processors in Eclipse
3. Annotation Processors Support in the NetBeans IDE 永久链接 https://yanbin.blog/java-implement-here-document/, 来自 隔叶黄莺 Yanbin's Blog
[版权声明]
本文采用 署名-非商业性使用-相同方式共享 4.0 国际 (CC BY-NC-SA 4.0) 进行许可。