JMS 使用 ActiveMQ 传送文件
这里使用的 MQ 中间件是开源的 ActiveMQ,我们没有采用 BytesMessage 来按字节传送文件,而是 ActiveMQ 为我们提供了 org.apache.activemq.BlobMessage,可以用它来传送大对象。org.apache.activemq.ActiveMQSession 中有以下几个创建 BlobMessage 对象的方法:
createBlobMessage(URL url)
createBlobMessage(URL url, boolean deletedByBroker)
createBlobMessage(File file)
createBlobMessage(InputStream in)
接收到 BlobMessage 消息后,可以调用其 getInputStream() 方法获得数据,然后写成磁盘文件,文件名、文件大小等可通过 Message 的 getXxxProperty("Property.Name") 取的。
注意,传输入文件的时候,发送方创建 ConnectionFactory 时的 brokerURL 需要指定 jms.blobTransferPolicy.uploadUrl 或者jms.blobTransferPolicy.defaultUploadUrl 属性为 ActiveMQ 中 fileserver 应用的 URI,即指定传输 BlogMessage 的 BlobTransferPolicy 策略,参看 Configuring the BLOB Transfer Policy。
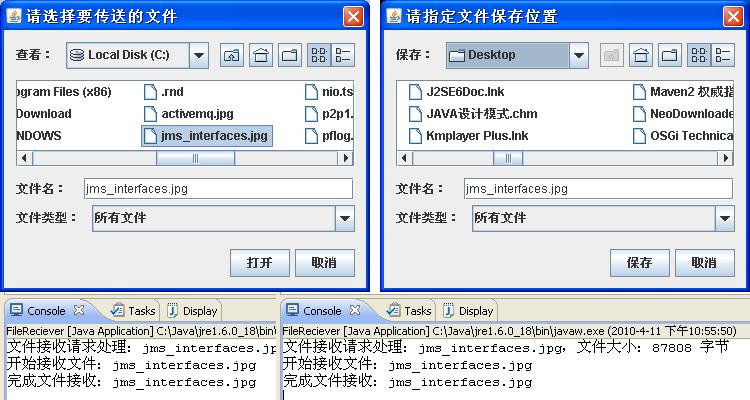
先上图看真相,包括执行 FileSender 时选择文件,FileReciever 在收到文件时会弹出保存文件的对话框,还有控制台的打印信息。
具体来看例子,使用 P2P 队列的方式,你也可以用发布/订阅的方式,只是代码中创建的 Destination 类型不同。
1. 启动 ActiveMQ
在 http://activemq.apache.org/activemq-531-release.html 下载 ActiveMQ,然后解压,执行其中的 bin/activemq.bat,控制台可以看到:
INFO | ActiveMQ Console at http://0.0.0.0:8161/admin
INFO | Initializing Spring root WebApplicationContext
INFO | Successfully connected to tcp://localhost:61616
INFO | Camel Console at http://0.0.0.0:8161/camel
INFO | ActiveMQ Web Demos at http://0.0.0.0:8161/demo
INFO | RESTful file access application at http://0.0.0.0:8161/fileserver
INFO | Started SelectChannelConnector@0.0.0.0:8161
表示启动成功了,假设运行 ActiveMQ 机器的 IP 地址是 10.80.38.10。
2. 编写发送文件的程序 FileSender.java
3. 编写接收文件的程序 FileReceiver.java
4. 运行程序
先执行 FileReceiver 程序来监听消息
再执行发送程序 FileSender,将会提示你选择一个要传送的文件(上图左边),确定后就会把文件发送到 ActiveMQ 服务器上
接收端 FileReceiver 监听到有文件传过来的消息后,会自动弹出保存文件的对话框,要你选择保存位置(上图右边),文件名能保持一致。确定后就开始接收文件,存到指定的位置。
如果设置 producer.setDeliveryMode(DeliveryMode.PERSISTENT); 消息持久性的话,发送方传文件的时候,接收方可以不在线,文件会暂存在 ActiveMQ 服务器上,等到接收程序上线后仍然可以收到发过来的文件。
参考:1. A problem with blobmessage on activemq 5.0
2. Apache ActiveMQ > Features > Message Features > Blob Messages
3. Apache ActiveMQ > Features > Message Dispatching Features > Async Sends 永久链接 https://yanbin.blog/jms-use-activemq-transfer-file/, 来自 隔叶黄莺 Yanbin's Blog
[版权声明] 本文采用 署名-非商业性使用-相同方式共享 4.0 国际 (CC BY-NC-SA 4.0) 进行许可。
createBlobMessage(URL url)
createBlobMessage(URL url, boolean deletedByBroker)
createBlobMessage(File file)
createBlobMessage(InputStream in)
接收到 BlobMessage 消息后,可以调用其 getInputStream() 方法获得数据,然后写成磁盘文件,文件名、文件大小等可通过 Message 的 getXxxProperty("Property.Name") 取的。
注意,传输入文件的时候,发送方创建 ConnectionFactory 时的 brokerURL 需要指定 jms.blobTransferPolicy.uploadUrl 或者jms.blobTransferPolicy.defaultUploadUrl 属性为 ActiveMQ 中 fileserver 应用的 URI,即指定传输 BlogMessage 的 BlobTransferPolicy 策略,参看 Configuring the BLOB Transfer Policy。
先上图看真相,包括执行 FileSender 时选择文件,FileReciever 在收到文件时会弹出保存文件的对话框,还有控制台的打印信息。
具体来看例子,使用 P2P 队列的方式,你也可以用发布/订阅的方式,只是代码中创建的 Destination 类型不同。
1. 启动 ActiveMQ
在 http://activemq.apache.org/activemq-531-release.html 下载 ActiveMQ,然后解压,执行其中的 bin/activemq.bat,控制台可以看到:
INFO | ActiveMQ Console at http://0.0.0.0:8161/admin
INFO | Initializing Spring root WebApplicationContext
INFO | Successfully connected to tcp://localhost:61616
INFO | Camel Console at http://0.0.0.0:8161/camel
INFO | ActiveMQ Web Demos at http://0.0.0.0:8161/demo
INFO | RESTful file access application at http://0.0.0.0:8161/fileserver
INFO | Started SelectChannelConnector@0.0.0.0:8161
表示启动成功了,假设运行 ActiveMQ 机器的 IP 地址是 10.80.38.10。
2. 编写发送文件的程序 FileSender.java
 1package com.unmi.jms;
 2
 3import java.io.File;
 4import javax.jms.*;
 5import javax.swing.JFileChooser;
 6import org.apache.activemq.*;
 7
 8/**
 9 * 通过 ActiveMQ 发送文件的程序
10 * @author Unmi
11 */
12public class FileSender {
13
14    /**
15     * @param args
16     * @throws JMSException
17     */
18    public static void main(String[] args) throws JMSException {
19
20        // 选择文件
21        JFileChooser fileChooser = new JFileChooser();
22        fileChooser.setDialogTitle("请选择要传送的文件");
23        if (fileChooser.showOpenDialog(null) != JFileChooser.APPROVE_OPTION) {
24            return;
25        }
26
27        File file = fileChooser.getSelectedFile();
28
29        // 获取 ConnectionFactory
30        ConnectionFactory connectionFactory = new ActiveMQConnectionFactory(
31                "tcp://10.80.38.10:61616?jms.blobTransferPolicy.defaultUploadUrl=http://10.80.38.10:8161/fileserver/");
32
33        // 创建 Connection
34        Connection connection = connectionFactory.createConnection();
35        connection.start();
36
37        // 创建 Session
38        ActiveMQSession session = (ActiveMQSession) connection.createSession(
39                false, Session.AUTO_ACKNOWLEDGE);
40
41        // 创建 Destination
42        Destination destination = session.createQueue("File.Transport");
43
44        // 创建 Producer
45        MessageProducer producer = session.createProducer(destination);
46        producer.setDeliveryMode(DeliveryMode.NON_PERSISTENT);// 设置为非持久性
47
48        // 设置持久性的话,文件也可以先缓存下来,接收端离线再连接也可以收到文件
49        // 构造 BlobMessage,用来传输文件
50        BlobMessage blobMessage = session.createBlobMessage(file);
51        blobMessage.setStringProperty("FILE.NAME", file.getName());
52        blobMessage.setLongProperty("FILE.SIZE", file.length());
53
54        System.out.println("开始发送文件:" + file.getName() + ",文件大小:"
55                + file.length() + " 字节");
56
57        // 7. 发送文件
58        producer.send(blobMessage);
59        System.out.println("完成文件发送:" + file.getName());
60
61        producer.close();
62        session.close();
63        connection.close(); // 不关闭 Connection, 程序则不退出
64    }
65}
3. 编写接收文件的程序 FileReceiver.java
 1package com.unmi.jms;
 2
 3import java.io.*;
 4import javax.jms.*;
 5import javax.jms.Message;
 6import javax.swing.*;
 7import org.apache.activemq.*;
 8
 9public class FileReciever {
10
11    /**
12     * @param args
13     * @throws JMSException
14     */
15    public static void main(String[] args) throws JMSException {
16
17        // 获取 ConnectionFactory
18        ConnectionFactory connectionFactory = new ActiveMQConnectionFactory(
19                "tcp://10.80.38.10:61616");
20
21        // 创建 Connection
22        Connection connection = connectionFactory.createConnection();
23        connection.start();
24
25        //  创建 Session
26        Session session = connection.createSession(false,Session.AUTO_ACKNOWLEDGE);
27
28        // 创建 Destinatione
29        Destination destination = session.createQueue("File.Transport");
30
31        // 创建 Consumer
32        MessageConsumer consumer = session.createConsumer(destination);
33
34        // 注册消息监听器,当消息到达时被触发并处理消息
35        consumer.setMessageListener(new MessageListener() {
36
37            // 监听器中处理消息
38            public void onMessage(Message message) {
39                if (message instanceof BlobMessage) {
40                    BlobMessage blobMessage = (BlobMessage) message;
41                    try {
42                        String fileName = blobMessage.getStringProperty("FILE.NAME");
43                        System.out.println("文件接收请求处理:" + fileName + ",文件大小:"
44                                + blobMessage.getLongProperty("FILE.SIZE")+ " 字节");
45
46                        JFileChooser fileChooser = new JFileChooser();
47                        fileChooser.setDialogTitle("请指定文件保存位置");
48                        fileChooser.setSelectedFile(new File(fileName));
49                        if (fileChooser.showSaveDialog(null) == JFileChooser.APPROVE_OPTION) {
50                            File file = fileChooser.getSelectedFile();
51                            OutputStream os = new FileOutputStream(file);
52
53                            System.out.println("开始接收文件:" + fileName);
54                            InputStream inputStream = blobMessage.getInputStream();
55
56                            //写文件,你也可以使用其他方式
57                            byte[] buff = new byte[256];
58                            int len = 0;
59                            while ((len = inputStream.read(buff)) > 0) {
60                                os.write(buff, 0, len);
61                            }
62
63                            os.close();
64                            System.out.println("完成文件接收:" + fileName);
65                        }
66
67                    } catch (Exception e) {
68                        e.printStackTrace();
69                    }
70                }
71            }
72        });
73    }
74}
4. 运行程序
先执行 FileReceiver 程序来监听消息
再执行发送程序 FileSender,将会提示你选择一个要传送的文件(上图左边),确定后就会把文件发送到 ActiveMQ 服务器上
接收端 FileReceiver 监听到有文件传过来的消息后,会自动弹出保存文件的对话框,要你选择保存位置(上图右边),文件名能保持一致。确定后就开始接收文件,存到指定的位置。
如果设置 producer.setDeliveryMode(DeliveryMode.PERSISTENT); 消息持久性的话,发送方传文件的时候,接收方可以不在线,文件会暂存在 ActiveMQ 服务器上,等到接收程序上线后仍然可以收到发过来的文件。
参考:1. A problem with blobmessage on activemq 5.0
2. Apache ActiveMQ > Features > Message Features > Blob Messages
3. Apache ActiveMQ > Features > Message Dispatching Features > Async Sends 永久链接 https://yanbin.blog/jms-use-activemq-transfer-file/, 来自 隔叶黄莺 Yanbin's Blog
[版权声明]
本文采用 署名-非商业性使用-相同方式共享 4.0 国际 (CC BY-NC-SA 4.0) 进行许可。