 第二章:装配 Bean
1. <ref>标签中的 bean, local, parent 三个属性的区别(P53)
2. <list><value...</list>和<set><value...</set>可以换着用都可以为 List, Set 以及数组属性赋值(P55)
3. <map>属性用 spring 进行装匹时 key 值只能是字符串类型,不过一般能满足要求(P55)
4. 装配 map 属性要用 <entry key="key1"><value>foo</value></entry>, 而装匹 properties 属性可以写成 <prop key="key1">foo</prop>, 这是因为 properties 的值总是字符串,而 map 中很随意(P55) Read More 在开源的项目中使用 Log4j一般 都是在类中添加一静态变量,如
protected static Log log = LogFactory.getLog(RequestProcessor.class); //通用日志组件
或
protected static Logger log = Logger.getLogger(RequestProcessor.class); //直接申明为Log4j的logger
原来有一个项目是做了一个自定义了 MyLogger 类, 其中的 debug, info 等到方法直接就是调用 log4j 的 logger 的对应方法. 别的代码中调用 MyLogger 的静态方法打印日志时, 依据log4j.properties的配置显示 %l 定位信息就始终是 MyLogger
如: 2007-05-23 12:18:46,828 [DEBUG] com.unmi.MyLogger.debug(MyLogger.java:12) Hello MyLogger Read More WEB 应用中一般都会处理主从表的信息, 或者称之为头层与行层的一对多的关系数据,如订单头/订单明细. 对于这种关系数据提交到后台的 Struts 的 ActionForm 的话, 这个 ActionForm 就要好好的设计一下, 不然会给自已带来许多额外的代码. 比如有的人的处理方法就是把页面提交到后台的毫无关系的散装数据非常吃力的拼凑一对多的关系对象出来.
下面举一个如今非常现实的关于股票的例子, 简单的应用场景是: 记录某个帐户所持有的股票信息,提交到后台,然后显示出来. 输入页面如下图
帐户信息包括帐户名和资金帐号;持有股票的每一行信息包括股票代码, 股票名称, 成本价, 股票数量. 股票行可以动态增删. Read More JDK1.5出来多年了(2004年10月正式发行),就连6.0正式版在 http://java.sun.com上已是赫然在目,紧跟着的各应用服务器和 Java IDE 厂商的都准备就绪. 可是相信很多开发者跟我一样却碍于公司用的是老版本的应用服务器,如WebSphere Application Server,,WebLogic等只能支持到1.4的JDK,要升级应用服务器成本和风险都有担心,所以项目中只能用1.4 的JDK,一直无法体验到 JDK 1.5 的新特性带来的便利.
有些同事机器里一直还是躺着 JDK 1.4,我可能比他们好一点就是直接装了一个 JDK 1.5,然后在 Java IDE 中设置编译器的 Compiler compliance level为 1.4(实质就是javac –target 1.4).这样避免了用JDK1.5编译的Class 放在1.4的JVM中运行出现49.0的字节码版本太高的错误,这样做只不是50步和100步的差距,照例用不了JDK1.5 的新特性. Read More
1select * from person where name = 'unmi'
iBatis 开发指南告诉我们,当 Person 对象的 name 属性不为 null 时启用 name 查询条件在映射文件 person.xml 中的配置为1<select id="getPersonsByName" resultClass="com.unmi.Person"> 2 select id as id,name as name,passwd as passwd from person 3 <dynamic prepend="WHERE"> 4 <isNotNull prepend="AND" property="name"> 5 (name like #name#) 6 </isNotNull> 7 </dynamic> 8</select>
Read More- 用 iBatis 应用程序连接的数据库是 Oracle, 映射文件中的插入语句写成如下形式
1<!-- 插入一条Person对应的记录到数据库中 -->
2<insert id="insertPerson"  parameterClass="com.unmi.Person">
3    INSERT INTO PERSON(ID,NAME,PASSWD) VALUES(#id#,#name#,#passwd#)
4</insert>
Read More - 用Hibernate也有一段时间了,项目中也用过CMP以及.net的DataSet,也想体验一下iBatis的SqlMap方式的魅力了,以前总是看iBatis介绍一的文章,现在应是亲自动手心临其境的时候了。
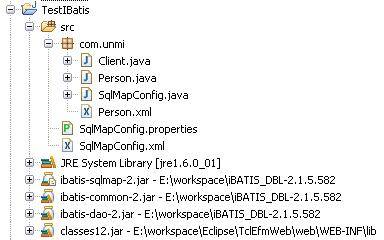 做这个实验基本是遵照 iBATIS SQL Maps 入门教程 中的例子做的,只是在原来的基础上还更简化了一些。
我用的开发工具是 Eclipse,如何建立你的工程和加入相应的 iBatis 包可不详叙。 Read More  Hibernate应用程序部署到WebSphere Application Server 5.1上,使用WAS的连接池,程序在处理了比较多的 session.save(object)操作之后,在执行提交事物 trans.commit()之时出现以下异常
java.lang.NullPointerException
at oracle.jdbc.dbaccess.DBData.clearItem(DBData.java:431)
at oracle.jdbc.dbaccess.DBDataSetImpl.clearItem(DBDataSetImpl.java:3528)
at oracle.jdbc.driver.OraclePreparedStatement.clearParameters(OraclePreparedStatement.java:3401)
at com.ibm.ws.rsadapter.jdbc.WSJdbcConnection.resetStatement(WSJdbcConnection.java:1719) Read More