Python 3.9 新特性回顾
Python 3.10 虽已于 2021/10/04 发布,但目前主要使用的 Python 版本仍然是 3.9。之前有两篇介绍了 Python 3.7 和 3.8 带来的新特性
于此,再补充一下 Python 3.7 和 3.8 各自的发布日期是 2018/06/27 和 2019/10/14。Python 3.9 是在 2020/10/05 发布,由此看出 Python 是每年一发布。
每个版本的主要新特性就是它们的亮点,不关注新特性也就不能很好的掌握这种语言,除非是直接使用汇编或字节码指令,他们的变迁比较缓慢。
对于以 Python 3.9 为现阶段基准版本使用来说,更有必要了解一下 Python 3.9 的新特性,不然别人一见代码就仿佛是以二战时的打法应对现代战争。
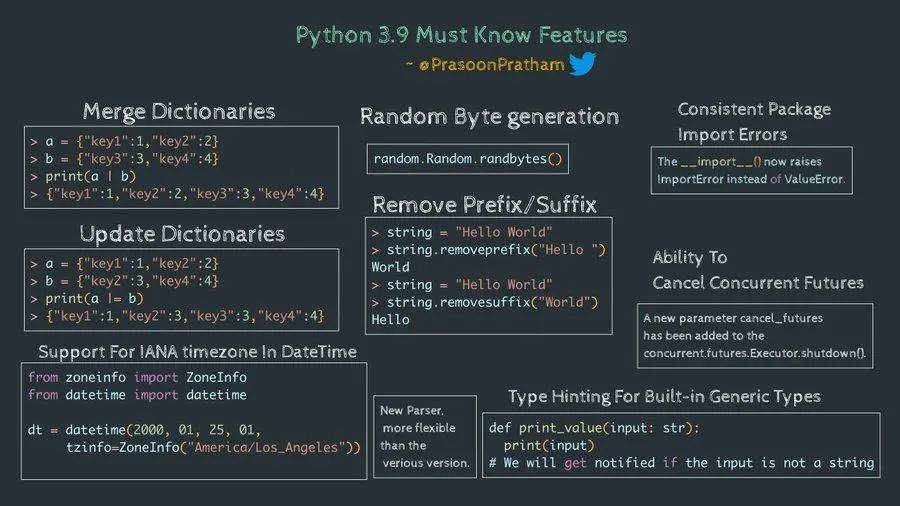
Python 3.9 主要有哪些新特征呢?总结起来就是
字典的更新/合并, 字符串新增删除前/后缀的方法,datetime 支持时区了, Executor.shutdown() 可取消未执行的任务,类型提示可直接用 list[str], dict[str, int] 这样表示泛型
下面那张对于我们快速了解他们有很大的帮助

覆盖规则与集合的并集(|)是一样的。字典并集结果是一个新字典, 不影响原有的字典,字典目前还没有交集(&)与差集(-) 操作。
并集并同时赋值(|=),类似数字的 +=, *= 等操作,字典的 |= 操作就是之前版本的 d1.update(d2) 操作,所以本质上还是并集操作
之前要删除字符串的前缀或后缀,本人是用字符串切片的方式
这在 Python 3.9 中可以通过 mypy
在 Python 3.9 之前的版本运行 mypy 会提示
就是眼看着是 list, dict 却要变换成 List 和 Dict,但在 Python 3.9 不支持泛型的话是可以直接用 list, dict,如
以上代码在 Python 3.7 中可以通过 mypy 的检查。
借机重新复习一下 Python 线程池的行为
执行上面代码的输出类似
开始体验 executor.shutdown() 的 cancel_futures 参数,默认为 False
执行效果
executor.shutdown() 的 wait 搭配 cancel_futures 表示是否等待已开始执行或已提交任务(未开始执行的任务被取消)的结束后再往下执行
实例
类似输出
在 Python 3.8 中
在 Python 3.9 中
更象是修复了一个 Bug
但这样做
希望同时具备参数或返回值的类型与注释特性就要用到 typing.Annotated
Sphinx 可用来生成 Python 的 API 文档, 首先需要安装 sphinx
要了解完整的 Python 3.9 新特性请参见官方的 What's New In Python 3.9 永久链接 https://yanbin.blog/python-3-9-new-features/, 来自 隔叶黄莺 Yanbin's Blog
[版权声明] 本文采用 署名-非商业性使用-相同方式共享 4.0 国际 (CC BY-NC-SA 4.0) 进行许可。
于此,再补充一下 Python 3.7 和 3.8 各自的发布日期是 2018/06/27 和 2019/10/14。Python 3.9 是在 2020/10/05 发布,由此看出 Python 是每年一发布。
每个版本的主要新特性就是它们的亮点,不关注新特性也就不能很好的掌握这种语言,除非是直接使用汇编或字节码指令,他们的变迁比较缓慢。
对于以 Python 3.9 为现阶段基准版本使用来说,更有必要了解一下 Python 3.9 的新特性,不然别人一见代码就仿佛是以二战时的打法应对现代战争。
Python 3.9 主要有哪些新特征呢?总结起来就是
字典的更新/合并, 字符串新增删除前/后缀的方法,datetime 支持时区了, Executor.shutdown() 可取消未执行的任务,类型提示可直接用 list[str], dict[str, int] 这样表示泛型
下面那张对于我们快速了解他们有很大的帮助

字典的并集
Python 的集合(set) 有交集(&), 并集(|), 和差集(-) 操作,在 3.9 中两个字典也能进行并集操作,有相同的键的话,右边覆盖左边的值1>>> d1 = {'a': 1, 'b': 2}
2>>> d2 = {'a': 5, 'c': 3}
3>>> d1 | d2
4{'a': 5, 'b': 2, 'c': 3}
5>>> d2 | d1
6{'a': 1, 'c': 3, 'b': 2}并集并同时赋值(|=),类似数字的 +=, *= 等操作,字典的 |= 操作就是之前版本的 d1.update(d2) 操作,所以本质上还是并集操作
1>>> d1 = {'a': 1, 'b': 2}
2>>> d2 = {'a': 5, 'c': 3}
3>>> d1 |= d2
4>>> d1
5{'a': 5, 'b': 2, 'c': 3}
d1 |= d2 相当于 d1 = d 1 | d2, 也就是 d1.update(d2) 的新写法br/>删除字符串前缀和后缀的方法
Python 3.9 新加了 str.removeprefix(prefix) 和 str.removesuffix(suffix) 两个方法1>>> 's3://bucket_one/data.zip'.removeprefix('s3://')
2'bucket_one/data.zip'
3>>> 's3://bucket_one/data.zip'.removesuffix('data.zip')
4's3://bucket_one/'1>>> 's3://bucket_one/data.zip'[-len('data.zip'):]
2'data.zip'
3>>> 's3://bucket_one/data.zip'[0: -len('data.zip'):]
4's3://bucket_one/'更简单的泛型类型提示
Python 3.9 对于集合的泛型可以直接用 list[str], dict[str, str] 形式1def f1(names: list[str]):
2 print(names)<br/><br/>
3
4def f2(names: dict[str, int]):
5 pass在 Python 3.9 之前的版本运行 mypy 会提示
test.py:1: error: "list" is not subscriptable, use "typing.List" instead所以需要改成
test.py:5: error: "dict" is not subscriptable, use "typing.Dict" instead
Found 2 errors in 1 file (checked 1 source file)
1from typing import List, Dict
2
3
4def f1(names: List[str]):
5    print(names)
6
7
8def f2(names: Dict[str, int]):
9 pass1def f1(names: list):
2 print(names)
3
4
5def f2(names: dict):
6 passDateTime 新增时区支持
Python 3.9 之前支持时区要用一个第三方的pytz 库,而现在有了 zoneinfo 模块,不再需要 pytz 了1>>> from zoneinfo import ZoneInfo
2>>> from datetime import datetime
3>>> dt = datetime(2020, 10, 31, 12, tzinfo=ZoneInfo("America/Chicago"))
4>>> dt
5datetime.datetime(2020, 10, 31, 12, 0, tzinfo=zoneinfo.ZoneInfo(key='America/Chicago'))
6>>> dt.tzname()
7'CDT'shutdown() Executor 时可取消待处理任务
在 Python 3.9 中,Executor(包括 ThreadPoolExecutor 和 ProcessPoolExecutor) 的 shutdown() 方法只有一个参数 wait=True|False。该参数的意义只代表 shutdown() 函数是同步还是异步调用,总是会等待所有任务结束再停止进程。借机重新复习一下 Python 线程池的行为
 1import time
 2from concurrent.futures import ThreadPoolExecutor as Executor
 3from sys import stdout as console
 4
 5
 6def task(num):
 7    time.sleep(2)
 8    console.write(f'task {num} done\n')
 9
10
11if __name__ == '__main__':
12    executor = Executor(3)
13
14    for i in range(1, 5):
15        executor.submit(task, i)
16
17    executor.shutdown(wait=False)
18 console.write('here\n')here几点说明:
task 1 done
task 3 done
task 2 done
task 4 done
- 把上面的 executor.shutdown(wait=False) 去掉的行为也是一样的,所有任务执行完后,程序能正常退出。因为线程池中线程的 Daemon 是 False, 这和 Java 的 ThreadPoolExecutor 不一样,不 shutdown 是不结束进程的
- executor.shutdown() 后不能再提交新任务了,这与 Java 的线程池是一样的
- 把 ThreadPoolExecutor 换成 ProcessPoolExecutor 也是一样的输出,但使用 ProcessPoolExecutor 时,执行代码一定要放到
if __name__ == '__main__'中 - 用 sys.stdout.write() 代替 print 来输出内容到控制台是为了避免多线程环境下不同线程的 print 会输出到同一行中,因为 print 是类似于异步操作,除非用锁
executor.shutdown(wait=True) # 默认为 True后的输出为
task 1 done即 executor.shutdown(wait=True) 等待所有的任务完成后再执行,all done
task 3 done
task 2 done
task 4 done
here
开始体验 executor.shutdown() 的 cancel_futures 参数,默认为 False
1executor.shutdown(wait=True, cancel_futures=True)task 1 done解释:因为线程池的大小为 3, 在执行 shutdown() 时已有三个任务开始执行,所以上面的 shutdown() 会等待所已被执行任务结束,但取消在队列中等待的任务。
task 2 done
task 3 done
here
executor.shutdown() 的 wait 搭配 cancel_futures 表示是否等待已开始执行或已提交任务(未开始执行的任务被取消)的结束后再往下执行
random.Random.randbytes() 生成字节
以往要生成随机字符串要用os.urandom(size), os.getrandom(size)(Linux 下才有的方法), 或 secrets.token_bytes(size), 但他们是伪随机数,想要得到随机数需自行加入种子,现在有了 random.Random.randbytes() 就变得轻松一些了实例
1from random import Random<br/><br/>
2
3random = Random()
4print(random.randbytes(10))b'\x9f\x12 \x15%\xb4\x8e\xcat\x13'
"".replace("", s, n) 的返回值
直接看例子在 Python 3.8 中
1>>> "".replace("", 's', 1)
2''
3>>> "".replace("", 's')
4's'1>>> "".replace("", 's', 1)
2's'
3>>> "".replace("", 's')
4's'typing.Annotated 类型提示
这一特性也有必要感受一下,它对于写偏静态语言代码风格有很大的帮助。Python 3.0 最早给变量或函数的返回值加提示时可以用任意的字符串,更像是个注释,像这样1def speed(distance: 'feet', time: 'seconds') -> 'miles per hour':
2 passmypy 就不干了$ mypy test.py test.py:1: error: Name "feet" is not defined test.py:1: error: Name "seconds" is not defined test.py:1: error: Invalid type comment or annotation Found 3 errors in 1 file (checked 1 source file)要想混过
mypy 这一关,必须是明确的已知类型,如1def speed(distance: float, time: float) -> float:
2 pass1from typing import Annotated
2
3def speed(distance: Annotated[float, 'feet'], time: Annotated[float, 'seconds'])\
4 -> Annotated[float, 'miles per hour']:
5 pass
6
7speed(2.1, 3)mypy test.py 没问题,但是把最后一行写成1speed(2.1, '3')mypy 就不干了test.py:9: error: Argument 2 to "speed" has incompatible type "str"; expected "float"Annotated 与 Sphinx 文档
Found 1 error in 1 file (checked 1 source file)
Sphinx 可用来生成 Python 的 API 文档, 首先需要安装 sphinx
pip install sphinx然后就可以用 Sphinx 的命令。下面是一个实际生成 Sphinx 文档的例子
- 创建文件 test.py,内容为
1from typing import Annotated 2 3def speed(distance: Annotated[float, 'feet'], time: Annotated[float, 'seconds'])\ 4 -> Annotated[float, 'miles per hour']: 5 pass - 在命令行中,进到 test.py 文件所在目录下,执行
sphinx-apidoc -fF -o docs ./
会在当前目录中生成 docs 目录 - 编辑 docs/conf.py 文件, 去掉其下三行前的注释启用它们上面是启用后的代码,假设 test.py 所在的目录是 /Users/yanbin/demo。或者写成
1import os 2import sys 3sys.path.insert(0, '/Users/yanbin/demo')如果前面未生成 docs 目录而是用的1import os 2import sys 3sys.path.insert(0, os.path.abspath('../'))sphinx-apidoc -fF -o ./ ./命令的话就无需动 conf.py 文件 - 再回到命令行容器,进到 docs 目录,并执行
make html
注:如果是中途有改动 docs/conf.py 文件,记得在 make html 之前执行 make clean, 或用 make clean html 相继执行,否则输出或达不到我们的预期
就会生成相应的 html 文档,我们可以打开 file:///Users/yanbin/demo/docs/_build/html/test.html, 看到的就是
feet 和 seconds 在文档中表现不出来。要了解完整的 Python 3.9 新特性请参见官方的 What's New In Python 3.9 永久链接 https://yanbin.blog/python-3-9-new-features/, 来自 隔叶黄莺 Yanbin's Blog
[版权声明]
 本文采用 署名-非商业性使用-相同方式共享 4.0 国际 (CC BY-NC-SA 4.0) 进行许可。