使用 Spring 的 gRPC 服务
人们在跨语言, 跨进程通信方面采用过不少的方案, 交换文件, CORBA, SOAP, 最后得到最广泛应用的是 RESTful API, 交换格式通常用文本格式的 JSON 和 XML. 但作为更高效的通信还是二进制格式, 在 Java 方面, 有过 Java 内置的 RMI, Spring 的 Hessian, Dubbo. 而发展到今天 gRPC 受到了更多的关注, gRPC 的通信协议是 HTTP/2, 编码格式是 Google 高效的 Protobuf.
gRPC 是由 Google 发起的一个远程调用框架, 是 gRPC Remote Procedure Calls 的缩写, 各处的解释是 g 最初是代表 Google, 现在只是像 YAML Ain't Markup Language 类似的命名, 说 g 不再代表 Google, 怎么听起来有点 既要又要的感觉, 怎么都会认为 gRPC 为 Google 的 RPC.
总之, gRPC 是一个高性能的开源统一的 RPC 框架, 能叫做统一是因为它支持多种语方, 如 Go, C++, Java, Python, Node, C#, PHP 等, 多语言支持是 由 Protobuf 格式决定的, 总之它是 Protobuf over HTTP/2, 实现上是用 Protobuf 定义数据结构与服务方法, 再映射成不同语言的代码实现. gRPC 已然成为了 RPC 的标准, 真正意识到它的不一般是在 Postman 中发现了它, 可见其在业界受不到了应用的重视.
本文来体验在 Java Spring 中如何应用 gRPC, 用 Spring 实现的服务端, 客户端, 并用 Postman 和 grpcurl 进行测试.
在 spring initializr 要选择 SpringBoot 4 才能选择 gRPC 依赖, Spring gRPC Server 或 Spring gRPC Client.
如果用 Maven 的, 选择这两个依赖后, 在 pom.xml 中对应的依赖是
1    <dependency>
2      <groupId>org.springframework.grpc</groupId>
3      <artifactId>spring-grpc-client-spring-boot-starter</artifactId>
4    </dependency>
5    <dependency>
6      <groupId>org.springframework.grpc</groupId>
7      <artifactId>spring-grpc-server-spring-boot-starter</artifactId>
8    </dependency>
在 SpringBoot 4 之前要用 gRPC 的话, 要使用如下依赖(无法用 Spring initializr 为 SpringBoot 3 选择 gRPC)
 1<dependency>
 2    <groupId>net.devh</groupId>
 3    <artifactId>grpc-server-spring-boot-starter</artifactId>
 4    <version>3.1.0.RELEASE</version>
 5    <scope>compile</scope>
 6</dependency>
 7<dependency>
 8<groupId>net.devh</groupId>
 9    <artifactId>grpc-client-spring-boot-starter</artifactId>
10    <version>3.1.0.RELEASE</version>
11    <scope>compile</scope>
12</dependency>
Spring gRPC 的官方文档 Getting Started 是这个, 当前版本 是 1.1.0-M1, 却没有正式版本 1.0.2 的文档, 这个 M1 版本的 Maven 依赖的 group 又变了
1<dependency>
2	<groupId>org.springframework.boot</groupId>
3	<artifactId>spring-boot-starter-grpc-server</artifactId>
4</dependency>
本文实例基于 spring initializr, 选择 Maven, Java 25, Spring Boot 4.0.5, 再选择依赖
Spring gRPC Server 和 Spring gRPC Client 生成的 pom.xml, 然后创建相应的 proto, gRPC 的服务与客户端代码.
整个代码目录结构是
 1test-grpc/
 2├── pom.xml
 3└── src
 4    └── main
 5        ├── java
 6        │   └── com
 7        │       └── example
 8        │           └── testgrpc
 9        │               ├── client
10        │               │   ├── GrpcClientConfig.java
11        │               │   ├── HelloGrpcClient.java
12        │               │   └── RunGrpcClient.java
13        │               └── server
14        │                   ├── HelloGrpcService.java
15        │                   └── StartGrpcServer.java
16        ├── proto
17        │   └── hello.proto
18        └── resources
19            └── application.properties
下面列出完整的代码
pom.xml
 1<?xml version="1.0" encoding="UTF-8"?>
 2<project xmlns="http://maven.apache.org/POM/4.0.0" xmlns:xsi="http://www.w3.org/2001/XMLSchema-instance"
 3         xsi:schemaLocation="http://maven.apache.org/POM/4.0.0 https://maven.apache.org/xsd/maven-4.0.0.xsd">
 4    <modelVersion>4.0.0</modelVersion>
 5    <parent>
 6        <groupId>org.springframework.boot</groupId>
 7        <artifactId>spring-boot-starter-parent</artifactId>
 8        <version>4.0.5</version>
 9        <relativePath/> <!-- lookup parent from repository -->
10    </parent>
11    <groupId>com.example</groupId>
12    <artifactId>test-grpc</artifactId>
13    <version>0.0.1-SNAPSHOT</version>
14    <name>test-grpc</name>
15    <description>test-grpc</description>
16    <properties>
17        <java.version>25</java.version>
18        <grpc.version>1.77.1</grpc.version>
19        <protobuf-java.version>4.33.4</protobuf-java.version>
20        <spring-grpc.version>1.0.2</spring-grpc.version>
21    </properties>
22    <dependencyManagement>
23        <dependencies>
24            <dependency>
25                <groupId>org.springframework.grpc</groupId>
26                <artifactId>spring-grpc-dependencies</artifactId>
27                <version>${spring-grpc.version}</version>
28                <type>pom</type>
29                <scope>import</scope>
30            </dependency>
31        </dependencies>
32    </dependencyManagement>
33    <dependencies>
34        <dependency>
35            <groupId>io.grpc</groupId>
36            <artifactId>grpc-services</artifactId>
37        </dependency>
38        <dependency>
39            <groupId>com.google.protobuf</groupId>
40            <artifactId>protobuf-java</artifactId>
41        </dependency>
42        <dependency>
43            <groupId>org.springframework.grpc</groupId>
44            <artifactId>spring-grpc-client-spring-boot-starter</artifactId>
45        </dependency>
46        <dependency>
47            <groupId>org.springframework.grpc</groupId>
48            <artifactId>spring-grpc-server-spring-boot-starter</artifactId>
49        </dependency>
50
51        <dependency>
52            <groupId>org.springframework.boot</groupId>
53            <artifactId>spring-boot-starter-test</artifactId>
54            <scope>test</scope>
55        </dependency>
56        <dependency>
57            <groupId>org.springframework.grpc</groupId>
58            <artifactId>spring-grpc-test</artifactId>
59            <scope>test</scope>
60        </dependency>
61    </dependencies>
62    <build>
63        <plugins>
64            <plugin>
65                <groupId>io.github.ascopes</groupId>
66                <artifactId>protobuf-maven-plugin</artifactId>
67                <version>4.0.3</version>
68                <configuration>
69                    <protoc>${protobuf-java.version}</protoc>
70                    <binaryMavenPlugins>
71                        <binaryMavenPlugin>
72                            <groupId>io.grpc</groupId>
73                            <artifactId>protoc-gen-grpc-java</artifactId>
74                            <version>${grpc.version}</version>
75                            <options>@generated=omit</options>
76                        </binaryMavenPlugin>
77                    </binaryMavenPlugins>
78                </configuration>
79                <executions>
80                    <execution>
81                        <id>generate</id>
82                        <goals>
83                            <goal>generate</goal>
84                        </goals>
85                    </execution>
86                </executions>
87            </plugin>
88            <plugin>
89                <groupId>org.springframework.boot</groupId>
90                <artifactId>spring-boot-maven-plugin</artifactId>
91            </plugin>
92        </plugins>
93    </build>
94
95</project>
其中除了 gRPC server/client 依赖外, 在 build/plugins 中还配置了由 proto 服务定义文件生成 Java 代码的插件.
hello.proto
 1syntax = "proto3";
 2
 3package hello;
 4
 5option java_package = "com.example.testgrpc.proto";
 6option java_outer_classname = "HelloProto";
 7option java_multiple_files = true;
 8
 9message HelloRequest {
10  string name = 1;
11}
12
13message HelloResponse {
14  string message = 1;
15  int64 timestamp = 2;
16}
17
18service HelloService {
19  rpc SayHello (HelloRequest) returns (HelloResponse);
20
21  rpc SayHelloStream (HelloRequest) returns (stream HelloResponse);
22}
在 hello.proto 文件中不仅定义了数据结果, 还有两个服务方法. 分别是 SayHello 和 SayHelloStream, 前者是普通的请求响应, 后者是服务端流式响应.
如果我们此时执行mvn generate-sources, 或者 mvn compile 的话, 就会在 target/generated-sources 目录中生成相应的 Java 代码文件
 1target/generated-sources
 2└── protobuf
 3    └── com
 4        └── example
 5            └── testgrpc
 6                └── proto
 7                    ├── HelloProto.java
 8                    ├── HelloRequest.java
 9                    ├── HelloRequestOrBuilder.java
10                    ├── HelloResponse.java
11                    ├── HelloResponseOrBuilder.java
12                    └── HelloServiceGrpc.java
HelloGrpcService.java
 1package com.example.testgrpc.server;
 2
 3import com.example.testgrpc.proto.HelloRequest;
 4import com.example.testgrpc.proto.HelloResponse;
 5import com.example.testgrpc.proto.HelloServiceGrpc;
 6import io.grpc.stub.StreamObserver;
 7import org.springframework.stereotype.Service;
 8
 9@Service
10public class HelloGrpcService extends HelloServiceGrpc.HelloServiceImplBase {
11
12    @Override
13    public void sayHello(HelloRequest request, StreamObserver<HelloResponse> responseObserver) {
14        HelloResponse response = HelloResponse.newBuilder()
15                .setMessage("Hello, " + request.getName() + "!")
16                .setTimestamp(System.currentTimeMillis())
17                .build();
18
19        responseObserver.onNext(response);
20        responseObserver.onCompleted();
21    }
22
23    @Override
24    public void sayHelloStream(HelloRequest request, StreamObserver<HelloResponse> responseObserver) {
25        for (int i = 1; i <= 5; i++) {
26            HelloResponse response = HelloResponse.newBuilder()
27                    .setMessage("Hello " + request.getName() + " - #" + i + " message")
28                    .setTimestamp(System.currentTimeMillis())
29                    .build();
30            responseObserver.onNext(response);
31
32            try {
33                Thread.sleep(500);
34            } catch (InterruptedException e) {
35                Thread.currentThread().interrupt();
36            }
37        }
38        responseObserver.onCompleted();
39    }
40}
实现了两个服务方法.
StartGrpcServer.java
 1package com.example.testgrpc.server;
 2
 3import org.springframework.boot.SpringApplication;
 4import org.springframework.boot.autoconfigure.SpringBootApplication;
 5
 6@SpringBootApplication
 7public class StartGrpcServer {
 8
 9    public static void main(String[] args) {
10        SpringApplication.run(StartGrpcServer.class, args);
11    }
12}
这是一个 SpringBoot 的启动类, 运行后会启动 gRPC 服务.
启动 gRPC 服务
可在 IDE 中运行 StartGrpcServer, 下面用 mvn 命令的方式来启动它
1mvn spring-boot:run -Dspring-boot.run.main-class=com.example.testgrpc.server.StartGrpcServer
因为后面还会有一个 gRPC 客户端的 main class, 所以这里用 -Dspring-boot.run.main-class 来指定要运行的 main class.
启动后控制台输出如下
12026-03-29 12:20:01.578 | INFO  | StartGrpcServer | No active profile set, falling back to 1 default profile: "default"
22026-03-29 12:20:01.778 | INFO  | NettyGrpcServerFactory | Registered gRPC service: hello.HelloService
32026-03-29 12:20:01.778 | INFO  | NettyGrpcServerFactory | Registered gRPC service: grpc.reflection.v1.ServerReflection
42026-03-29 12:20:01.778 | INFO  | NettyGrpcServerFactory | Registered gRPC service: grpc.health.v1.Health
52026-03-29 12:20:01.815 | INFO  | GrpcServerLifecycle | gRPC Server started, listening on address: [/[0:0:0:0:0:0:0:0]:9090]
62026-03-29 12:20:01.816 | INFO  | StartGrpcServer | Started StartGrpcServer in 0.342 seconds (process running for 0.452)
从这里看到 gRPC 除了启动在 hello.proto 中定义的 HelloService 服务外, 还注册了 grpc.reflection.v1.ServerReflection 和
grpc.health.v1.Health 两个服务, 前者是为了让客户端能够通过反射来查询服务信息, 后者是为了提供健康检查的接口. gRPC 服务默认监听在 9090 端口上.
该端口号可在 application.properties 中通过 spring.grpc.server.port=9090 来配置, 如
1spring.grpc.server.port=9091
测试 gRPC 服务
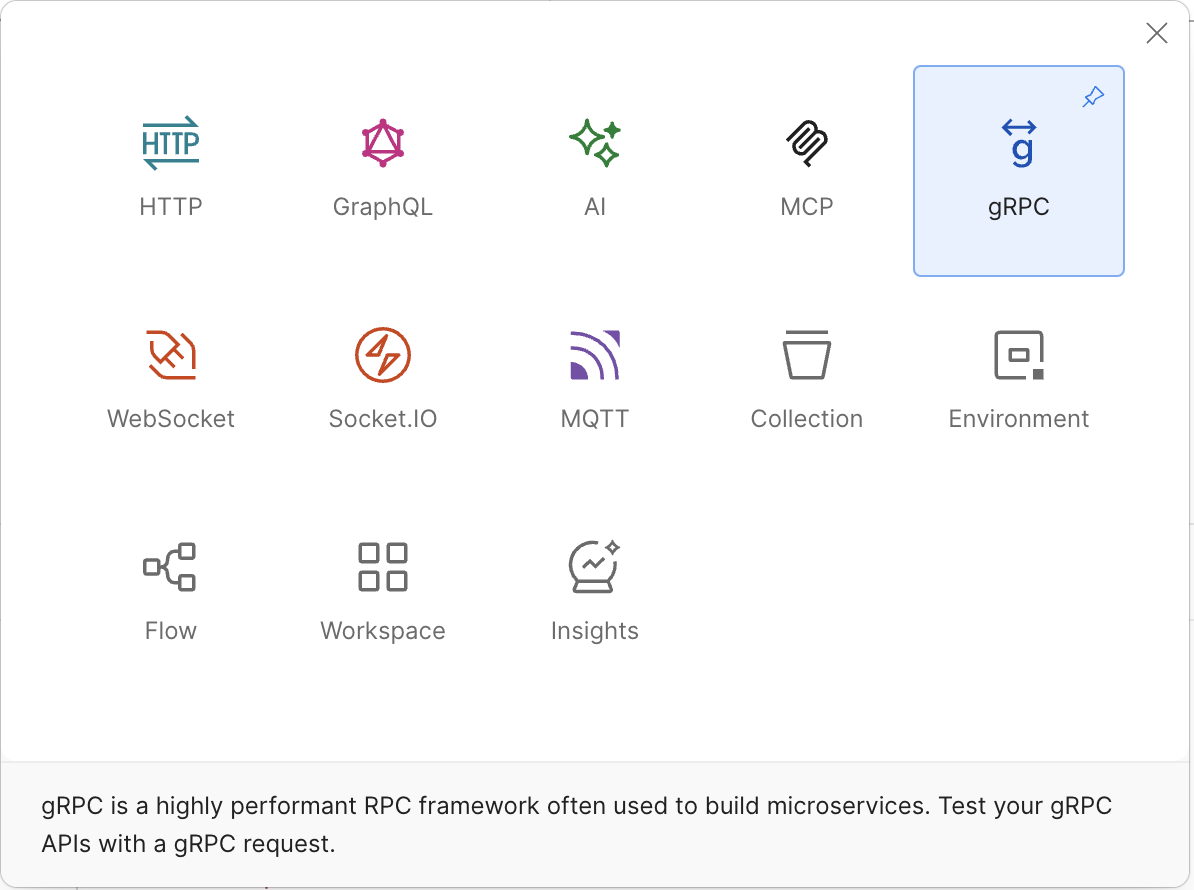
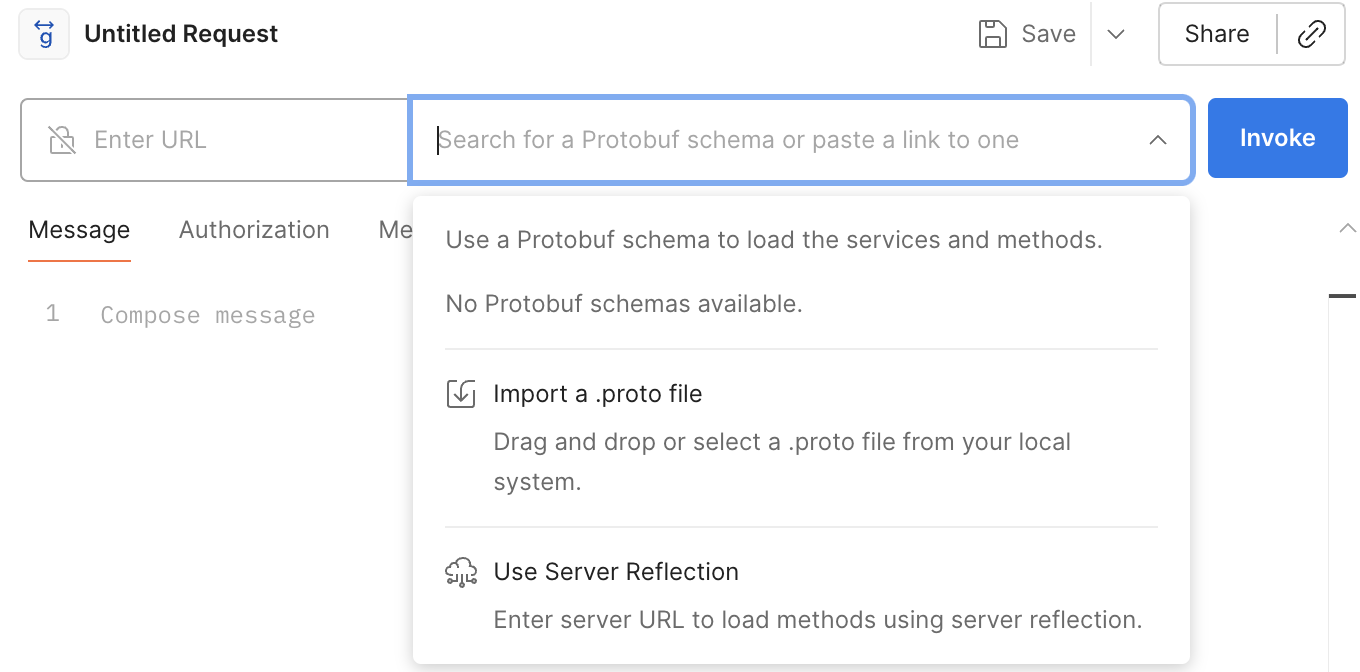
现在 gRPC 服务已经启动了, 可以用 Postman 来测试它. 在 Postman 中创建一个新的请求, 选择 gRPC 类型, 没输入 URL 之前, 右侧下拉可以看到
两个发现 gRPC 服务的方式, 1) Import .proto file, 2) Use Server Reflection
可以选择第一种方式, 直接导入 hello.proto 文件, 就会列出在其中定义的两个服务
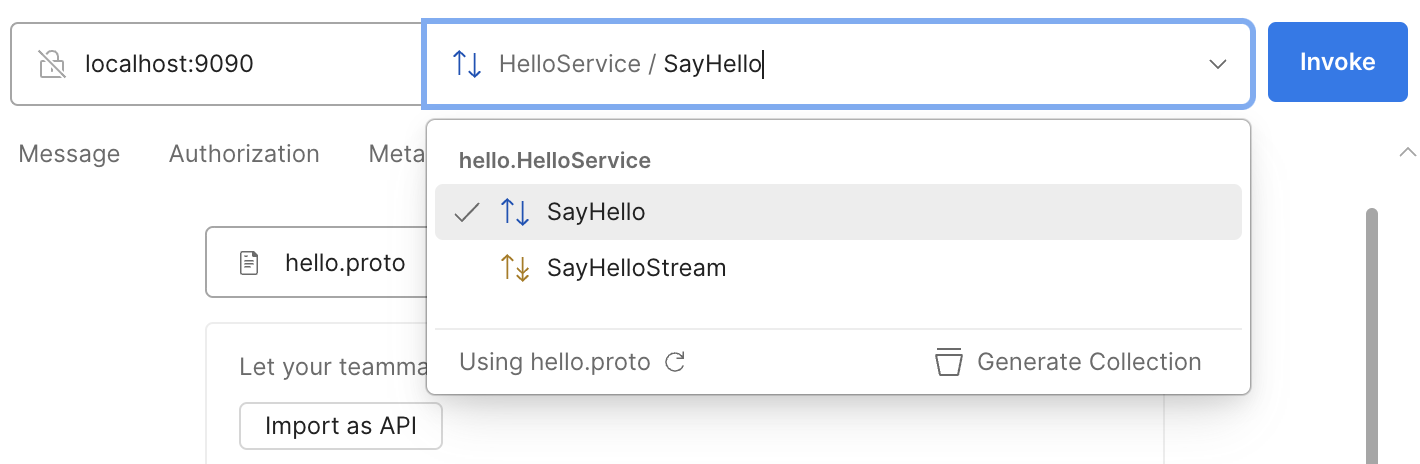
再输入 URL localhost:9090 就能开始测试了.
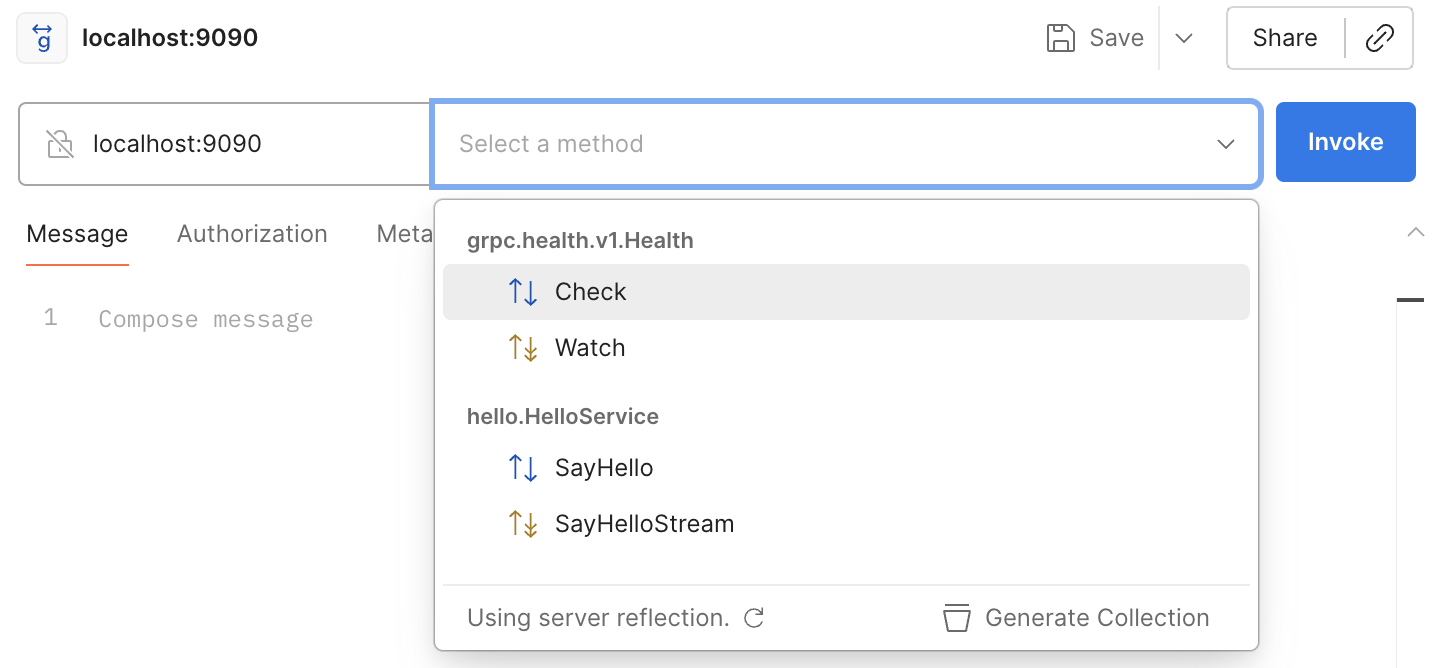
或者选择第二种方式, 在前面启动 gRPC 服务时我们看到控制台输出说启动了 ServerReflection 服务, 需要事先输入 URL localhost:9090, 然后在
Select a method 中点击下拉框就会列出 gRPC 服务中注册的所有方法了, 不仅包括 hello.proto 中定义的 hello.HelloService.SayHello
和 hello.HelloService.SayHelloStream 服务方法, 还包括 grpc.health.v1.Health.Check 和 grpc.health.v1.Health.Watch 两个服务的方法.
不管是哪一种发现服务的方式, 我们现在还测试一下 hello.HelloService.SayHello 方法, 选择它后, 在请求体中输入如下 JSON 数据
1{
2  "name": "World"
3}
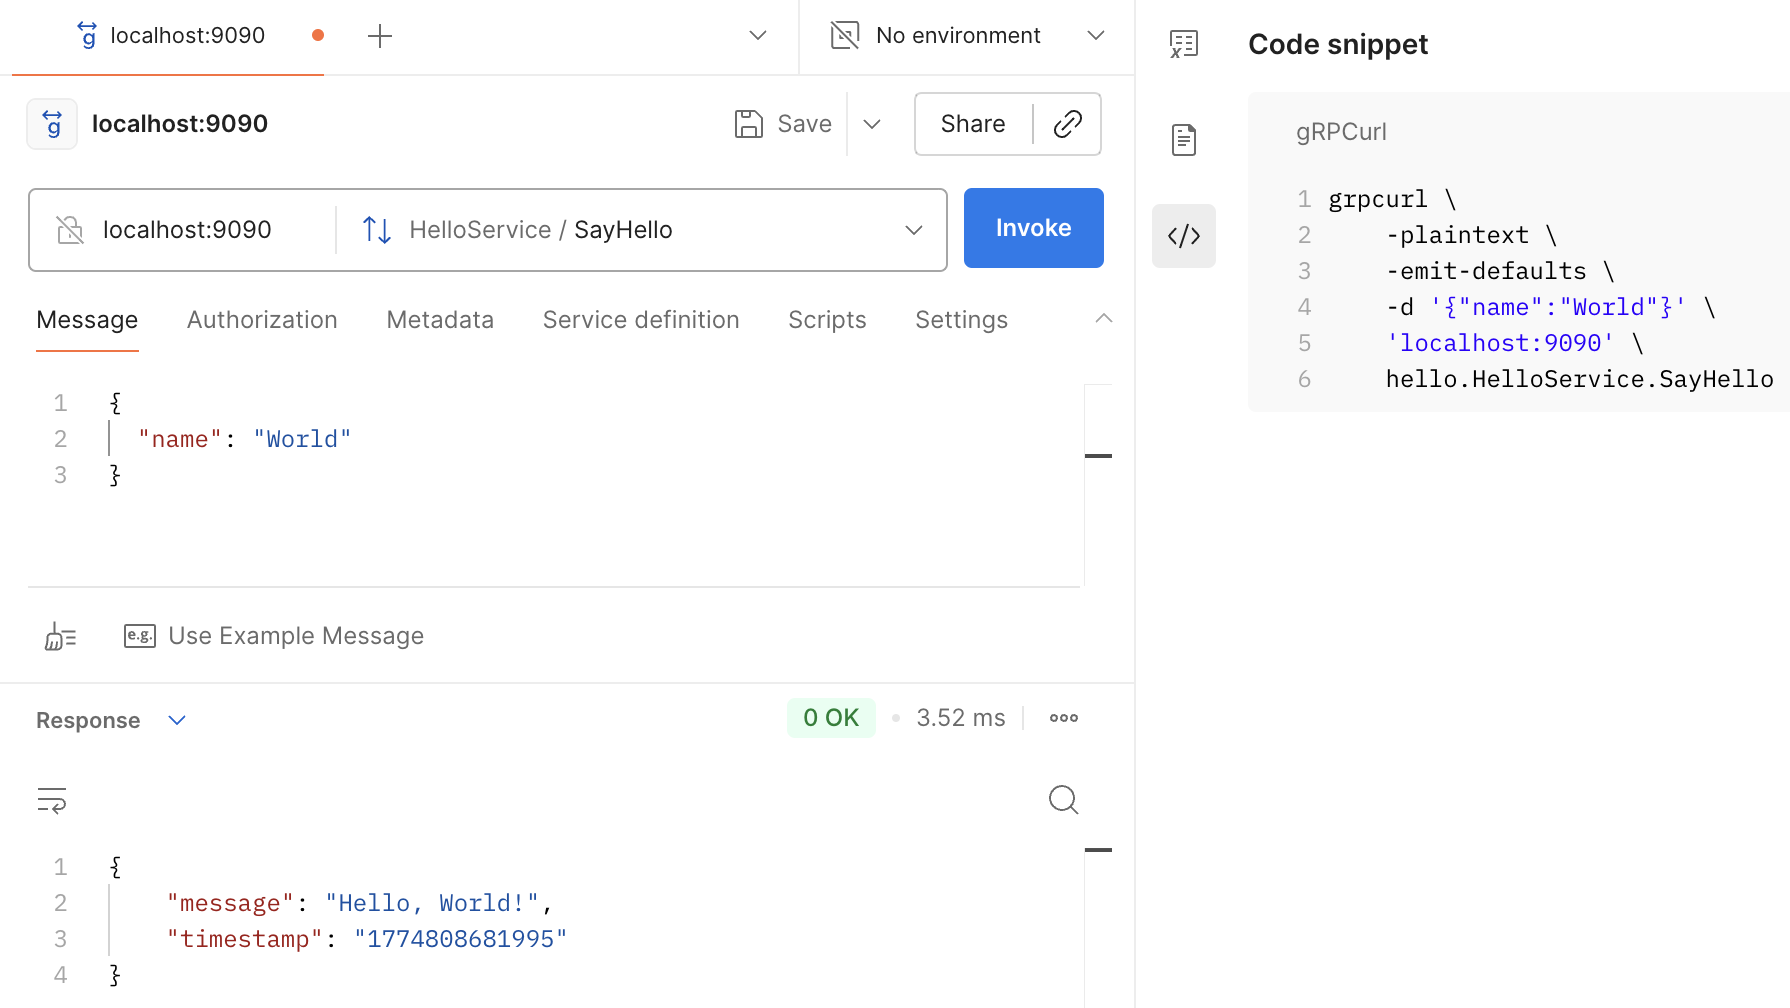
还有一个 grpcurl 命令行工具可用来测试 gRPC 服务, 正如从上图的右侧 Postman 显示出来的 gRPCurl 命令, 下面用 grpcurl 来测试
1grpcurl -plaintext -d '{"name":"World"}' localhost:9090 hello.HelloService/SayHello
输出结果如下
1{
2  "message": "Hello, World!",
3  "timestamp": "1774806359051"
4}
观察通信网络包
用 Wireshark 来观察 gRPC 的通信网络包, 过滤条件是 tcp.port == 9090, 可以看到 gRPC 的通信协议是 HTTP/2, 编码格式是 Protobuf.
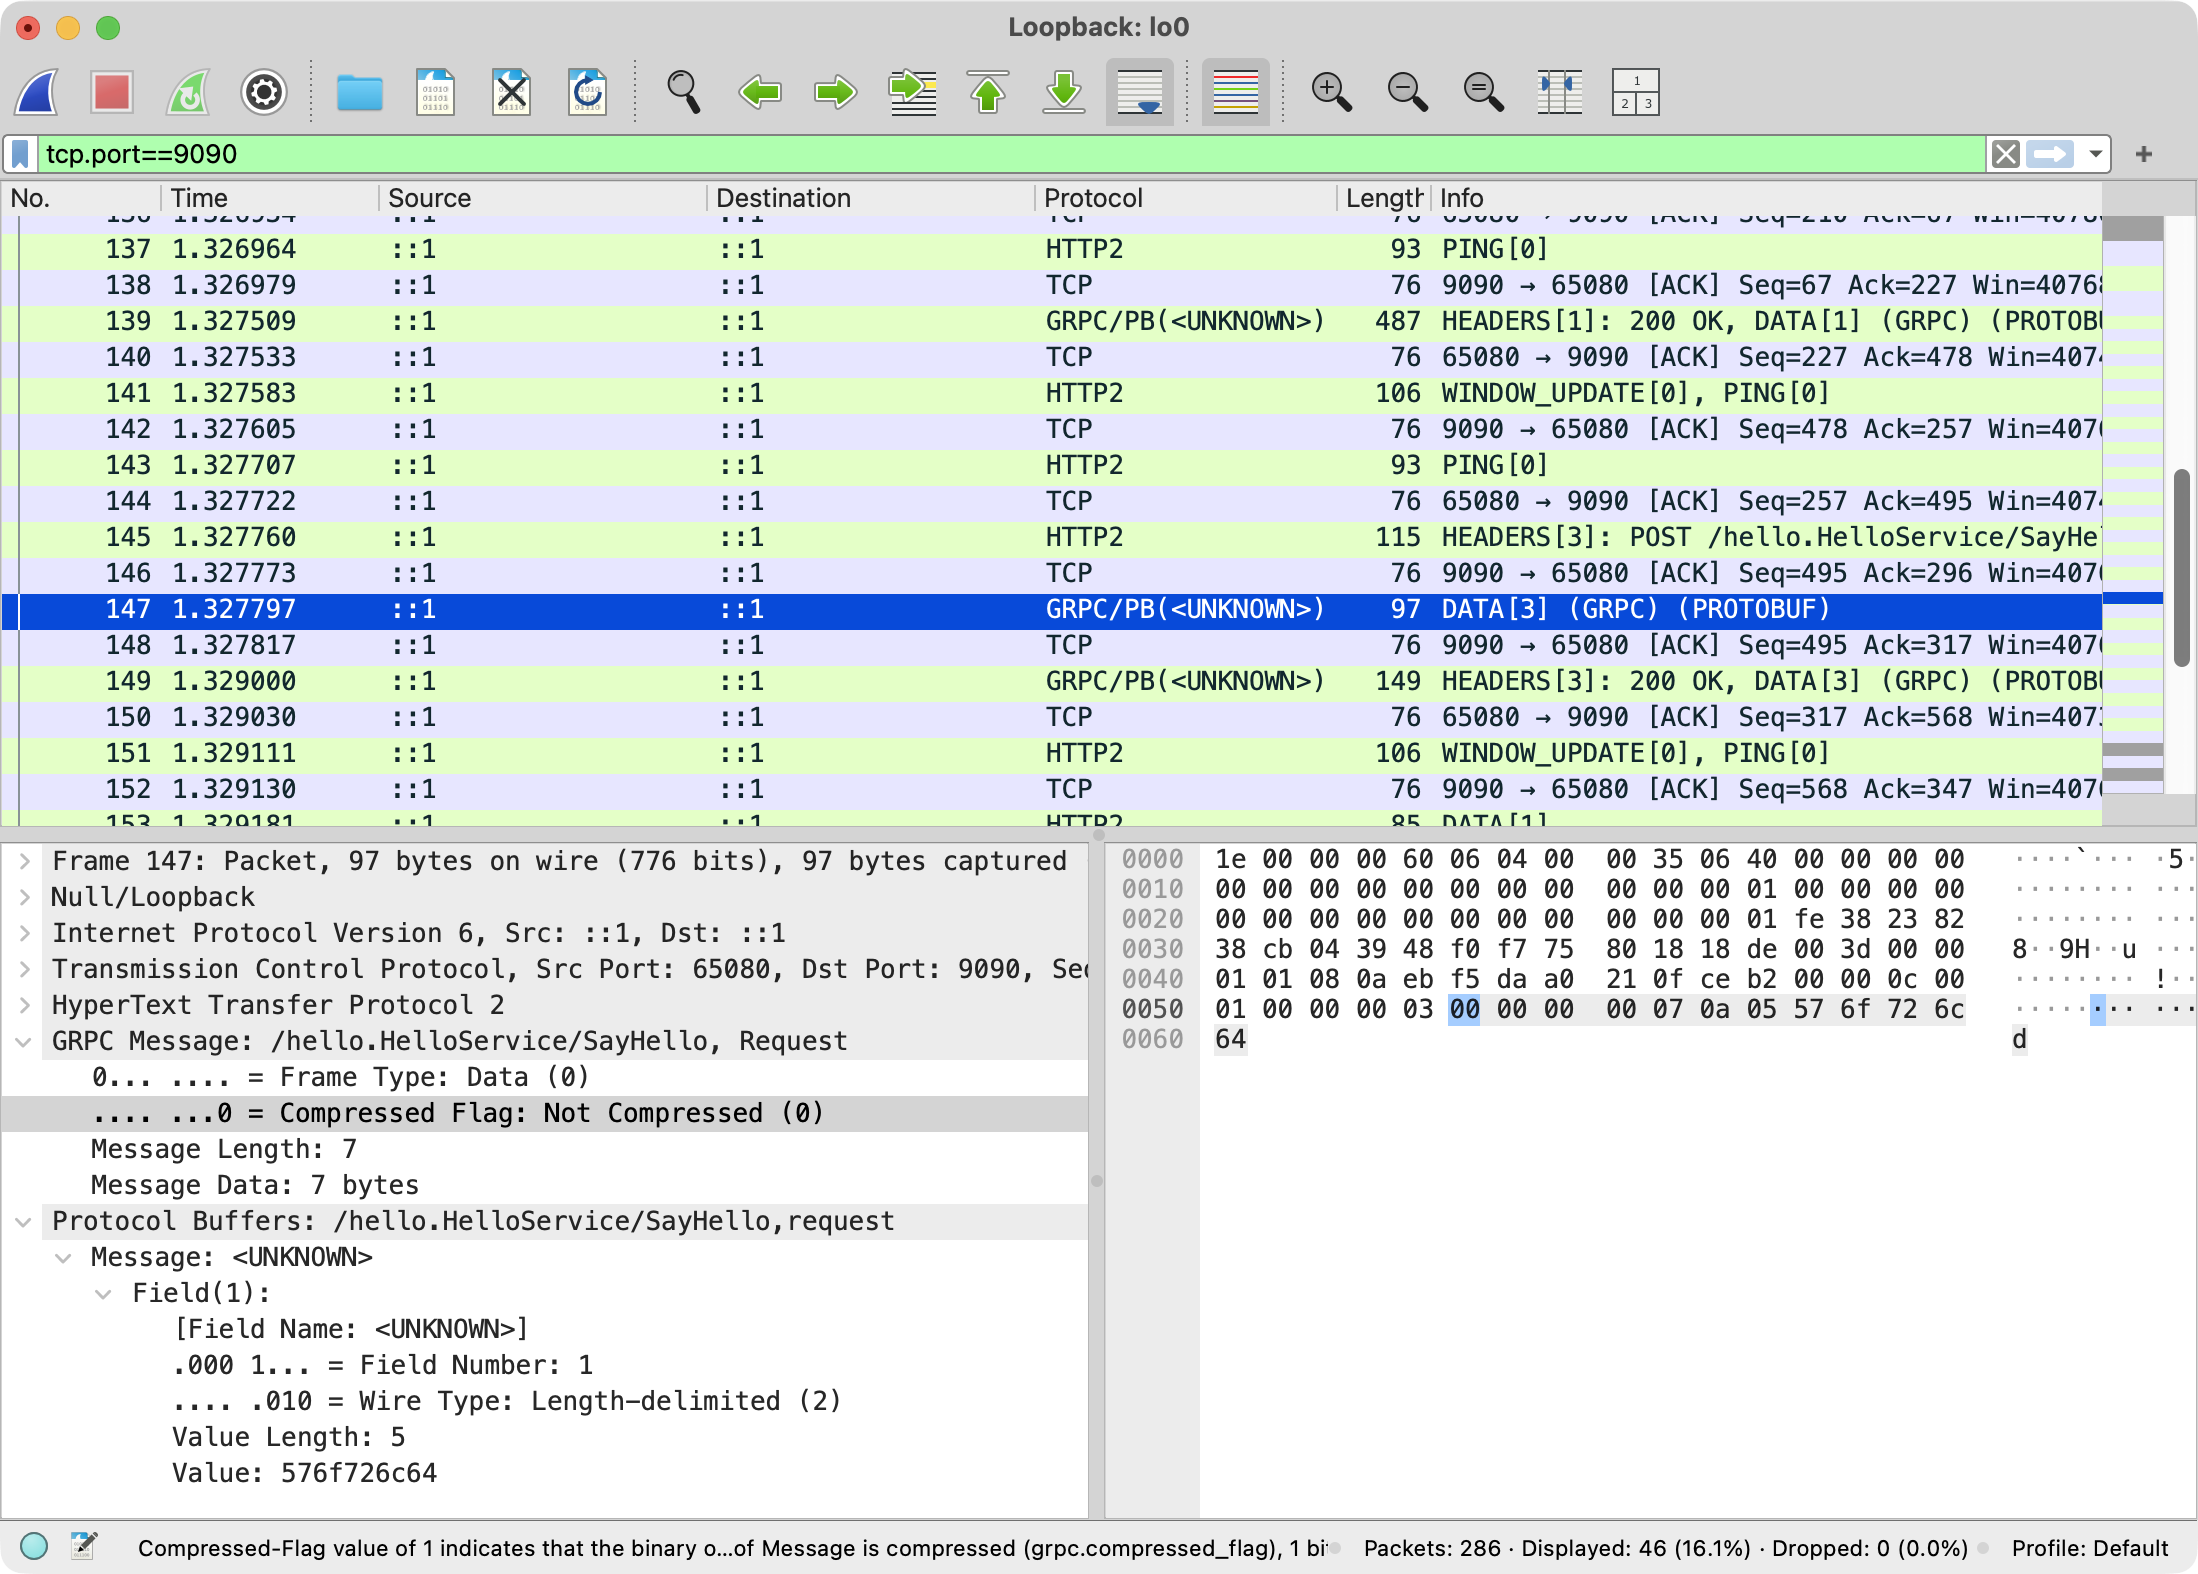
Protobuf 的编码格式是二进制的, 直接看网络包的内容是无法理解的, 需要用 Protobuf 的工具来解析它.
测试 SayHelloStream 方法
 1grpcurl -plaintext -d '{"name":"World"}' localhost:9090 hello.HelloService/SayHelloStream
 2{
 3  "message": "Hello World - #1 message",
 4  "timestamp": "1774807151281"
 5}
 6{
 7  "message": "Hello World - #2 message",
 8  "timestamp": "1774807151786"
 9}
10{
11  "message": "Hello World - #3 message",
12  "timestamp": "1774807152286"
13}
14{
15  "message": "Hello World - #4 message",
16  "timestamp": "1774807152787"
17}
18{
19  "message": "Hello World - #5 message",
20  "timestamp": "1774807153289"
21}
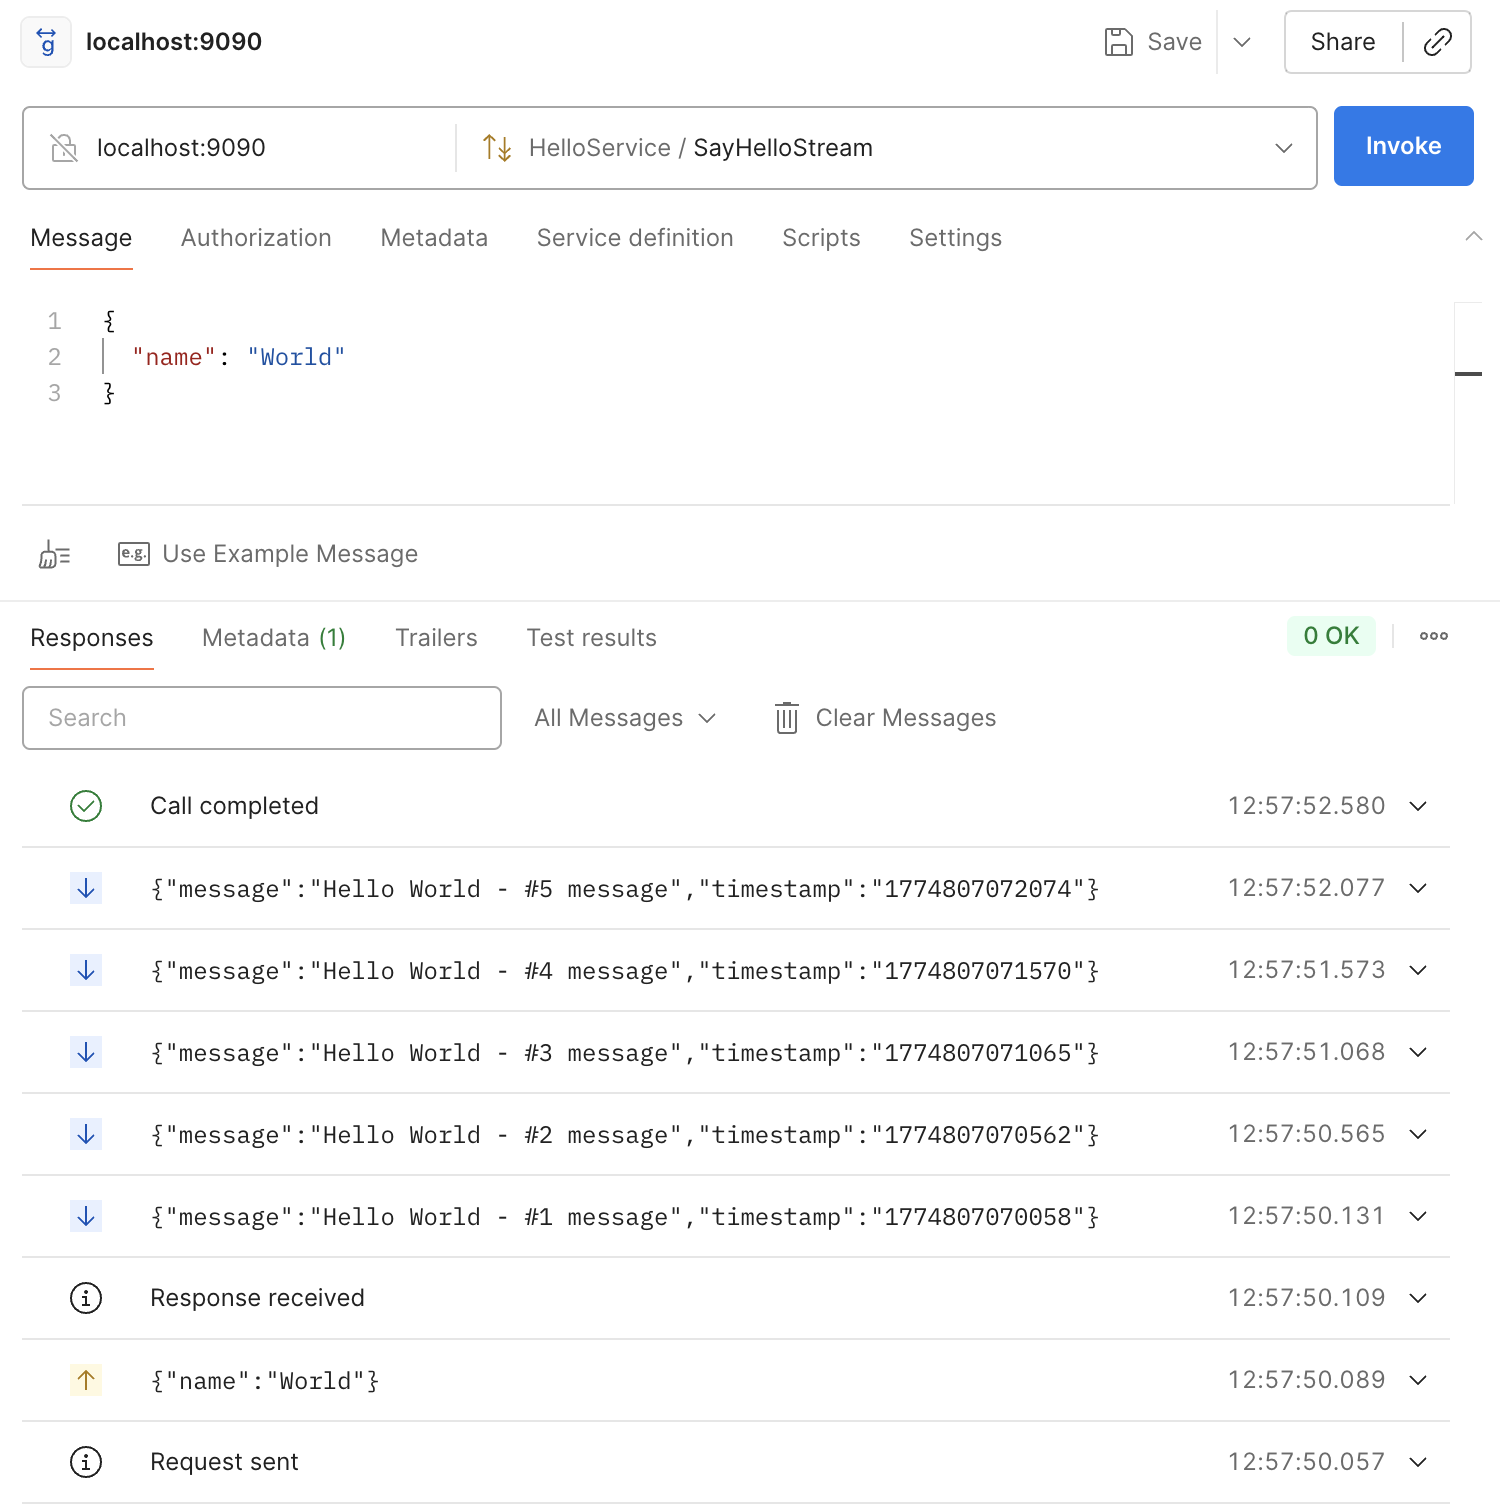
在控制台看到每隔 500ms 就会有一个新的响应, 直到最后服务端调用 responseObserver.onCompleted() 来结束流式响应.
在 Postman 中测试 hello.HelloService.SayHelloStream 方法
Spring gRPC 客户端
下面用 Spring gRPC 客户端代码来调用 hello.HelloService 服务, 代码分别如下
GrpcClientConfig.java
 1package com.example.testgrpc.client;
 2
 3import com.example.testgrpc.proto.HelloServiceGrpc;
 4import io.grpc.ManagedChannel;
 5import org.springframework.context.annotation.Bean;
 6import org.springframework.context.annotation.Configuration;
 7import org.springframework.grpc.client.GrpcChannelFactory;
 8
 9@Configuration
10public class GrpcClientConfig {
11
12    @Bean
13    public HelloServiceGrpc.HelloServiceBlockingStub helloBlockingStub(GrpcChannelFactory channelFactory) {
14        // 任意写的 channel 名称则使用默认的配置 spring.grpc.client.default-channel.*
15        // 会使用 spring.grpc.client.channels.hello-service 下的配置
16        ManagedChannel channel = channelFactory.createChannel("hello-service");
17        return HelloServiceGrpc.newBlockingStub(channel);
18    }
19
20    @Bean
21    public HelloServiceGrpc.HelloServiceStub helloAsyncStub(GrpcChannelFactory channelFactory) {
22        // ManagedChannel channel = channelFactory.createChannel("hello-service");
23        ManagedChannel channel = channelFactory.createChannel("192.168.1.100:9090");
24        return HelloServiceGrpc.newStub(channel);
25    }
26}
定位 gRPC 服务时要创建 ManagedChannel 对象, 有以下几种方式
- 任意写服务名称则使用默认的配置
spring.grpc.client.default-channel.*, 会访问localhost:9090, 下的服务, 例如channelFactory.createChannel("any-service-name") - 也可以直接指定远端服务地址, 如
192.168.1.100:9090 - 或者使用在
application.properties中配置的服务名称, 如channelFactory.createChannel("hello-service"), 如果在application.properties中有对应的配置, 则会使用相应的参数, 如1spring.grpc.client.channels.hello-service.address=192.168.1.101:9090 2spring.grpc.client.channels.hello-service.negotiation-type=plaintext
有了相应的 HelloServiceBlockingStub 和 HelloServiceStub 对象后, 就可以调用 gRPC 服务了, 继续在 RunGrpcClient.java 中
 1package com.example.testgrpc.client;
 2
 3import com.example.testgrpc.proto.HelloRequest;
 4import com.example.testgrpc.proto.HelloResponse;
 5import com.example.testgrpc.proto.HelloServiceGrpc;
 6import io.grpc.stub.StreamObserver;
 7import org.springframework.beans.factory.annotation.Autowired;
 8import org.springframework.stereotype.Service;
 9
10import java.util.concurrent.CountDownLatch;
11import java.util.concurrent.TimeUnit;
12
13@Service
14public class HelloGrpcClient {
15
16    @Autowired
17    private HelloServiceGrpc.HelloServiceBlockingStub blockingStub;
18
19    @Autowired
20    private HelloServiceGrpc.HelloServiceStub asyncStub;
21
22    public String sayHello(String name) {
23        HelloRequest request = HelloRequest.newBuilder()
24                .setName(name)
25                .build();
26
27        HelloResponse response = blockingStub.sayHello(request);
28        System.out.printf("Received response: %s\n", response.getMessage());
29        return response.getMessage();
30    }
31
32    public void sayHelloStream(String name) throws InterruptedException {
33        HelloRequest request = HelloRequest.newBuilder()
34                .setName(name)
35                .build();
36
37        CountDownLatch latch = new CountDownLatch(1);
38
39        asyncStub.sayHelloStream(request, new StreamObserver<HelloResponse>() {
40            @Override
41            public void onNext(HelloResponse response) {
42                System.out.printf("Stream response: %s\n", response.getMessage());
43            }
44
45            @Override
46            public void onError(Throwable t) {
47                System.err.printf("Stream call error: %s", t.getMessage());
48                latch.countDown();
49            }
50
51            @Override
52            public void onCompleted() {
53                System.out.println("Stream call complete");
54                latch.countDown();
55            }
56        });
57
58        latch.await(10, TimeUnit.SECONDS);
59    }
60}
创建客户端启动类 RunGrpcClient.java
 1package com.example.testgrpc.client;
 2
 3import org.springframework.beans.factory.annotation.Autowired;
 4import org.springframework.boot.CommandLineRunner;
 5import org.springframework.boot.SpringApplication;
 6import org.springframework.boot.autoconfigure.SpringBootApplication;
 7
 8@SpringBootApplication
 9public class RunGrpcClient implements CommandLineRunner {
10
11    @Autowired
12    private HelloGrpcClient helloGrpcClient;
13
14    public static void main() {
15        SpringApplication.run(RunGrpcClient.class);
16    }
17
18    @Override
19    public void run(String... args) throws Exception {
20        String response = helloGrpcClient.sayHello("gRPC Client");
21        System.out.println("Received response: " + response);
22
23        System.out.println("Starting stream call...");
24        helloGrpcClient.sayHelloStream("gRPC Stream Client");
25    }
26}
用 mvn 命令来运行客户端
1mvn spring-boot:run -Dspring-boot.run.main-class=com.example.testgrpc.client.RunGrpcClient
执行后控制台相关的输出如下
1Received response: Hello, gRPC Client!
2Received response: Hello, gRPC Client!
3Starting stream call...
4Stream response: Hello gRPC Stream Client - #1 message
5Stream response: Hello gRPC Stream Client - #2 message
6Stream response: Hello gRPC Stream Client - #3 message
7Stream response: Hello gRPC Stream Client - #4 message
8Stream response: Hello gRPC Stream Client - #5 message
9Stream call complete
gRPC 的优势与应用场景
在微服务架构中, 很多时候都会选择 RESTful API 来实现服务间的通信, 但服务不需要暴露给外部用户, 那么选择 gRPC 协议可获得更高的性能. 因为它使用 HTTP/2 协议和 Protobuf 编码格式, 相比于传统的 RESTful API 和 JSON/XML 格式, gRPC 的通信效率更高, 延迟更低. gRPC 充分利用到了 HTTP/2 的多路复用, 头部压缩, 流式传输的特性, 以及 Protobuf 的高效二进制编码格式(体积小, 序列化快), 使得它在服务间通信中表现出色. 另外 gRPC 还支持多语言, 可以在不同的编程语言之间进行通信. 比如对于带宽受限的移动端或 IoT 设备, gRPC 的高效通信协议和编码格式可以显著降低网络开销, 提升性能. 另外 gRPC 还支持双向流式通信, 适合于实时数据传输的场景.
一个现实的项目考虑, SpringBoot Web 项目中内部使用 C++ 的动态库, 这会造成 C++ 代码一崩溃整个 SpringBoot 服务就崩溃了, 这时可以把 C++
动态库调用放在一个独立的进程中, SpringBoot 与该外部进程就需要一种高效的通信方式, 如用 .sock 文件的 Unix Domain Socket 通信, 内存映射,
或自定义 TCP/UDP Socket 通信, 或往高层次的 RESTful API. 思考到这一步的话, gRPC 自然就成了比 RESTful API 更优的选择了.
也就是由 gRPC 来调用 C++ 的动态库, 这样就把 C++ 代码的崩溃风险隔离在了独立的进程中, 即使 C++ 代码崩溃了, 也不会影响到 SpringBoot 服务的稳定性.
但是需要在 SpringBoot 端实现 gRPC 进程的管理功能, 包括启动, 停止, 重启等操作, 以及监控 gRPC 进程的状态, 以确保它能够正常运行.
在 gRPC 崩溃时能够重新启动一个新的 gRPC 进程来继续提供服务, 先前失败的调用需要重试, 还有为防止内存泄漏, 可设置在 gRPC 处理了若干请求
后由 SpringBoot 来重启它, 以释放 gRPC 进程占用的内存资源.
[版权声明]
 本文采用 署名-非商业性使用-相同方式共享 4.0 国际 (CC BY-NC-SA 4.0) 进行许可。