SpringBoot2 应用 Axis 1.4 开发 WebService
有了前一篇 应用 Axis 1.4 开发 WebService 的对 Axis 1 较为深刻的理解后,现在正式给古老的 Axis 1.4 拉个伴,那就是 SpringBoot2。SpringBoot2 + Axis 1 的主要工作就是把 Axis 的 web.xml 用 SpringBoot2 的方式进行转述。
在 SpringBoot 中用 Axis 1 后,有两个特性不再支持
在 SpringBoot 中配置 Servlet 或 ServletListener 有两种方式
spring-boot-starter 引入了 log4j-to-slf4j, jul-to-slf4j, 所以不需要配置 log4j.properties, 需要的话可用 logback.xml 配置日志输出。
下面来看整个 SpringBoot2 + Axis 1 项目的目录结构(Maven 项目)
该项目已上传至 GitHub springboot2-axis1.4
Axis 1.4 中间的依赖是根据下载的 axis-bin-1_4.tar.gz 解压后 webapps/axis/WEB-INFO/lib 目录中 jar 包依赖改成用 Maven 来管理,外加了一个 javax.mail 依赖,省得启动服务时总提示没有 mail 组件的警告信息。其他为 SpringBoot2 的依赖,由于 Axis 是一个 Web 项目,所以引入了 spring-boot-starter-web。
日志方面,由于 spring-boot-starter-logging 的介入,log4j, jul 的日志全被 slf4j 接管,最终由 LogBack 输出,所以只需要 logback.xml,或者完全在 application.properties 中配置日志也行。
src/main/webapps/WEB-INF/server-config.wsdd 文件是拷贝自 axis 的 server-config.wsdd,用 WSDD 的方式发布 Web Service 要用到它
ServletRegistrationBean/ServletListenerRegistrationBean
AppConfig
@WebServlet/@WebListener 的方式
AppConfig1
从中二选一,比如想要用 AppConfig, 则要把 AppConfig1 中的 @Configuration 注解注释掉,反之亦然。
注:用 @WebServlet/@WebListener 的方式时,Servlet 和 Listener 不能为实例的内部类,因此声明类时要用
加上
到目前为止,我们可以启动本应用,这是一个 Web 项目(因为引入了 spring-boot-starter-web 依赖),它会起动一个内嵌的 Tomcat, 启动后打开 http://localhost:8080/servlet/,看到
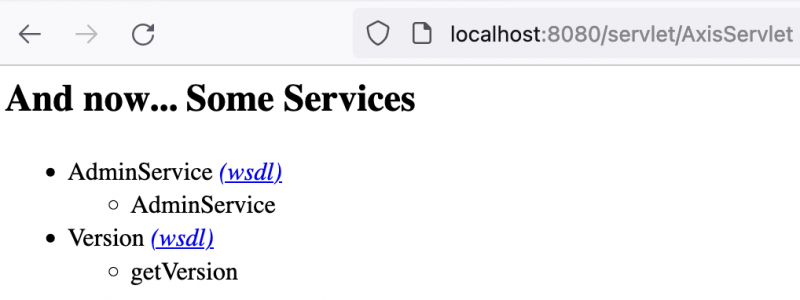 这是一个熟悉的 Apache Axis 1 的 Web Service 列表界面,此时测试 Version.getVersion 服务是可用的, 访问 http://localhost:8080/services/Version?method=getVersion

发布 HelloService,只要在 server-config.wsdd 中加上几行
暴露 blog.yanbin.ws.HelloService 中的所有 public 方法为 Web Service, 并且服务对象的生命周期是 application。要卸载 HelloService 服务,只要把这几行去掉,并重启应用
完后,只要重启应用程序,再次查看服务列表就能看到
 用 http://localhost:8080/services/HelloService?wsdl 查看服务描述。
 HelloService 有一个接口是 sayHello, 来测试一下该接口
在 ServiceTest 中有测试该服务的代码,如下
测试通过,并且输出如下:
 可利用该日志输出信息,用 cURL 或 PostMan 进行一样的 HTTP 请求,这方面的详情请参考上一篇 应用 Axis 1.4 开发 WebService。为了不来回跳跃,还是重复一下吧
然后可执行类似如下的命令
为了省事,当前项目包含必须的 jar 包,我们直接用 Java 代码来调用 AdminClient 更简单且可重用。本例中写在 RunAdminClient 类中,以单元测试用例的方式呈现
如果要卸载该 HelloService, 把有关它的那几行从
再对它执行 AdminClient,如
用 AdminClient 的好处是不需要每次重启,因为它除了对
链接:
[版权声明] 本文采用 署名-非商业性使用-相同方式共享 4.0 国际 (CC BY-NC-SA 4.0) 进行许可。
在 SpringBoot 中用 Axis 1 后,有两个特性不再支持
- 不再支持 jws 即时发布 Web Service,不能直接搬用 url-pattern *.jws,没继续深究,实际中希望这么部署的方式用得较少
- 不再支持 SOAPMonitorService,它是一个 Java Applet, Java Applet 在新版的 JDK 中已被移除,早就不推荐使用了
在 SpringBoot 中配置 Servlet 或 ServletListener 有两种方式
- ServletRegistrationBean/ServletListenerRegistrationBean
- @WebServlet/@WebListener
spring-boot-starter 引入了 log4j-to-slf4j, jul-to-slf4j, 所以不需要配置 log4j.properties, 需要的话可用 logback.xml 配置日志输出。
下面来看整个 SpringBoot2 + Axis 1 项目的目录结构(Maven 项目)
 1springboot2-axis1.4
 2├── pom.xml
 3└── src
 4    ├── main
 5    │   ├── java
 6    │   │   └── blog
 7    │   │       └── yanbin
 8    │   │           └── ws
 9    │   │               ├── HelloService.java
10    │   │               ├── Main.java
11    │   │               └── config
12    │   │                   ├── AppConfig.java
13    │   │                   └── AppConfig1.java
14    │   ├── resources
15    │   │   ├── application.properties
16    │   │   └── logback.xml
17    │   └── webapp
18    │       └── WEB-INF
19    │           └── server-config.wsdd
20    └── test
21        ├── java
22        │   └── blog
23        │       └── yanbin
24        │           └── ws
25        │               ├── RunAdminClient.java
26        │               └── ServiceTest.java
27        └── resources
28            ├── deploy.wsdd
29            └── undeploy.wsdd
该项目已上传至 GitHub springboot2-axis1.4
项目及配置解析
下面是对该项目的关键部分的说明依赖包
pom.xml 1<?xml version="1.0" encoding="UTF-8"?>
2<project xmlns="http://maven.apache.org/POM/4.0.0" xmlns:xsi="http://www.w3.org/2001/XMLSchema-instance"
3 xsi:schemaLocation="http://maven.apache.org/POM/4.0.0 https://maven.apache.org/xsd/maven-4.0.0.xsd">
4 <modelVersion>4.0.0</modelVersion>
5 <parent>
6 <groupId>org.springframework.boot</groupId>
7 <artifactId>spring-boot-starter-parent</artifactId>
8 <version>2.5.6</version>
9 <relativePath/> <!-- lookup parent from repository -->
10 </parent>
11 <groupId>blog.yanbin.ws</groupId>
12 <artifactId>springboot2-axis1</artifactId>
13 <version>0.0.1-SNAPSHOT</version>
14 <name>springboot2-axis1</name>
15 <description>Demo project for SpringBoot2 with Axis1</description>
16 <properties>
17 <java.version>1.8</java.version>
18 </properties>
19 <dependencies>
20 <dependency>
21 <groupId>org.springframework.boot</groupId>
22 <artifactId>spring-boot-starter-web</artifactId>
23 </dependency>
24 <dependency>
25 <groupId>commons-discovery</groupId>
26 <artifactId>commons-discovery</artifactId>
27 <version>0.2</version>
28 </dependency>
29
30 <!-- Axis 1.4 -->
31 <dependency>
32 <groupId>org.apache.axis</groupId>
33 <artifactId>axis</artifactId>
34 <version>1.4</version>
35 </dependency>
36 <dependency>
37 <groupId>org.apache.axis</groupId>
38 <artifactId>axis-jaxrpc</artifactId>
39 <version>1.4</version>
40 </dependency>
41 <dependency>
42 <groupId>axis</groupId>
43 <artifactId>axis-wsdl4j</artifactId>
44 <version>1.5.1</version>
45 </dependency>
46 <dependency>
47 <groupId>org.apache.axis</groupId>
48 <artifactId>axis-saaj</artifactId>
49 <version>1.4</version>
50 </dependency>
51 <!-- Axis 1.4 -->
52
53 <dependency>
54 <groupId>javax.mail</groupId>
55 <artifactId>mail</artifactId>
56 <version>1.4.7</version>
57 </dependency>
58
59 <dependency>
60 <groupId>org.springframework.boot</groupId>
61 <artifactId>spring-boot-starter-test</artifactId>
62 <scope>test</scope>
63 </dependency>
64 </dependencies>
65
66 <build>
67 <plugins>
68 <plugin>
69 <groupId>org.springframework.boot</groupId>
70 <artifactId>spring-boot-maven-plugin</artifactId>
71 </plugin>
72 </plugins>
73 </build>
74
75</project>Axis 1.4 中间的依赖是根据下载的 axis-bin-1_4.tar.gz 解压后 webapps/axis/WEB-INFO/lib 目录中 jar 包依赖改成用 Maven 来管理,外加了一个 javax.mail 依赖,省得启动服务时总提示没有 mail 组件的警告信息。其他为 SpringBoot2 的依赖,由于 Axis 是一个 Web 项目,所以引入了 spring-boot-starter-web。
日志方面,由于 spring-boot-starter-logging 的介入,log4j, jul 的日志全被 slf4j 接管,最终由 LogBack 输出,所以只需要 logback.xml,或者完全在 application.properties 中配置日志也行。
src/main/webapps/WEB-INF/server-config.wsdd 文件是拷贝自 axis 的 server-config.wsdd,用 WSDD 的方式发布 Web Service 要用到它
Servlet/Listener 配置
接着就是转换 axis 的 web.xml 为 SpringBoot 的表达方式,有两种实现ServletRegistrationBean/ServletListenerRegistrationBean
AppConfig
 1package blog.yanbin.ws.config;
 2
 3import org.apache.axis.transport.http.AdminServlet;
 4import org.apache.axis.transport.http.AxisHTTPSessionListener;
 5import org.apache.axis.transport.http.AxisServlet;
 6import org.springframework.boot.web.servlet.ServletListenerRegistrationBean;
 7import org.springframework.boot.web.servlet.ServletRegistrationBean;
 8import org.springframework.context.annotation.Bean;
 9import org.springframework.context.annotation.Configuration;
10
11@Configuration
12public class AppConfig {
13
14    @Bean
15    public ServletRegistrationBean<AxisServlet> axisServlet() {
16        AxisServlet servlet = new AxisServlet();
17        return new ServletRegistrationBean<>(servlet, "/servlet/AxisServlet", "/services/*", "/axis/services/*");
18    }
19
20    @Bean
21    public ServletRegistrationBean<AdminServlet> axisAdminServlet() {
22        AdminServlet servlet = new AdminServlet();
23        ServletRegistrationBean<AdminServlet> adminServletBean = new ServletRegistrationBean<>(servlet);
24        adminServletBean.setLoadOnStartup(100);
25        return adminServletBean;
26    }
27
28    @Bean
29    public ServletListenerRegistrationBean<AxisHTTPSessionListener> axisSessionListener() {
30        AxisHTTPSessionListener sessionListener = new AxisHTTPSessionListener();
31        return new ServletListenerRegistrationBean<>(sessionListener);
32    }
33}
@WebServlet/@WebListener 的方式
AppConfig1
 1package blog.yanbin.ws.config;
 2
 3
 4import org.apache.axis.transport.http.AdminServlet;
 5import org.apache.axis.transport.http.AxisHTTPSessionListener;
 6import org.apache.axis.transport.http.AxisServlet;
 7import org.springframework.boot.web.servlet.ServletComponentScan;
 8import org.springframework.context.annotation.Configuration;
 9
10import javax.servlet.annotation.WebListener;
11import javax.servlet.annotation.WebServlet;
12
13@Configuration
14@ServletComponentScan
15public class AppConfig1 {
16
17    @WebServlet({"/servlet/AxisServlet", "/services/*", "/axis/services/*"})
18    public static class MyAxisServlet extends AxisServlet {
19    }
20
21    @WebServlet(loadOnStartup = 100)
22    public static class MyAxisAdminService extends AdminServlet {
23    }
24
25    @WebListener
26    public static class MyAxisSessionListener extends AxisHTTPSessionListener {
27    }
28}
从中二选一,比如想要用 AppConfig, 则要把 AppConfig1 中的 @Configuration 注解注释掉,反之亦然。
注:用 @WebServlet/@WebListener 的方式时,Servlet 和 Listener 不能为实例的内部类,因此声明类时要用
public static class加上
/axis/services/* 的 url-pattern 是因为 AdminClient 默认会调用 http://localhost:8080/axis/services/AdminService,如果总是用 -l 参数指定 url 的话,该 url-pattern 可省去。应用程序入口
Main 启动类没什么特别的,就是一个最简单的 SpringBootApplication 启动类,后面说的重启应用就是重新运行下面的 Main 类1@SpringBootApplication
2public class Main {
3 public static void main(String[] args) {
4 SpringApplication.run(Main.class, args);
5 }
6}到目前为止,我们可以启动本应用,这是一个 Web 项目(因为引入了 spring-boot-starter-web 依赖),它会起动一个内嵌的 Tomcat, 启动后打开 http://localhost:8080/servlet/,看到
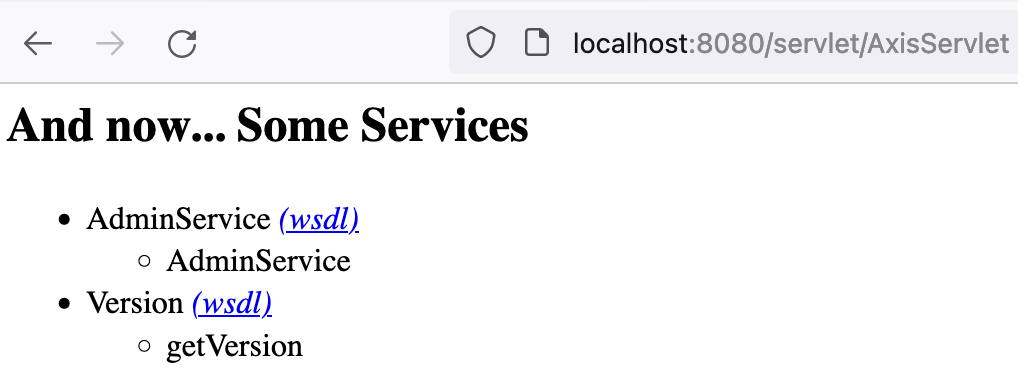 这是一个熟悉的 Apache Axis 1 的 Web Service 列表界面,此时测试 Version.getVersion 服务是可用的, 访问 http://localhost:8080/services/Version?method=getVersion
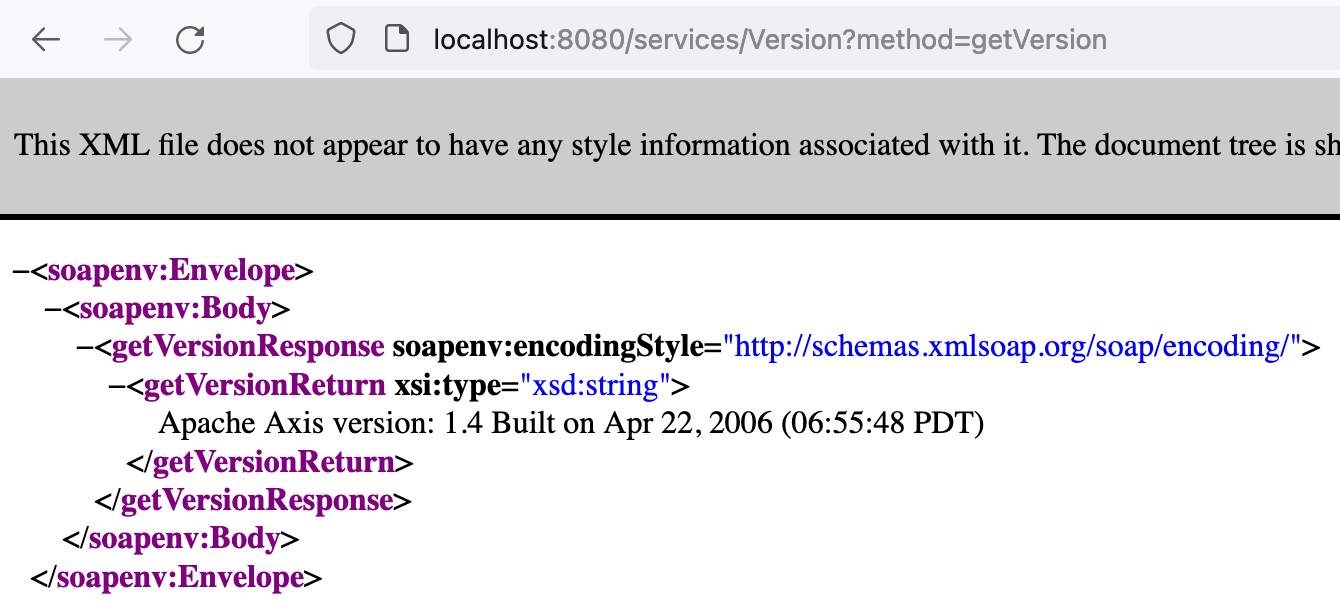
开发一个简单的 Web Service
现在来开发一个自己简单的 Web Service - HelloService,要添加的 Java 类只要 HelloService, 代码为1package blog.yanbin.ws;
2
3public class HelloService {
4
5 public String sayHello(String name) {
6 return "Hello " + name;
7 }
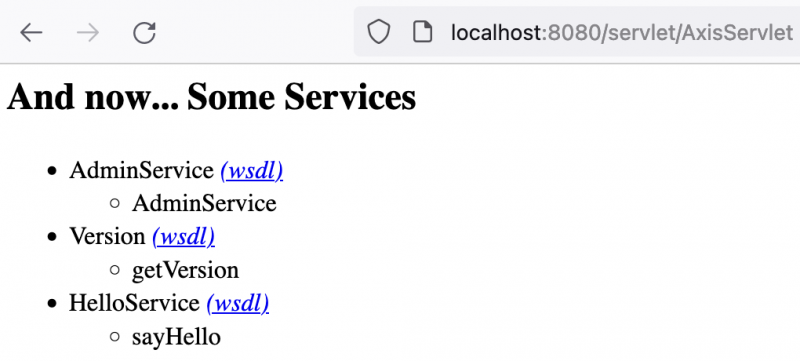
8}发布 HelloService,只要在 server-config.wsdd 中加上几行
1 <service name="HelloService" provider="java:RPC">
2 <parameter name="className" value="blog.yanbin.ws.HelloService"/>
3 <parameter name="allowedMethods" value="*"/>
4 <parameter name="scope" value="application"/>
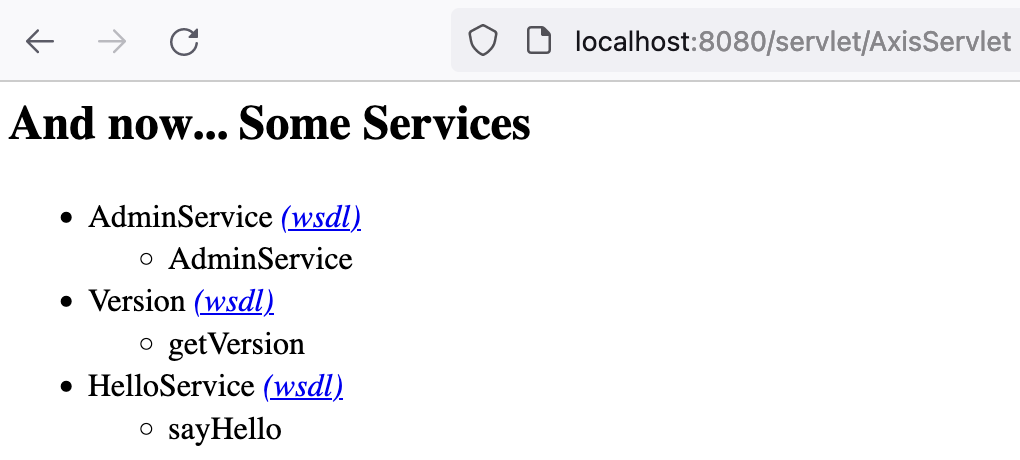
5 </service>暴露 blog.yanbin.ws.HelloService 中的所有 public 方法为 Web Service, 并且服务对象的生命周期是 application。要卸载 HelloService 服务,只要把这几行去掉,并重启应用
完后,只要重启应用程序,再次查看服务列表就能看到
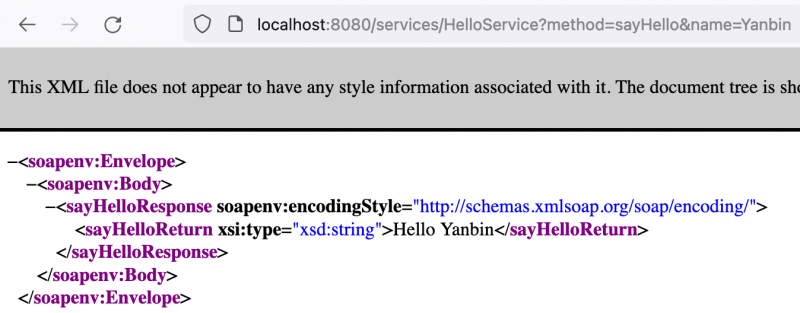
 用 http://localhost:8080/services/HelloService?wsdl 查看服务描述。
测试新加的 HelloService
Web 方式,访问 http://localhost:8080/services/HelloService?method=sayHello&name=Yanbin HelloService 有一个接口是 sayHello, 来测试一下该接口
在 ServiceTest 中有测试该服务的代码,如下
1@Test
2void sayHello() throws Exception {
3    String servicesURL = "http://localhost:8080/services/HelloService";
4    Call call = new Call(servicesURL);
5    String result = (String)call.invoke("", "sayHello", new Object[]{"Yanbin"});
6
7    assertEquals("Hello Yanbin", result);
8    System.out.println(result);
9}
测试通过,并且输出如下:
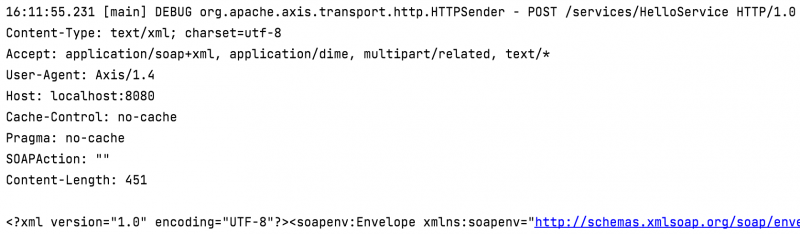
Hello Yanbin同时我们在日志配置 logback.xml 设置了 org.apache.axis.transport.http.HTTPSender 的输出级别为 DEBUG,所以能完整看到 HTTP 交互的请求响应的详情
 可利用该日志输出信息,用 cURL 或 PostMan 进行一样的 HTTP 请求,这方面的详情请参考上一篇 应用 Axis 1.4 开发 WebService。为了不来回跳跃,还是重复一下吧
$ curl -X POST -H "SOAPAction;" http://localhost:8080/services/HelloService \
--data '<?xml version="1.0"?>
<soapenv:Envelope xmlns:soapenv="http://schemas.xmlsoap.org/soap/envelope/"
xmlns:xsd="http://www.w3.org/2001/XMLSchema" xmlns:xsi="http://www.w3.org/2001/XMLSchema-instance">
<soapenv:Body>
<sayHello soapenv:encodingStyle="http://schemas.xmlsoap.org/soap/encoding/">
<arg0 xmlns:soapenc="http://schemas.xmlsoap.org/soap/encoding/" xsi:type="soapenc:string">Yanbin</arg0>
</sayHello>
</soapenv:Body>
</soapenv:Envelope>' <?xml version="1.0" encoding="UTF-8"?><soapenv:Envelope xmlns:soapenv="http://schemas.xmlsoap.org/soap/envelope/" xmlns:xsd="http://www.w3.org/2001/XMLSchema" xmlns:xsi="http://www.w3.org/2001/XMLSchema-instance"><soapenv:Body><sayHelloResponse soapenv:encodingStyle="http://schemas.xmlsoap.org/soap/encoding/"><sayHelloReturn xsi:type="xsd:string">Hello Yanbin</sayHelloReturn></sayHelloResponse></soapenv:Body></soapenv:Envelope>
用 deploy.wsdd 文件部署服务
前面是直接修改server-config.wsdd 的方来部署新服务的,我们也可以通过 AdminClient 来部署,写好了 HelloService 类后,把想要加入到 server-config.wsdd 文件中的内容放在一个单独的文件里,如这里的 deploy.wsdd,内容为1<?xml version="1.0" encoding="UTF-8"?>
2<deployment xmlns="http://xml.apache.org/axis/wsdd/"
3 xmlns:java="http://xml.apache.org/axis/wsdd/providers/java">
4 <service name="HelloService" provider="java:RPC">
5 <parameter name="className" value="blog.yanbin.ws.HelloService" />
6 <parameter name="allowedMethods" value="*" />
7 <parameter name="scope" value="request" />
8 </service>
9</deployment>然后可执行类似如下的命令
$ java -Djava.ext.dirs=lib org.apache.axis.client.AdminClient -lhttp://localhost:8080/services/AdminService test/resources/deloy.wsdd-Djava.ext.dirs=lib 指定能运行 AdminClient 的含有足够依赖 jar 包的目录,如 axis-bin-1_4.tar.gz 解压后 webapps/axis/WEB-INFO/lib 目录
为了省事,当前项目包含必须的 jar 包,我们直接用 Java 代码来调用 AdminClient 更简单且可重用。本例中写在 RunAdminClient 类中,以单元测试用例的方式呈现
1@Test
2void deployHelloService() {
3    AdminClient.main(new String[]{
4        "-lhttp://localhost:8080/services/AdminService",
5            "src/test/resources/deploy.wsdd"
6    });
7}
如果要卸载该 HelloService, 把有关它的那几行从
server-config.wsdd 中移除掉,再重启服务就行。或者创建一个 undeploy.wsdd 文件,内容为1<?xml version="1.0" encoding="UTF-8"?>
2<undeployment xmlns="http://xml.apache.org/axis/wsdd/">
3 <service name="HelloService">
4 </service>
5</undeployment>再对它执行 AdminClient,如
$ java -Djava.ext.dirs=lib org.apache.axis.client.AdminClient -lhttp://localhost:8080/services/AdminService test/resources/deloy.wsdd或是用 RunAdminClient 类中的
1@Test
2void undeployHelloService() {
3    AdminClient.main(new String[]{
4        "-lhttp://localhost:8080/services/AdminService",
5        "src/test/resources/undeploy.wsdd"
6    });
7}
用 AdminClient 的好处是不需要每次重启,因为它除了对
server-config.wsdd 文件修改外,还调用 AdminService 在内存里也作了手脚。问题
如果在 IntelliJ IDEA 中,你的 Axis 应用是一个子模块,那么在 IDE 中启动时须配置Working directory: $MODULE_DIR$否则运行时报类似如下的错误
16 Nov 2021 19:25:11 [main] ERROR org.apache.axis.configuration.EngineConfigurationFactoryServlet.getServerEngineConfig(162) - Unable to find config file. Creating new servlet engine config file: /WEB-INF/server-config.wsdd因为从当前目录开始找不到 src/main/webapp/WEB-INF,而且放在该目录中的 index.html 也不会被注册为 welcome file。
16 Nov 2021 19:25:11 [main] ERROR org.apache.axis.configuration.EngineConfigurationFactoryServlet.getServerEngineConfig(176) - Problem with servlet engine /WEB-INF directory
org.apache.axis.ConfigurationException: Configuration file directory '/private/var/folders/hm/t_nnzqw55g17fqwhf2rgtx3r0000gp/T/tomcat-docbase.8080.3352273356626804333/WEB-INF' does not exist or is not a directory or is not readable.
at org.apache.axis.configuration.FileProvider.<init>(FileProvider.java:99)
at org.apache.axis.configuration.EngineConfigurationFactoryServlet.getServerEngineConfig(EngineConfigurationFactoryServlet.java:174)
总结
最后好像也没有太多要说,升级到 Apache Axis2, 因为它最近都有更新,Axis 1 早就没人管了。或者还可以选择 Apache CXF 去,CXF 是两个项目的联合体,Celtix 和 XFire(XFire 还真有耳闻),曾经叫过 CeltiXfire,后来缩写成了 CXF(Celtix 含 CX, XFire 含 XF, 大家都公平)。还有一个选择是 Spring WS。这里有一篇三者对比的文章 Apache CXF vs. Apache AXIS vs. Spring WS。链接:
- Spring boot axis 1.4 webService Server
- The @ServletComponentScan Annotation in Spring Boot
- How to Register a Servlet in Java
- Using Servlet components: @WebServlet, @WebFilter and @WebListener in Spring boot application
[版权声明]
本文采用 署名-非商业性使用-相同方式共享 4.0 国际 (CC BY-NC-SA 4.0) 进行许可。