Windows下安装使用openldap
openldap 比起其他商业目录服务器(比如 IBM Directory Server),特别的轻巧,十分适合于本地开发测试用,在产品环境中的表现也很优秀。
openldap 软件在它的官方网站 http://www.openldap.org, 不过下载过来是源代码,并没有包含 win32 下的 Makefile 文件,只提供了在 Unix/Linux 下编译用的 Makefile。所以相应的在网上介绍在 windows 下安装使用 openldap 的资料比较少,而在 Unix/Linux 下应用文档却很丰富。
本文实践了在 Windows 下安装配 openldap,并添加一个条目,LdapBrowser 浏览,及 Java 程序连接 openldap 的全过程。
1. 下载安装 openldap for windows,当前版本2.2.29
下载地址:http://download.bergmans.us/openldap/openldap-2.2.29/openldap-2.2.29-db-4.3.29-openssl-0.9.8a-win32_Setup.exe
相关链接:http://lucas.bergmans.us/hacks/openldap/
安装很简单,一路 next 即可,假设我们安装在 c:\openldap
2. 配置 openldap,编辑 slapd.conf 文件
1) 打开 c:\openldap\slapd.conf,找到
include ./schema/core.schema,在它后面添加
include ./schema/cosine.schema
include ./schema/inetorgperson.schema
接下来的例子只需要用到以上三个 schema,当然,如果你觉得需要的话,你可以把其他的 schema 全部添加进来
include ./schema/corba.schema
include ./schema/dyngroup.schema
include ./schema/java.schema
include ./schema/misc.schema
include ./schema/nis.schema
include ./schema/openldap.schema
2) 还是在 slapd.conf 文件中,找到
suffix "dc=my-domain,dc=com"
rootdn "cn=Manager,dc=my-domain,dc=com"
把这两行改为
suffix "o=tcl,c=cn"
rootdn "cn=Manager,o=tcl,c=cn"
suffix 就是看自己如何定义了,后面步骤的 ldif 文件就必须与它定义了。还要注意到这个配置文件中有一个 rootpw secret,这个 secret 是 cn=Manager 的密码,以后会用到,不过这里是明文密码,你可以用命令: slappasswd -h {MD5} -s secret 算出加密的密码 {MD5}Xr4ilOzQ4PCOq3aQ0qbuaQ== 取代配置中的 secret。
3. 启动 openldap
CMD 进入到 c:\openldap 下,运行命令 slapd -d 1
用可以看到控制台下打印一片信息,openldap 默认是用的 Berkeley DB 数据库存储目录数据的。
如果你安装时选择了安装 install OpenLDAP-slapd as NT service 服务,你可以在系统服务中启动 OpenLDAP Directory Service。
4. 建立条目,编辑导入 ldif 文件
1) 新建一个 ldif(LDAP Data Interchanged Format) 文件(纯文本格式),例如 test.ldif,文件内容如下:
dn: o=tcl,c=cn
objectClass: dcObject
objectClass: organization
o: tcl
dc: com
dn: uid=Unmi, o=tcl,c=cn
uid: Unmi
objectClass: inetOrgPerson
mail: fantasia@sina.com
userPassword:: MTIzNDU2
labeledURI: http://unmi.blogcn.com
sn: Qiu
cn:: 6ZqU5Y+26buE6I66
2) 执行命令:ldapadd -x -D "cn=manager,o=tcl,c=cn" -w secret -f test.ldif
导入组织信息和一个用户 uid=Unmi
你可以用 LdapBrower 来导入这个 ldif 文件。
5. LdapBrowser 浏览
可点击链接 LdapBrowser282.zip 下载,其中已配置好了 OpenLdap_Localhost
代码中还没有实现用户的查找,读取、修改条目属性的操作
参考资料:
1. 如何设置一个基本的OpenLDAP Server
2. windows下openldap的安装与java操作测试
3. LDAP 入门知识
4. OpenLDAP学习笔记
下一步计划是:
1. 完成 Apache 与 openldap 的集成
2. 完成 Tomcat 与 openldap 的集成
3. 使用 spring-ldap 的 LdapTemplate 操作 openldap 永久链接 https://yanbin.blog/windows-install-openldap/, 来自 隔叶黄莺 Yanbin's Blog
[版权声明] 本文采用 署名-非商业性使用-相同方式共享 4.0 国际 (CC BY-NC-SA 4.0) 进行许可。
openldap 软件在它的官方网站 http://www.openldap.org, 不过下载过来是源代码,并没有包含 win32 下的 Makefile 文件,只提供了在 Unix/Linux 下编译用的 Makefile。所以相应的在网上介绍在 windows 下安装使用 openldap 的资料比较少,而在 Unix/Linux 下应用文档却很丰富。
本文实践了在 Windows 下安装配 openldap,并添加一个条目,LdapBrowser 浏览,及 Java 程序连接 openldap 的全过程。
1. 下载安装 openldap for windows,当前版本2.2.29
下载地址:http://download.bergmans.us/openldap/openldap-2.2.29/openldap-2.2.29-db-4.3.29-openssl-0.9.8a-win32_Setup.exe
相关链接:http://lucas.bergmans.us/hacks/openldap/
安装很简单,一路 next 即可,假设我们安装在 c:\openldap
2. 配置 openldap,编辑 slapd.conf 文件
1) 打开 c:\openldap\slapd.conf,找到
include ./schema/core.schema,在它后面添加
include ./schema/cosine.schema
include ./schema/inetorgperson.schema
接下来的例子只需要用到以上三个 schema,当然,如果你觉得需要的话,你可以把其他的 schema 全部添加进来
include ./schema/corba.schema
include ./schema/dyngroup.schema
include ./schema/java.schema
include ./schema/misc.schema
include ./schema/nis.schema
include ./schema/openldap.schema
2) 还是在 slapd.conf 文件中,找到
suffix "dc=my-domain,dc=com"
rootdn "cn=Manager,dc=my-domain,dc=com"
把这两行改为
suffix "o=tcl,c=cn"
rootdn "cn=Manager,o=tcl,c=cn"
suffix 就是看自己如何定义了,后面步骤的 ldif 文件就必须与它定义了。还要注意到这个配置文件中有一个 rootpw secret,这个 secret 是 cn=Manager 的密码,以后会用到,不过这里是明文密码,你可以用命令: slappasswd -h {MD5} -s secret 算出加密的密码 {MD5}Xr4ilOzQ4PCOq3aQ0qbuaQ== 取代配置中的 secret。
3. 启动 openldap
CMD 进入到 c:\openldap 下,运行命令 slapd -d 1
用可以看到控制台下打印一片信息,openldap 默认是用的 Berkeley DB 数据库存储目录数据的。
如果你安装时选择了安装 install OpenLDAP-slapd as NT service 服务,你可以在系统服务中启动 OpenLDAP Directory Service。
4. 建立条目,编辑导入 ldif 文件
1) 新建一个 ldif(LDAP Data Interchanged Format) 文件(纯文本格式),例如 test.ldif,文件内容如下:
dn: o=tcl,c=cn
objectClass: dcObject
objectClass: organization
o: tcl
dc: com
dn: uid=Unmi, o=tcl,c=cn
uid: Unmi
objectClass: inetOrgPerson
mail: fantasia@sina.com
userPassword:: MTIzNDU2
labeledURI: http://unmi.blogcn.com
sn: Qiu
cn:: 6ZqU5Y+26buE6I66
2) 执行命令:ldapadd -x -D "cn=manager,o=tcl,c=cn" -w secret -f test.ldif
导入组织信息和一个用户 uid=Unmi
你可以用 LdapBrower 来导入这个 ldif 文件。
5. LdapBrowser 浏览
可点击链接 LdapBrowser282.zip 下载,其中已配置好了 OpenLdap_Localhost
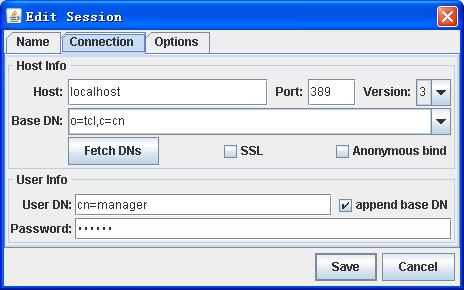
1) 设置如下图所示:
指定了 Host 为 localhost 之后,可以点击 Fetch DNs 按钮显示出 o=tcl,c=cn 来,如果要能在 LdapBrowser 中对数据能修改就不能用 Anonymous bind, 必须填上 User DN: cn=manager,Passwer: secret。
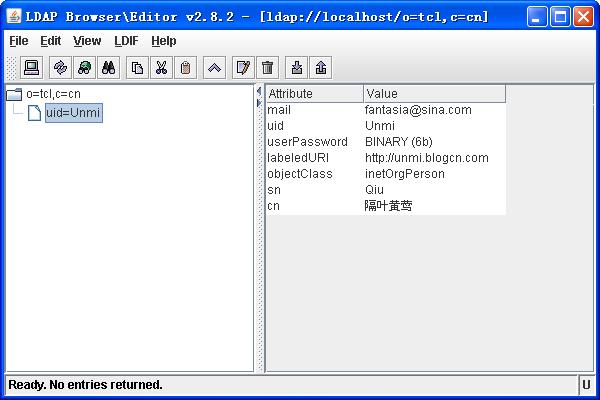
2) 看到的效果是:
6. Java 连接 openldap
 1import  java.util.Hashtable;
 2import  javax.naming.Context;
 3import  javax.naming.NamingException;
 4import  javax.naming.directory.DirContext;
 5import  javax.naming.directory.InitialDirContext;
 6
 7public   class  LDAPTest {
 8    public static void  main(String[] args) {
 9    LDAPTest LDAPTest1 =  new  LDAPTest();
10    String root =  "o=tcl,c=cn" ;  //root
11    Hashtable env =  new  Hashtable();
12    env.put(Context.INITIAL_CONTEXT_FACTORY,  "com.sun.jndi.ldap.LdapCtxFactory" );
13    env.put(Context.PROVIDER_URL,  "ldap://localhost/"  + root);
14    env.put(Context.SECURITY_AUTHENTICATION,  "simple" );
15    env.put(Context.SECURITY_PRINCIPAL,  "cn=Manager,o=tcl,c=cn" );
16    env.put(Context.SECURITY_CREDENTIALS,  "secret" );
17    DirContext ctx =  null ;
18     try  {
19      ctx =  new  InitialDirContext(env);
20      System.out.println( "认证成功" );
21    }
22     catch  (javax.naming.AuthenticationException e) {
23      e.printStackTrace();
24      System.out.println( "认证失败" );
25    }
26     catch  (Exception e) {
27      System.out.println( "认证出错:" );
28      e.printStackTrace();
29    }
30
31     if  (ctx !=  null ) {
32       try  {
33        ctx.close();
34      }
35       catch  (NamingException e) {
36         //ignore
37      }
38    }
39  }
40}
代码中还没有实现用户的查找,读取、修改条目属性的操作
参考资料:
1. 如何设置一个基本的OpenLDAP Server
2. windows下openldap的安装与java操作测试
3. LDAP 入门知识
4. OpenLDAP学习笔记
下一步计划是:
1. 完成 Apache 与 openldap 的集成
2. 完成 Tomcat 与 openldap 的集成
3. 使用 spring-ldap 的 LdapTemplate 操作 openldap 永久链接 https://yanbin.blog/windows-install-openldap/, 来自 隔叶黄莺 Yanbin's Blog
[版权声明]
 本文采用 署名-非商业性使用-相同方式共享 4.0 国际 (CC BY-NC-SA 4.0) 进行许可。