为 FastAPI 的 SwaggerUI 定制 CSS 样式
FastAPI 比起 Flask 而言一个十分便利的功能是它内置对 Swagger UI 文档的支持,然而默认生成的 Swagger UI 也总不尽如人意,于是就有了如何通过引入自己的样式(或样式文件)对默认 Swagger UI 进行定制化的需求。在 ChatGPT 之前,Google 和阅读源代码是齐头并进的选择,自己有了 ChatGPT 之类的 AI, 人们一下就把身段放低了许多,再也不像使用 Google 那样的心态去使用 AI 了。所以呢,第一次支持付了 $8 问问当前号称最厉害的 Grok 3(也算是对 DOGE 的支持吧), 得到答案如下
在网站的 /static 目录下也创建了 custom_swagger.css 文件,然而根本就没有效果,Inspect 浏览器后发现 FastAPI 的 /docs 根本就有加载 /static/custom_swagger.css 文件。
再追问一下去,又给出了下面的答案
这样跟随着 AI 坠入了它的自我幻觉当中。上面两个答案都是 AI 在无中生有的,为迎合人类而进行的创造。
对于第一个答案,SwaggerUI 根本就不支持 "css_url" 这个参数,完整的支持参数可参考:Swagger UI Configuration Docs.
而第二个答案,也类似,AI 为 FastAPI 的 get_swagger_ui_html() 函数莫名的新加了一个 "custom_css" 参数,FastAPI 的 get_swagger_ui_html() 函数原型在这里 fastapi/fastapi/openapi/docs.py
经过此番 AI 的实践,更是浪费了不少的时间,如果运气好些找到了有效的答案,对于掌握相应的知识基本是鲜有帮助。
要说上面唯一线索只有,定制
首先再次回到 Grok 3 给出的答案一,加在 FastAPI 的 swagger_ui_parameters 参数中的属性会加到
由于 SwaggerUIBundle() 并不支持 "css_url" 属性,在 Swagger UI Configuration Docs 中也没有找到定制 CSS 文件的解决方案。
下面展开如何利用
本例所需安装的 Python 依赖是
启动之后,打开 http://0.0.0.0:8080/docs 看到 SwaggerUI 界面是
 这个界面有点拉胯,想要通过 CSS 定制实现如面更为紧凑的 UI, 同时去除 Schemas

如果能简单的通过某个属性或参数引用自定义的 css, 进而调整 UI 的 Authorize 按钮的 margin-top: -120px, 再把 'openapi.json' 链接隐去就好,实际上还有些曲折。在这里隐去 "Schemas" 部分可在声明 FastAPI 时指定属性
通过 Google 或 AI, 我们定位到访问 FastAPI 的
注意,我们在覆盖
 后面的工作就要了解
这里有两条思路
本文采用第二种方式。思路理通了,那就开始实际,修改 main.py 后完整的代码如下
我们需要支持静态文件,所以需要在工程目录中创建文件 static/custom_swagger.css, 其中加入需要的样式定义,本实例的内容是
如此我们最终就是实现
最后我们不妨查看一下修改后 http://0.0.0.0:8080/docs 的网页源文件,没多少行,所以列在下面
从中可以看到我们通过正则表达式在原有的 swagger-ui.css link 后加上了自己的 /static/custom_sagger.css, 仅此而已。同时注意到 JS 函数 SwaggerUIBundle 的参数值,有助于我们理解如 FastAPI 的函数
从前有人一个同样的问题询问我三五遍,心里头就有过起伏 -- 即便是记忆差吧,那用笔记或记事本记录录下来也不至于此吧。现今自己用 AI 不断的重复问相同的问题就是同样的感觉。Google 即使不像书籍那样可以系统性的学习新技能,那怎么着还会让我们有提炼关键字,寻找线索,不断探索的过程。而用 AI 连基本的思考都省了,把有用没用的信息全丢给 AI 处理,经常会得到幻觉式的信息。AI 有时候就像是鸦片,产生了依赖便时时离不开它,Google 搜索后链接不设置为
程序员当初被称作 Google 或 StackOver 的搬运工,那 AI 时代如何称呼呢?StackOver 怎么着也是真实的人的求索,验证的过程。最初 AI 的内容也是来自 Wikipedia, StackOver, Reddit 那样的由人产生的内容,现在可好,机器也会产生大量的内容,吐到各个社区,而后又被机器吃回去。试想一下,如果那些社区全被机器占领了,AI 一本正经说假话,进入幻觉模式的机会就更大了。 永久链接 https://yanbin.blog/customize-fastapi-swaggerui-css/, 来自 隔叶黄莺 Yanbin's Blog
[版权声明] 本文采用 署名-非商业性使用-相同方式共享 4.0 国际 (CC BY-NC-SA 4.0) 进行许可。
1app.mount("/static", StaticFiles(directory="static"), name="static")<br/><br/>
2app = FastAPI(
3    swagger_ui_parameters={
4        "css_url": "/static/custom_swagger.css"
5    }
6)
在网站的 /static 目录下也创建了 custom_swagger.css 文件,然而根本就没有效果,Inspect 浏览器后发现 FastAPI 的 /docs 根本就有加载 /static/custom_swagger.css 文件。
再追问一下去,又给出了下面的答案
 1@app.get("/docs", include_in_schema=False)
 2async def custom_swagger_ui_html():
 3    return get_swagger_ui_html(
 4        .... # 此处省略
 5        custom_css="""
 6            <style>
 7                body { background-color: #f0f0f0; }
 8            </style>
 9        """
10    )
这样跟随着 AI 坠入了它的自我幻觉当中。上面两个答案都是 AI 在无中生有的,为迎合人类而进行的创造。
对于第一个答案,SwaggerUI 根本就不支持 "css_url" 这个参数,完整的支持参数可参考:Swagger UI Configuration Docs.
而第二个答案,也类似,AI 为 FastAPI 的 get_swagger_ui_html() 函数莫名的新加了一个 "custom_css" 参数,FastAPI 的 get_swagger_ui_html() 函数原型在这里 fastapi/fastapi/openapi/docs.py
经过此番 AI 的实践,更是浪费了不少的时间,如果运气好些找到了有效的答案,对于掌握相应的知识基本是鲜有帮助。
要说上面唯一线索只有,定制
/docs 可以显式的调用 get_swagger_ui_html() 函数,这就是我们能发挥的地方。首先再次回到 Grok 3 给出的答案一,加在 FastAPI 的 swagger_ui_parameters 参数中的属性会加到
/docs 页面的 SwaggerUIBundler() 调用 1 <script>
2 const ui = SwaggerUIBundle({
3 url: '/openapi.json',
4 "dom_id": "#swagger-ui",
5"layout": "BaseLayout",
6"deepLinking": true,
7"showExtensions": true,
8"showCommonExtensions": true,
9"css_url": "/static/custom_swagger.css",
10oauth2RedirectUrl: window.location.origin + '/docs/oauth2-redirect',
11 presets: [
12 SwaggerUIBundle.presets.apis,
13 SwaggerUIBundle.SwaggerUIStandalonePreset
14 ],
15 })
16 </script>由于 SwaggerUIBundle() 并不支持 "css_url" 属性,在 Swagger UI Configuration Docs 中也没有找到定制 CSS 文件的解决方案。
下面展开如何利用
get_swagger_ui_html() 函数来定制 CSS,从一个完整的 FastAPI 例子开讲。本例不用 fastapi 命令 + main.py 的方式启动 Web 服务,而是显式的用 uvicorn 在代码中启动服务。本例所需安装的 Python 依赖是
pip install "fastapi[standard]"完整的 main.py 代码是
1from fastapi import FastAPI, Security, Path
2from fastapi.security.api_key import APIKeyHeader
3from pydantic import BaseModel
4import uvicorn
5
6app = FastAPI()
7
8api_key_header = APIKeyHeader(name="x-api-key")
9
10
11class User(BaseModel):
12 userId: int
13 userName: str
14
15
16@app.get("/users/{userId}", response_model=User)
17def get_user(user_id: str = Path(..., alias="userId"), api_key=Security(api_key_header)):
18 return {"userId": 0, "userName": "Scott"}
19
20
21if __name__ == '__main__':
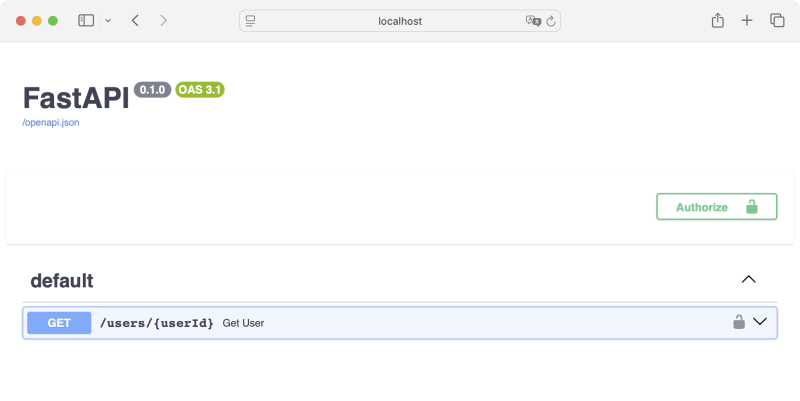
22 uvicorn.run(app, host="0.0.0.0", port=8080)启动之后,打开 http://0.0.0.0:8080/docs 看到 SwaggerUI 界面是
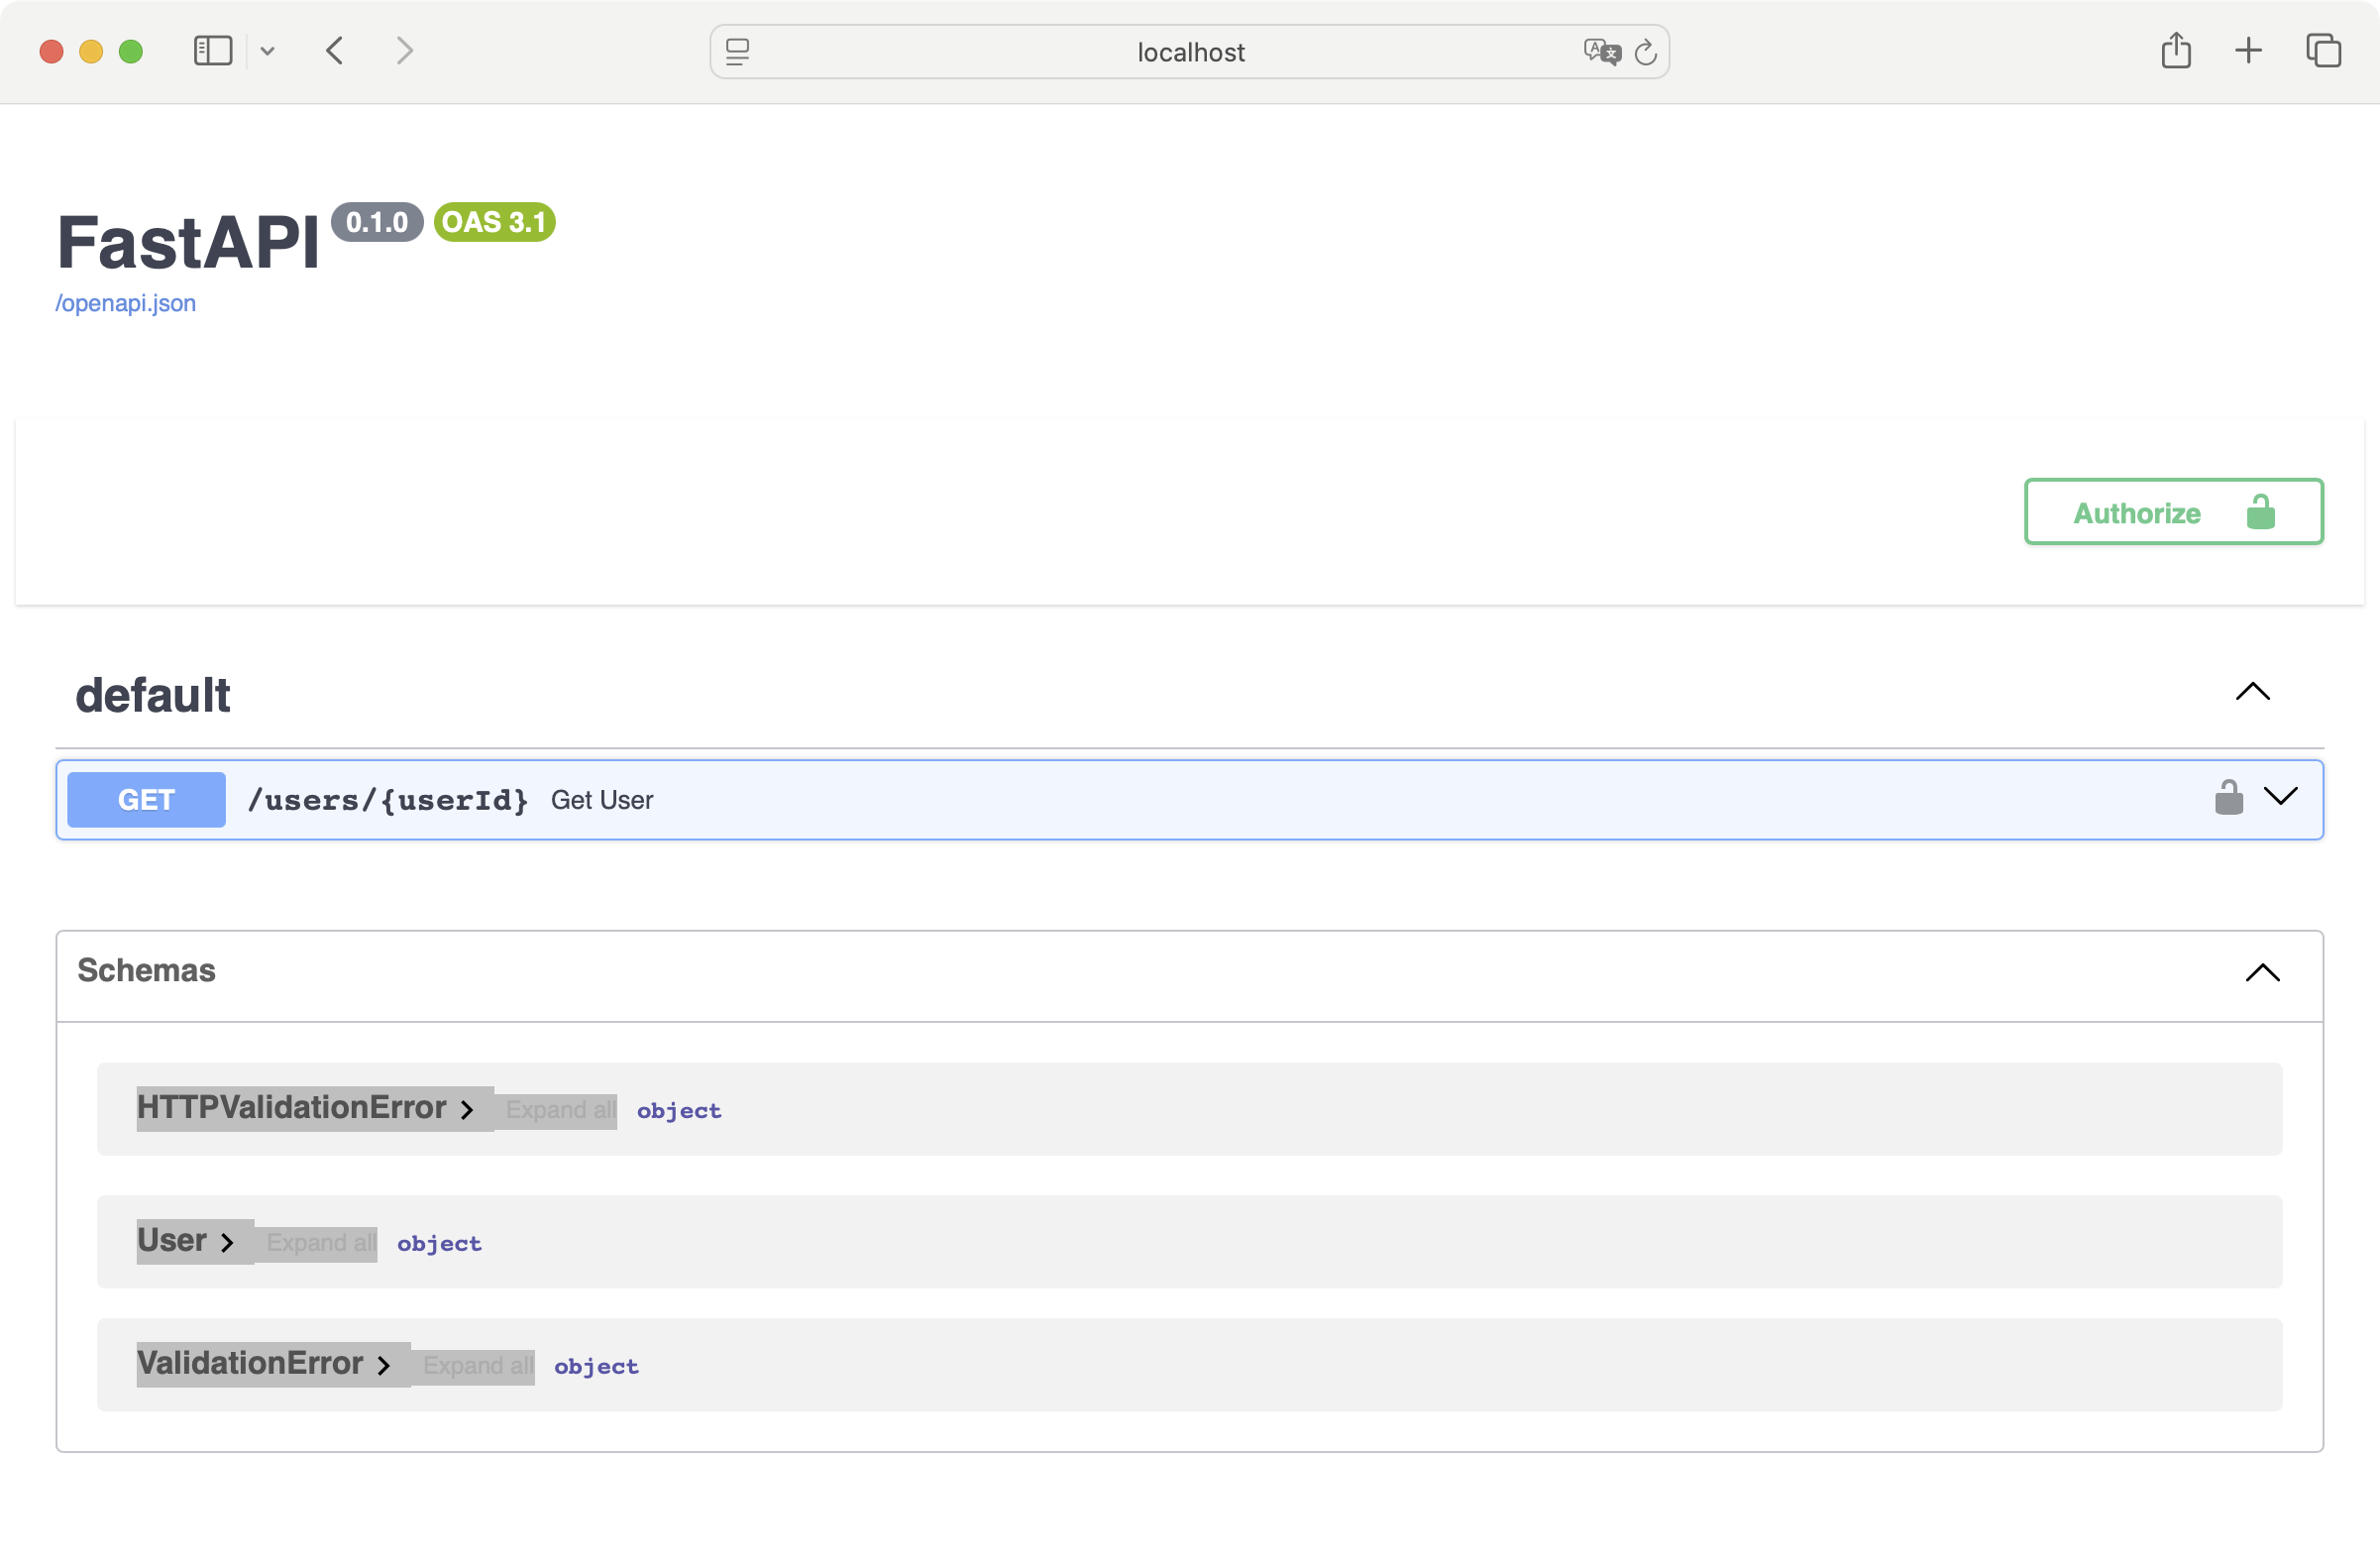 这个界面有点拉胯,想要通过 CSS 定制实现如面更为紧凑的 UI, 同时去除 Schemas
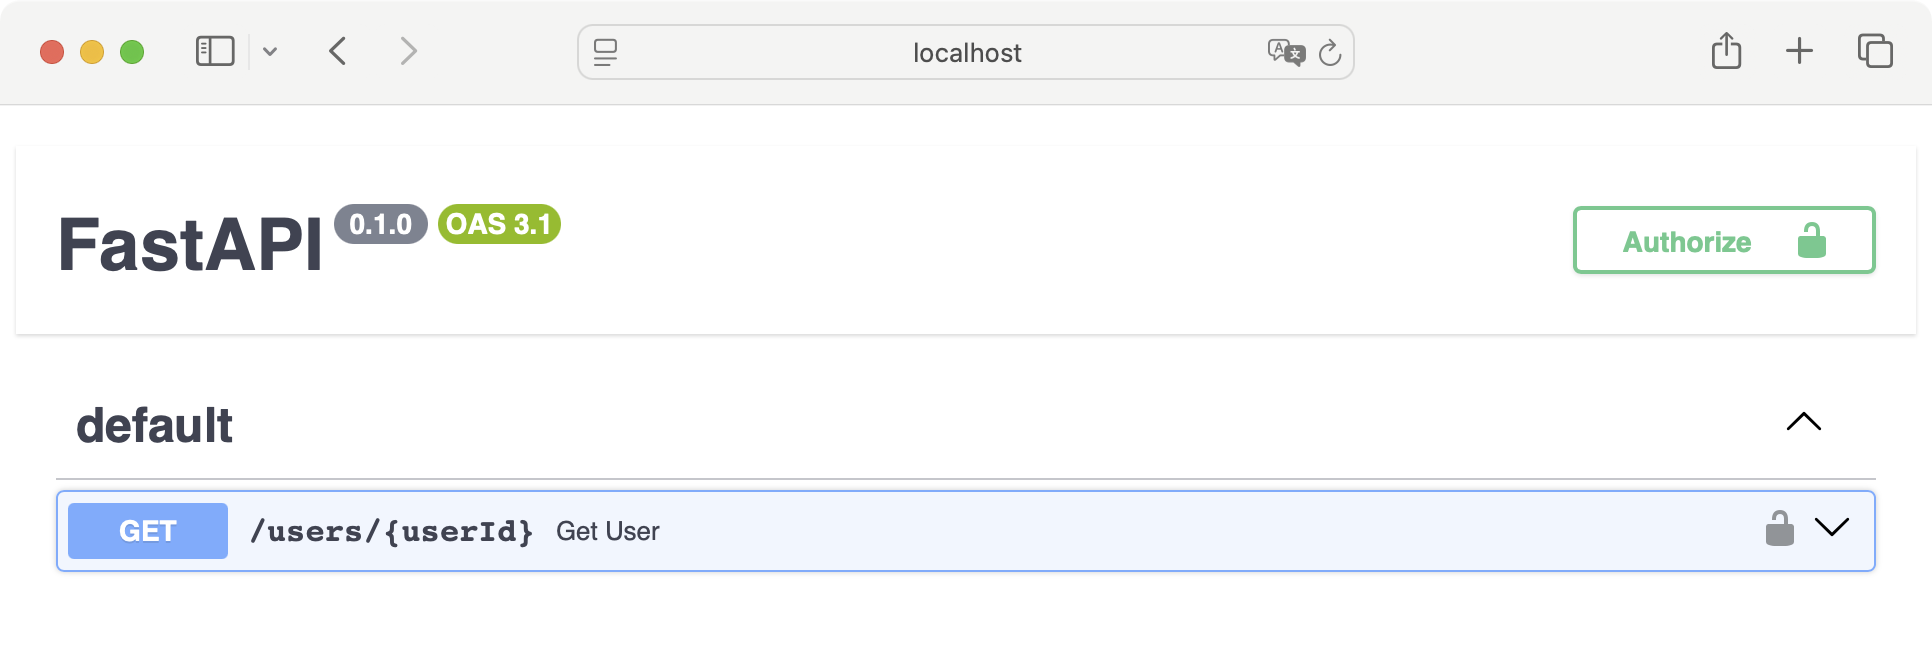
图 2
如果能简单的通过某个属性或参数引用自定义的 css, 进而调整 UI 的 Authorize 按钮的 margin-top: -120px, 再把 'openapi.json' 链接隐去就好,实际上还有些曲折。在这里隐去 "Schemas" 部分可在声明 FastAPI 时指定属性
1app = FastAPI(
2    swagger_ui_parameters={
3        "defaultModelsExpandDepth": -1   # 这样便不在 SwaggerUI 中显示 Schemas
4    }
5)
通过 Google 或 AI, 我们定位到访问 FastAPI 的
/docs 实际就是调用了 get_swagger_ui_html() 函数,可以覆盖 /docs 接口。于是等效的 /docs 就是 1from fastapi.openapi.docs import get_swagger_ui_html
2from fastapi.responses import HTMLResponse
3
4app = FastAPI(docs_url=None)
5
6@app.get("/docs", include_in_schema=False)
7def custom_swagger_ui_html() -> HTMLResponse:
8 return get_swagger_ui_html(
9 openapi_url="/openapi.json",
10 title="FastAPI",
11 swagger_ui_parameters={
12 "defaultModelsExpandDepth": -1,
13 }
14 )注意,我们在覆盖
/docs 时需要在声明 FastAPI 时用 docs_url=None 把默认的 /docs 禁用掉。访问 http://0.0.0.0:8080/docs 就是 后面的工作就要了解
 get_swagger_ui_html() 方法原型了。 1def get_swagger_ui_html(
2 *,
3 openapi_url,
4 title: ,
5 swagger_js_url = "https://cdn.jsdelivr.net/npm/swagger-ui-dist@5/swagger-ui-bundle.js",
6 swagger_css_url = "https://cdn.jsdelivr.net/npm/swagger-ui-dist@5/swagger-ui.css",
7 swagger_favicon_url = "https://fastapi.tiangolo.com/img/favicon.png",
8 oauth2_redirect_url = None,
9 init_oauth = None,
10 swagger_ui_parameters = None,
11) -> HTMLResponse:这里有两条思路
- 用
swagger_css_url指定自己的 custom_swagger.css, 然后把默认样式 https://cdn.jsdelivr.net/npm/swagger-ui-dist@5/swagger-ui.css 内容复制 custom_swagger.css 文件中,然后添加自己的内容。这种方式必须时刻留意默认的 swagger-ui.css 内容有列新。 - 该函数返回了一个 HTMLResponse, 我们可以去其中的 HTML 进行后处理,然后再返回一个重新包装的 HTMLResponse
本文采用第二种方式。思路理通了,那就开始实际,修改 main.py 后完整的代码如下
 1from fastapi import FastAPI, Security, Path
 2from fastapi.security.api_key import APIKeyHeader
 3from pydantic import BaseModel
 4import uvicorn
 5import re
 6
 7from fastapi.openapi.docs import get_swagger_ui_html
 8from fastapi.responses import HTMLResponse
 9from fastapi.staticfiles import StaticFiles
10
11app = FastAPI(docs_url=None)
12app.mount("/static", StaticFiles(directory="static"), name="static")
13
14
15@app.get("/docs", include_in_schema=False)
16def custom_swagger_ui_html() -> HTMLResponse:
17    res: HTMLResponse = get_swagger_ui_html(
18        openapi_url="/openapi.json",
19        title="FastAPI",
20        swagger_ui_parameters={
21            "defaultModelsExpandDepth": -1
22        }
23    )
24
25    new_body = re.sub(
26        r'(<link type="text/css" rel="stylesheet"[^>]+>)',
27        r'\1\n    <link type="text/css" rel="stylesheet" href="./static/custom_swagger.css">',
28        res.body.decode())
29    return HTMLResponse(new_body)
30
31
32api_key_header = APIKeyHeader(name="x-api-key")
33
34
35class User(BaseModel):
36    userId: int
37    userName: str
38
39
40@app.get("/users/{userId}", response_model=User)
41def get_user(user_id: str = Path(..., alias="userId"), api_key=Security(api_key_header)):
42    return {"userId": 0, "userName": "Scott"}
43
44
45if __name__ == '__main__':
46    uvicorn.run(app, host="0.0.0.0", port=8080)
我们需要支持静态文件,所以需要在工程目录中创建文件 static/custom_swagger.css, 其中加入需要的样式定义,本实例的内容是
1div.scheme-container {
2    margin-top: -120px !important;
3}
4
5div.info span.url {
6    display: none;
7}
如此我们最终就是实现
图 2 中的简洁效果。最后我们不妨查看一下修改后 http://0.0.0.0:8080/docs 的网页源文件,没多少行,所以列在下面
 1    <!DOCTYPE html>
 2    <html>
 3    <head>
 4    <link type="text/css" rel="stylesheet" href="https://cdn.jsdelivr.net/npm/swagger-ui-dist@5/swagger-ui.css">
 5    <link type="text/css" rel="stylesheet" href="./static/custom_swagger.css">
 6    <link rel="shortcut icon" href="https://fastapi.tiangolo.com/img/favicon.png">
 7    <title>FastAPI</title>
 8    </head>
 9    <body>
10    <div id="swagger-ui">
11    </div>
12    <script src="https://cdn.jsdelivr.net/npm/swagger-ui-dist@5/swagger-ui-bundle.js"></script>
13    <!-- `SwaggerUIBundle` is now available on the page -->
14    <script>
15    const ui = SwaggerUIBundle({
16        url: '/openapi.json',
17    "dom_id": "#swagger-ui",
18"layout": "BaseLayout",
19"deepLinking": true,
20"showExtensions": true,
21"showCommonExtensions": true,
22"defaultModelsExpandDepth": -1,<br/><br/>
23    presets: [
24        SwaggerUIBundle.presets.apis,
25        SwaggerUIBundle.SwaggerUIStandalonePreset
26        ],
27    })
28    </script>
29    </body>
30    </html>
从中可以看到我们通过正则表达式在原有的 swagger-ui.css link 后加上了自己的 /static/custom_sagger.css, 仅此而已。同时注意到 JS 函数 SwaggerUIBundle 的参数值,有助于我们理解如 FastAPI 的函数
get_swagger_ui_html() 是怎么影响到 JS 的 SwaggerUIBundler 函数的调用。后记:关于 AI
确实很久没更新博客了,一则原来的 VPS 三天两头宕机,好像数据库哪出了问题,现在已迁到 AWS,内存增加到了 2G 稍好些了,但仍未治本,还得努力找原因。再则如今 AI 大行其道,似乎要完全代替人的思考了,很多不再通过搜索引擎访问到博客站点了。以前的 “内事不决问百度,外事不决问谷歌,房事不决问天涯”,恐怕要改成 “万事不决问 AI” 了,不管是 ChatGPT, Grok, Claude, Gemini 或是其他的。如果产生了对 AI 的严重依赖,同样了问题问过 AI 十来遍,会发现它答案基本就没经过大脑,只有一次次的复制粘贴过程。从前有人一个同样的问题询问我三五遍,心里头就有过起伏 -- 即便是记忆差吧,那用笔记或记事本记录录下来也不至于此吧。现今自己用 AI 不断的重复问相同的问题就是同样的感觉。Google 即使不像书籍那样可以系统性的学习新技能,那怎么着还会让我们有提炼关键字,寻找线索,不断探索的过程。而用 AI 连基本的思考都省了,把有用没用的信息全丢给 AI 处理,经常会得到幻觉式的信息。AI 有时候就像是鸦片,产生了依赖便时时离不开它,Google 搜索后链接不设置为
target="_blank" 的用意(找到答案,快速离开)有所不同。难怪 AI 要上升为一个国家战略,因为某些时候极有用。程序员当初被称作 Google 或 StackOver 的搬运工,那 AI 时代如何称呼呢?StackOver 怎么着也是真实的人的求索,验证的过程。最初 AI 的内容也是来自 Wikipedia, StackOver, Reddit 那样的由人产生的内容,现在可好,机器也会产生大量的内容,吐到各个社区,而后又被机器吃回去。试想一下,如果那些社区全被机器占领了,AI 一本正经说假话,进入幻觉模式的机会就更大了。 永久链接 https://yanbin.blog/customize-fastapi-swaggerui-css/, 来自 隔叶黄莺 Yanbin's Blog
[版权声明]
本文采用 署名-非商业性使用-相同方式共享 4.0 国际 (CC BY-NC-SA 4.0) 进行许可。