Introduce Vagrant and common usages
Many of my demos about Kafka, Docker, Python, Kubernates, and etc. are made with Vagrant virtual machines. It is time to write a blog for some frequently used Vagrant commands. Vagrant is a member of the HashiCorp family. Others of HashiCorp's famous tools include Terraform , Consul , Vault , Boundary , Packer , Nomad and Waypoint .
Speaking of Vagrant, I have to mention the similar Docker, in fact, they are quite different, while they both give people the external feeling that they are command line control Linux. Vagrant is essentially a virtual machine shell, allowing us to use Vagrant commands to interact with the virtual machine more conveniently, instead of switching back and forth between the host machine and the virtual machine, it is more convenient to manage multiple virtual machines in one single terminal; while Docker is a container, The essence of a container is a process on the host machine, but it is isolated from the file system, process, network, etc. of the process with a namespace, making the container process look like a virtual OS.
Vagrant is a tool for the development environment, and Docker is a tool for the deployment environment; Vagrant operates a standard Linux or Windows operating system, and the Docker is very critical on image size. Docker image is usually a trimmed system, just has necessary command to run our service. Since Vagrant corresponds to a virtual machine, the operation status with Vagrant and the installed software will be retained after Vagrant virtual machine shutdown, while the operations status in Docker are all for the current container (copy-on-write), which does not affect the corresponding image , Unless it is committed as a new image with docker commit.
Understand that Vagrant is just the shell of a virtual machine, so it requires different virtual machine implementations, such as VirtualBox, Hyper-V, VMware, etc., and we can use Vagrant to interact with Docker as well. Vagrant can support multiple Operation Systems.
With Vagrant, no longer to download OS installation ISO image file, then take a long time to setup a new virtual machine step-by-step. Or manually import a compressed virtual machine file exported by others. Everything is similar to Docker. Just select an online box.
first of all, if we want to use Vagrant under Mac OS X, we should install Virtualbox, then Vagrant, which can be installed with brew commands
Docker has a Dockerfile, which corresponds to Vagrant is Vagrantfile. If we want to create multiple virtual machines on the same host, we usually create a separate directory for each Vagrantfile. For example, if we want to create a Ubuntu 20.04 LTS virtual machine, just create a folder
Executing
To search a official ubuntu 20.04 box (no longer called mirror), we can go to https://app.vagrantup.com/boxes/search?utf8=%E2%9C%93&sort=downloads&provider=virtualbox&q=ubuntu+20.04, the copy below content from this web page
For the content of Vagrantfile, the following commands do the same thing as above
By default, the operation instructions of the vagrant virtual machine described below are for the virtual machine indicated by the Vagrantfile file in the current directory. If we want to operate on a virtual machine in any directory, we must to specify the name or ID of the virtual machine. If we don't specify the name in the Vagrantfile, all the virtual machines will have default names, and the IDs are different. How to get virtual machines Name or ID? command
Now we can start using
From the command line prompt, we can identify whether the shell is currently in the host or in the virtual machine. The similar $ or ubuntu-20.04$ is on localhost, while vagrant@ubuntu-focal:~$ is in the virtual machine.
Any time, we can check what happens to VirtualBox, now we see
 If we create a new directory, put a Vagrantfile file and start it with vagrant up, we'll see another virtual machine in VirtualBox started. And from above screenshot, we noticed that the memory of the virtual machine created by Vagrant is only 1024 MB. Other configurations can be seen in its Settings, such as the network is NAT. Most of these can be configured through Vagrantfile. If we use vagrant to control VirtualBox, please try not to modify the virtual machine settings directly in VirtualBox.
That is, go to the /vagrant directory on the virtual machine, and the content is the /Users/yanbin/vagrant/ubuntu-20.04 directory on localhost, which is the directory where the Vagrantfile file is located. Mounted in the virtual machine is a readable and writable file system, and files can be shared between the virtual machine and localhost through this shared folder.
At this time, we entered the VirtualBox virtual machine ubuntu-2004_default_1619..., and now we can do what ssh can do.
The commands of vagrant can be listed with vagrant --help, and let's take a look at some other common used vagrant commands
Above information tells use all ID and name of each Vagrant virtual machines. Name is not unique, but ID is. If we use name follows vagrant command, it will only affect the first available virtual machine.
With id or name, We can run vagrant command anywhere, don't have to go to the directory where Vagrantfile is located.
All boxes, versions and providers corresponding to the keywords will be listed. Sometime, searching box in terminal is slower more than with web page. We can choose either way, search https://app.vagrantup.com, or use commdn
Other vagrant box commands:
vagrant box outdated: check if all boxes are updated
vagrant box update: update box
The following is some knowledges about Vagrantfile configurations, including machine name, memory, CPU, network, port forwarding, and pre-installed software when initializing the virtual machine.
To understand the how to config
Then use the command
Remember that, many vagrant can task parameters
Reload the virtual machine, use
Name changed. Now we can use name to operate. Actually, the virtual machine identifier name is not that important, because we can always use ID. We can see more information from the command
Note: After updating the virtual machine name, need
Run

After vagrant reload, vagrant ssh into the virtual machine, check the memory and CPU
The memory has changed from the default 1G to 2G, and there are 3 CPUs.
Then execution
IP address
If too many static IP segments are configured in the Vagrantfile, too many network devices like vboxnet1, vboxnet2, vboxnet3... will be generated in the host operating system. You can see them with ifconfig
vboxnetX network interfaces are generated because of too may configuring static IP in Vagrantfile, we need to use VBoxMange to clean up
Then
Or use to
Let's do a test of port forwarding, we need to
 config.vm.network "forward_port", guest: <port>, host: <port> can appear multiple times in the Vagrantfile to configure multiple port mappings. Because it's a ruby function call, we can call it using named parameters.
if
In addition to the above two approaches, provision is the better way to pre-install software, or other settings. Look at the configuration first
The configuration here
Unless run
Besides using inline to execute scripts, provision can also execute external script files, or call Ansible, Chef, puppet, etc. For details, please see https://www.vagrantup.com/docs/provisioning .
Then
If you want to control individually, add id or name, such as
link:
永久链接 https://yanbin.blog/english-vagrant-intro-config-commands/, 来自 隔叶黄莺 Yanbin's Blog
[版权声明] 本文采用 署名-非商业性使用-相同方式共享 4.0 国际 (CC BY-NC-SA 4.0) 进行许可。
Speaking of Vagrant, I have to mention the similar Docker, in fact, they are quite different, while they both give people the external feeling that they are command line control Linux. Vagrant is essentially a virtual machine shell, allowing us to use Vagrant commands to interact with the virtual machine more conveniently, instead of switching back and forth between the host machine and the virtual machine, it is more convenient to manage multiple virtual machines in one single terminal; while Docker is a container, The essence of a container is a process on the host machine, but it is isolated from the file system, process, network, etc. of the process with a namespace, making the container process look like a virtual OS.
Vagrant is a tool for the development environment, and Docker is a tool for the deployment environment; Vagrant operates a standard Linux or Windows operating system, and the Docker is very critical on image size. Docker image is usually a trimmed system, just has necessary command to run our service. Since Vagrant corresponds to a virtual machine, the operation status with Vagrant and the installed software will be retained after Vagrant virtual machine shutdown, while the operations status in Docker are all for the current container (copy-on-write), which does not affect the corresponding image , Unless it is committed as a new image with docker commit.
Understand that Vagrant is just the shell of a virtual machine, so it requires different virtual machine implementations, such as VirtualBox, Hyper-V, VMware, etc., and we can use Vagrant to interact with Docker as well. Vagrant can support multiple Operation Systems.
With Vagrant, no longer to download OS installation ISO image file, then take a long time to setup a new virtual machine step-by-step. Or manually import a compressed virtual machine file exported by others. Everything is similar to Docker. Just select an online box.
first of all, if we want to use Vagrant under Mac OS X, we should install Virtualbox, then Vagrant, which can be installed with brew commands
$ brew install --cask virtualboxAfter installation, we can run the Vagrant command. The current version is
$ brew install vagrant
$ VirtualBoxVM --helpAt this time, using vagrant's
Oracle VM VirtualBox VM Runner v6.1.20
$ vagrant --version
Vagrant 2.2.15
up, halt or other sub-commands can be treated as communicating with virtual machine commands such as VirtualBoxVM, VBoxManage. Let's take a look at how the vagrant command creates, starts, ssh and shutdown a virtual machine.Docker has a Dockerfile, which corresponds to Vagrant is Vagrantfile. If we want to create multiple virtual machines on the same host, we usually create a separate directory for each Vagrantfile. For example, if we want to create a Ubuntu 20.04 LTS virtual machine, just create a folder
ubuntu-20.04, and then put a file Vagrantfile insideExecuting
vagrant command will search for Vagrantfile in order, from current to the root folder. For example, ./Vagrantfile -> ../Vagrantfile -> ../../Vagrantfile, ... until / Vagrantfile. By modifying the environment variable VAGRANT_CWD, we can change the search start position. Multiple virtual machines can be defined in one single Vagrantfile file, this is more convenient, will be explained below.To search a official ubuntu 20.04 box (no longer called mirror), we can go to https://app.vagrantup.com/boxes/search?utf8=%E2%9C%93&sort=downloads&provider=virtualbox&q=ubuntu+20.04, the copy below content from this web page
1Vagrant.configure("2") do |config|
2  config.vm.box = "ubuntu/focal64"
3end
For the content of Vagrantfile, the following commands do the same thing as above
~$ mkdir ubuntu-20.04 && cd ubuntu-20.04We can also use
ubuntu-20.04$ cat << EOF > Vagrantfile
Vagrant.configure("2") do |config|
config.vm.box = "ubuntu/focal64"
end
EOF
vagrant init commandubuntu-20.04$ vagrant init ubuntu/focal64to achieve substantially equivalent results with previous cat command. Only thing different is that
Vagrantfile created by vagrant init contains many detailed comments. Vagrantfile is a ruby file, because Vagrant is written in ruby.By default, the operation instructions of the vagrant virtual machine described below are for the virtual machine indicated by the Vagrantfile file in the current directory. If we want to operate on a virtual machine in any directory, we must to specify the name or ID of the virtual machine. If we don't specify the name in the Vagrantfile, all the virtual machines will have default names, and the IDs are different. How to get virtual machines Name or ID? command
vagrant global-status will help us, leave its details later.Now we can start using
up, ssh, halt and other commands to start the virtual machine, ssh to the virtual machine, and shutdown the virtual machineFrom the command line prompt, we can identify whether the shell is currently in the host or in the virtual machine. The similar $ or ubuntu-20.04$ is on localhost, while vagrant@ubuntu-focal:~$ is in the virtual machine.
vagrant ssh username is vagrantvagrant up starts a virtual machine
 1ubuntu-20.04$ vagrant up
 2Bringing machine 'default' up with 'virtualbox' provider...
 3==> default: Importing base box 'ubuntu/focal64'...
 4==> default: Matching MAC address for NAT networking...
 5==> default: Checking if box 'ubuntu/focal64' version '20210415.0.0' is up to date...
 6==> default: A newer version of the box 'ubuntu/focal64' for provider 'virtualbox' is
 7==> default: available! You currently have version '20210415.0.0'. The latest is version
 8==> default: '20210429.0.0'. Run `vagrant box update` to update.
 9==> default: Setting the name of the VM: ubuntu-2004_default_1619755398798_4656
10==> default: Clearing any previously set network interfaces...
11==> default: Preparing network interfaces based on configuration...
12    default: Adapter 1: nat
13==> default: Forwarding ports...
14    default: 22 (guest) => 2222 (host) (adapter 1)
15==> default: Running 'pre-boot' VM customizations...
16==> default: Booting VM...
17==> default: Waiting for machine to boot. This may take a few minutes...
18    default: SSH address: 127.0.0.1:2222
19    default: SSH username: vagrant
20    default: SSH auth method: private key
21    default: Warning: Connection reset. Retrying...
22    default: Warning: Remote connection disconnect. Retrying...
23    default:
24    default: Vagrant insecure key detected. Vagrant will automatically replace
25    default: this with a newly generated keypair for better security.
26    default:
27    default: Inserting generated public key within guest...
28    default: Removing insecure key from the guest if it's present...
29    default: Key inserted! Disconnecting and reconnecting using new SSH key...
30==> default: Machine booted and ready!
31==> default: Checking for guest additions in VM...
32==> default: Mounting shared folders...
33    default: /vagrant => /Users/yanbin/vagrant/ubuntu-20.04
Any time, we can check what happens to VirtualBox, now we see
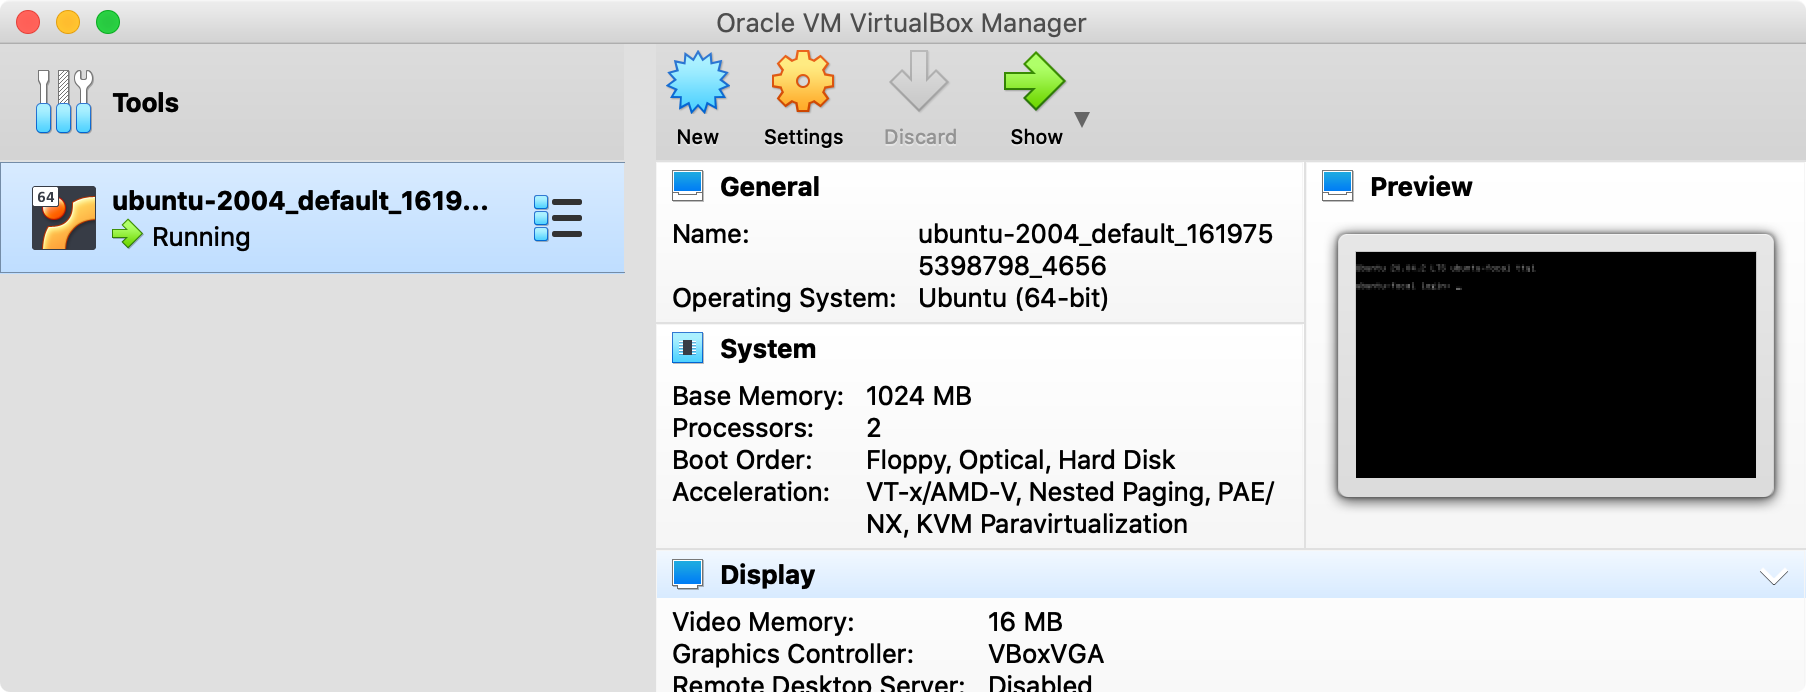 If we create a new directory, put a Vagrantfile file and start it with vagrant up, we'll see another virtual machine in VirtualBox started. And from above screenshot, we noticed that the memory of the virtual machine created by Vagrant is only 1024 MB. Other configurations can be seen in its Settings, such as the network is NAT. Most of these can be configured through Vagrantfile. If we use vagrant to control VirtualBox, please try not to modify the virtual machine settings directly in VirtualBox.
File sharing between virtual machine and host
Notice that the mounted shared directory shows up during the startup of vagrant, such as the above1==> default: Mounting shared folders...
2 default: /vagrant => /Users/yanbin/vagrant/ubuntu-20.04That is, go to the /vagrant directory on the virtual machine, and the content is the /Users/yanbin/vagrant/ubuntu-20.04 directory on localhost, which is the directory where the Vagrantfile file is located. Mounted in the virtual machine is a readable and writable file system, and files can be shared between the virtual machine and localhost through this shared folder.
vagrant ssh: ssh to virtual machine
 1ubuntu-20.04$ vagrant ssh
 2Welcome to Ubuntu 20.04.2 LTS (GNU/Linux 5.4.0-72-generic x86_64)
 3
 4.......
 5
 6  System information as of Fri Apr 30 04:19:44 UTC 2021
 7
 8  System load:  0.02              Processes:               113
 9  Usage of /:   3.2% of 38.71GB   Users logged in:         1
10  Memory usage: 20%               IPv4 address for enp0s3: 10.0.2.15
11  Swap usage:   0%
12
13.......
14
15Last login: Fri Apr 30 04:06:24 2021 from 10.0.2.2
16vagrant@ubuntu-focal:~$ free
17              total        used        free      shared  buff/cache   available
18Mem:        1004584      143788      500384         940      360412      706680
19Swap:             0           0           0
20vagrant@ubuntu-focal:~$ hostname
21ubuntu-focal
At this time, we entered the VirtualBox virtual machine ubuntu-2004_default_1619..., and now we can do what ssh can do.
vagrant halt: Turn off the current virtual machine, the status of the virtual machine in VirtualBox becomes Powered Offvagrant status: View the status of the current virtual machine, running, poweroff, not created (never up), saved (the state after executing vagrant suspend)vagrant destroy: destroy the virtual machine
ubuntu-20.04$ vagrant destroyThe vagrant destroy operation will delete the corresponding virtual machine from VirutalBox.
default: Are you sure you want to destroy the 'default' VM? [y/N] y
==> default: Forcing shutdown of VM...
==> default: Destroying VM and associated drives..
The commands of vagrant can be listed with vagrant --help, and let's take a look at some other common used vagrant commands
vagrant global-status - List the status of all virtual machines
1$ vagrant global-status
2id       name    provider   state    directory
3--------------------------------------------------------------------------
4cef6e15  default virtualbox poweroff /Users/yanbin/vagrant/ubuntu-18.04
5b9988a1  default virtualbox running  /Users/yanbin/vagrant/fedora30
65888413  default virtualbox running  /Users/yanbin/vagrant/ubuntu-20.04
Above information tells use all ID and name of each Vagrant virtual machines. Name is not unique, but ID is. If we use name follows vagrant command, it will only affect the first available virtual machine.
vagrant up cef6e15 Will start the virtual machine of ubuntu-18.04vagrant ssh b9988a1 Will ssh to connect to fedora30 virtual machineWith id or name, We can run vagrant command anywhere, don't have to go to the directory where Vagrantfile is located.
vagrant cloud search - search box
If we don't want to open https://app.vagrantup.com/boxes/search web search a vagrant box, we can also use commands to search 1ubuntu-20.04$ vagrant cloud search fedora
2| NAME | VERSION | DOWNLOADS | PROVIDERS |
3+----------------------+---------+-----------+--------------------------------------------------------+
4| generic/fedora28 | 3.2.18 | 267,894 | vmware_desktop, virtualbox, parallels, libvirt, hyperv |
5| generic/fedora27 | 3.2.18 | 171,412 | vmware_desktop, virtualbox, parallels, libvirt, hyperv |
6| generic/fedora32 | 3.2.18 | 116,801 | vmware_desktop, virtualbox, parallels, libvirt, hyperv |
7| generic/fedora33 | 3.2.18 | 114,666 | vmware_desktop, virtualbox, parallels, libvirt, hyperv |
8| generic/fedora26 | 3.2.18 | 111,408 | vmware_desktop, virtualbox, parallels, libvirt, hyperv |
9| generic/fedora25 | 3.2.18 | 102,329 | virtualbox, vmware_desktop, parallels, libvirt, hyperv |
10| generic/fedora29 | 3.2.18 | 88,640 | vmware_desktop, virtualbox, parallels, libvirt, hyperv |
11| generic/fedora30 | 3.2.18 | 83,148 | vmware_desktop, virtualbox, parallels, libvirt, hyperv |
12| roboxes/fedora28 | 3.2.18 | 55,764 | vmware_desktop, virtualbox, parallels, libvirt, hyperv |
13| lavabit/magma-fedora | 3.2.18 | 53,727 | vmware_desktop, virtualbox, libvirt, hyperv |
14+----------------------+---------+-----------+--------------------------------------------------------+All boxes, versions and providers corresponding to the keywords will be listed. Sometime, searching box in terminal is slower more than with web page. We can choose either way, search https://app.vagrantup.com, or use commdn
vagrant cloud search, once we get found the box, then create Vagrant file manually, or vagrant init, or vagrant box add.vagrant box add - add box to local warehouse
$ vagrant box add generic/fedora30 --provider virtualboxIf no provider is specified, all available providers will be listed for selection. vagrant box add can also add a box from a url or local file path. The box of vagrant box add is stored in the
~/.vagrant.d/boxes directory under Mac OS X1$ ls -l ~/.vagrant.d/boxes
2total 0
3drwxr-xr-x 4 yanbin staff 128 Apr 29 23:45 generic-VAGRANTSLASH-fedora30
4drwxr-xr-x 4 yanbin staff 128 Apr 30 00:29 hashicorp-VAGRANTSLASH-vagrant-share
5drwxr-xr-x 4 yanbin staff 128 Apr 29 23:53 ubuntu-VAGRANTSLASH-bionic64
6drwxr-xr-x 4 yanbin staff 128 Apr 29 19:15 ubuntu-VAGRANTSLASH-focal64vagrant box list - list local boxes
$ vagrant box list
generic/fedora30 (virtualbox, 3.2.18)
ubuntu/bionic64 (virtualbox, 20210415.0.0)
ubuntu/focal64 (virtualbox, 20210415.0.0)
vagrant box remove - remove box from local
$ vagrant box remove ubuntu/bionic64Of course, it will be removed from
Removing box 'ubuntu/bionic64' (v20210415.0.0) with provider 'virtualbox'...
~/.vagrant.d/boxes directory.Other vagrant box commands:
vagrant box outdated: check if all boxes are updated
vagrant box update: update box
vagrant's share command
vagrant share it not a built-in command, we must install the vagrant-share plug-in and ngrok component firstly$ vagrant plugin install vagrant-shareCommands such as vagrant share --ssh, vagrant share --http 80 do not seem useful to use.
$ brew install ngrok
The following is some knowledges about Vagrantfile configurations, including machine name, memory, CPU, network, port forwarding, and pre-installed software when initializing the virtual machine.
To understand the how to config
Vagrantfile, we could check a Vagrantfile generated by command vagrant init ubuntu/focal64. Where it has details explainations. The official documentation is here https://www.vagrantup.com/docs/vagrantfile , I do very like the style HashiCorp's online documentation, visiting Terraform's online documentation is almost my everyday work.Configure hostname of a virtual machine
By default, the hostname of the virtual machine is uncertain, and comes from the machine name preset in the box. When we configure multiple Vagrant virtual machines for clustering, it is necessary to specify a meaningful machine name for each virtual machine. in this case, the Vagrantfile needs to be configured as follows1Vagrant.configure("2") do |config|
2 config.vm.hostname = "k8s-master"
3 config.vm.box = "ubuntu/focal64"
4end Then use the command
vagrant reload to restart the virtual machine (the equivalent of vagrant halt; vagrant up), and then vagrant ssh, we'll see hostname becomes k8s-masterubuntu-20.04$ vagrant ssh
vagrant@k8s-master:~$ hostname
k8s-master
Configure virtual machine identifier name
Here, virtual machine identifier name and virtual machine hostname are different concepts. virtual machine name is an identifier for vagrant operations. Executevagrant global-status shows this name1$ vagrant global-status
2id name provider state directory
3-----------------------------------------------------------------------
4f284d36 default virtualbox running /Users/yanbin/vagrant/ubuntu-20.04
5def48b8 default virtualbox running /Users/yanbin/vagrant/fedora30Remember that, many vagrant can task parameters
[id | name], which is above id or name, but because the name is always default by default, so use id to identify the virtual machine is always a good idea, for example$ vagrant ssh f284d36If we give the virtual machine an identifier name, for example
$ vagrant halt d3f48b8
ubuntu-server-1, then the operation can be$ vagrant up ubuntu-server-1To configure the identifier name of the virtual machine,
Vagrantfile call the config.vm.define function and pass in a name1Vagrant.configure("2") do |config|
2 config.vm.define "ubuntu-server-1"
3 config.vm.box = "ubuntu/focal64"
4endReload the virtual machine, use
vagrant global-status to check it again1$ vagrant global-status
2id name provider state directory
3------------------------------------------------------------------------------
4def48b8 default virtualbox running /Users/yanbin/vagrant/fedora30
56dc44cb ubuntu-server-1 virtualbox running /Users/yanbin/vagrant/ubuntu-20.04Name changed. Now we can use name to operate. Actually, the virtual machine identifier name is not that important, because we can always use ID. We can see more information from the command
vagrant global-status, including the directory where the virtual machine located. We'll frequently use vagrant global-status to check ID, name before other vagrant commands.Note: After updating the virtual machine name, need
vagrant global-status --pruneto clean out the junk entries.Configure the name of the virtual machine
Why there is another name? The reason why we say the name of the virtual machine here is because..., first configure and then see the effect after running1Vagrant.configure("2") do |config|
2 config.vm.box = "ubuntu/focal64"
3
4 config.vm.provider "virtualbox" do |vb|
5 vb.name = "ubuntu-server-x"
6 end
7endRun
vagrant destroy, then vagrant up, then open VirtualBox, we'll see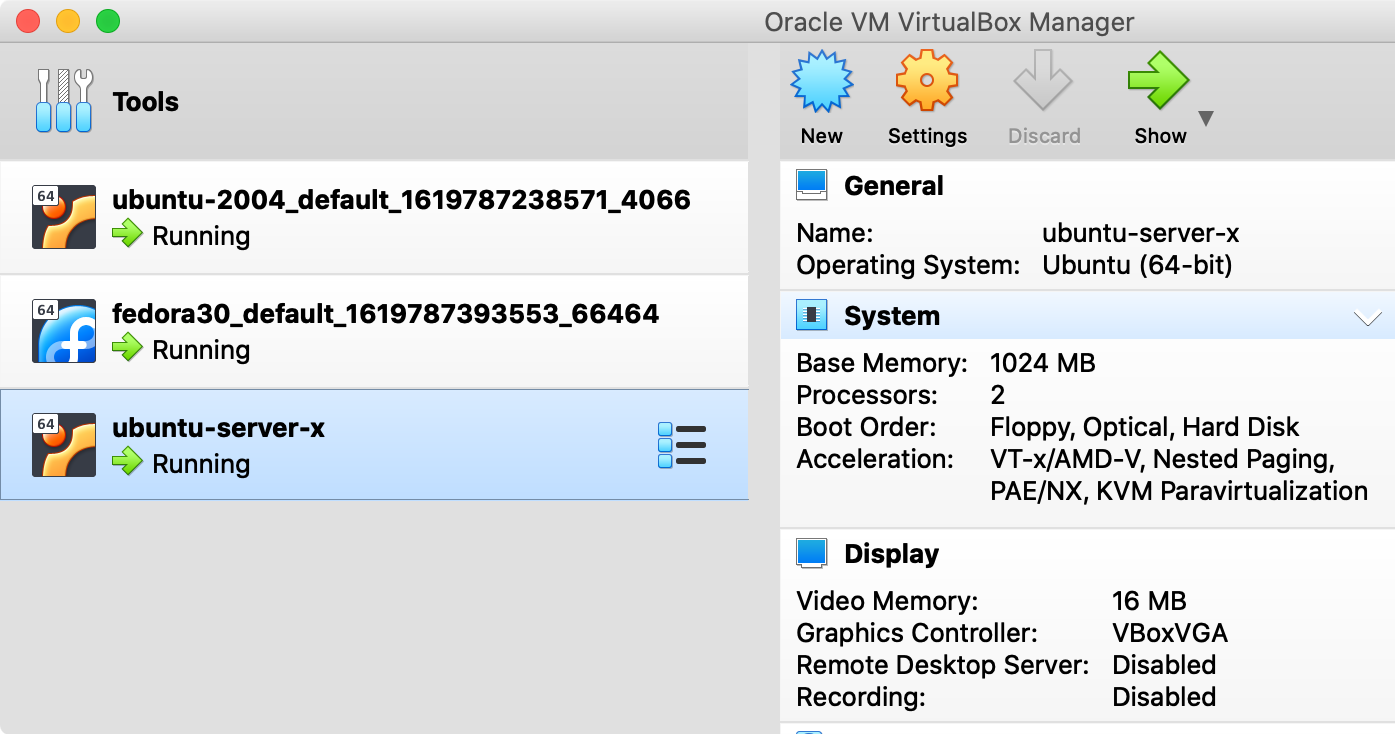
ubuntu-server-x, instead of xxx_default followed by a timestamp with nanoseconds. When we choose to use vagrant, we probably rarely check virtual machine name in VirtualBox.Configure virtual machine memory and CPU
The configuration of virtual machine memory is obviously very important. Just imagine what development work can we do with the default 1G memory? Earlier we have come to the configuration of the config.vm.provider block, and the configuration of memory and CPU is also carried out. For example, we configure 2G memory and 3 CPUs.1Vagrant.configure("2") do |config|
2 config.vb.box = "ubuntu/focal64"
3
4 config.vm.provider "virtualbox" do |vb|
5 vb.memory = 2048
6 vb.cpus = 3
7 end
8endAfter vagrant reload, vagrant ssh into the virtual machine, check the memory and CPU
1vagrant@ubuntu-focal:~$ cat /proc/meminfo | grep MemTotal
2MemTotal:        2035020 kB
3vagrant@ubuntu-focal:~$ cat /proc/cpuinfo | grep processor
4processor   : 0
5processor   : 1
6processor   : 2
The memory has changed from the default 1G to 2G, and there are 3 CPUs.
Network configuration
The default network configuration of the Vagrant virtual machine is NAT, which allows the virtual machine to access the external network and communicate with the host or other local virtual machines, but the external machine cannot directly access the virtual machine. We can configure to obtain IP from DHCP (it will be on the same network as the host, which is equivalent to the bridge option in VirutalBox), or use a static IP address, which makes it easier to interact with external machines.1Vagrant.configure("2") do |config|
2 config.vm.box = "ubuntu/"
3 config.vm.network "public_network"
4# config.vm.network "private_network", type: "dhcp" # save as above
5# config.vm.network "private_network", ip: "172.28.1.100" # static private IP
6 config.vm.network "forwarded_port", guest: 80, host: 8080
7endThen execution
vagrant reload will ask which network interface to choose to connect to an external network. After vagrant started, vagrant ssh login, we will be able to see 1vagrant ssh
2Welcome to Ubuntu 20.04.2 LTS (GNU/Linux 5.4.0-72-generic x86_64)
3
4 * Documentation: https://help.ubuntu.com
5 * Management: https://landscape.canonical.com
6 * Support: https://ubuntu.com/advantage
7
8 System information as of Fri Apr 30 14:06:34 UTC 2021
9
10 System load: 0.21 Processes: 131
11 Usage of /: 3.2% of 38.71GB Users logged in: 0
12 Memory usage: 9% IPv4 address for enp0s3: 10.0.2.15
13 Swap usage: 0% IPv4 address for enp0s8: 192.168.86.47IP address
192.168.86.47 is allocated from my wifi router IP address, rather than 10.0.2.15 is assigned on from NAT.config.vm.network "provate_network", ip: "172.28.1.100"The above static IP address will cause a virtual network 172.28.1.1/24 to be created on the host machine, such as vboxnet1, or vboxnet2 (if vboxnet1 is used). Therefore, the static IP of the virtual machine can always be accessed by the host machine and other virtual machines on the host machine.
If too many static IP segments are configured in the Vagrantfile, too many network devices like vboxnet1, vboxnet2, vboxnet3... will be generated in the host operating system. You can see them with ifconfig
 1$ ifconfig
 2....
 3vboxnet0: flags=8843<UP,BROADCAST,RUNNING,SIMPLEX,MULTICAST> mtu 1500
 4    ether 0a:00:27:00:00:00
 5    inet 127.0.0.1 netmask 0xffffff00 broadcast 127.0.0.255
 6vboxnet1: flags=8843<UP,BROADCAST,RUNNING,SIMPLEX,MULTICAST> mtu 1500
 7    ether 0a:00:27:00:00:01
 8    inet 10.0.2.1 netmask 0xffffff00 broadcast 10.0.2.255
 9vboxnet2: flags=8943<UP,BROADCAST,RUNNING,PROMISC,SIMPLEX,MULTICAST> mtu 1500
10    ether 0a:00:27:00:00:02
11    inet 172.28.1.1 netmask 0xffffff00 broadcast 172.28.1.25
vboxnetX network interfaces are generated because of too may configuring static IP in Vagrantfile, we need to use VBoxMange to clean up
$ VBoxManage hostonlyif remove vboxnet1Adding
$ VBoxManage hostonlyif remove vboxnet2
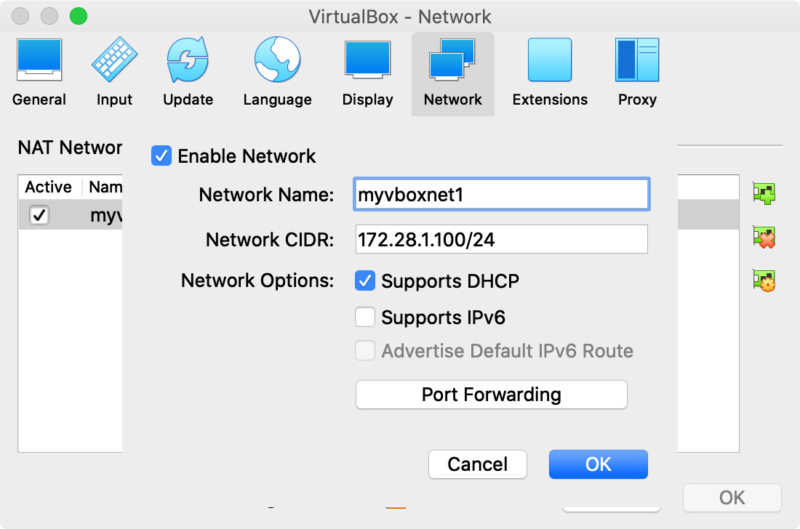
auto_config: false to config.vm.network will no longer automatically configure vboxnetX. It needs to be created manually to avoid a lot of garbage. The complete configuration is as followsconfig.vm.network "private_network", ip: "172.28.1.100", auto_config: falseFor example, for VBoxManger, we should create a network manually
$ VBoxManage natnetwork add --netname myvboxnet1 --network "172.28.1.100/24" --enable --dhcp onIt will be like this in VirtualBox

Port forwarding configuration
Especially when configured as a default NAT network or static IP, external machines (non-host machines or other virtual machines on it) cannot be directly accessed. In this situation, the port forwarding function is required, which need host port to map to virtual machine port.1Vagrant.configure("2") do |config|
2 config.vm.box = "ubuntu/"
3 config.vm.network "forwarded_port", guest: 80, host: 8080
4endThen
vagrant reload, we can see the output when starting1==> default: Forwarding ports...
2 default: 80 (guest) => 8080 (host) (adapter 1)
3 default: 22 (guest) => 2200 (host) (adapter 1)Or use to
vagrant port list the current port mapping$ vagrant portThe host sees the 8080 listening port started by VBoxHead1
22 (guest) => 2200 (host)
80 (guest) => 8080 (host)
1$ netstat -na|grep 8080
2tcp4       0      0  *.8080                 *.*                    LISTEN
3$ lsof -i :8080
4COMMAND     PID USER   FD   TYPE             DEVICE SIZE/OFF NODE NAME
5VBoxHeadl 33617 yanbin   20u  IPv4 0xd679f7ee9be9755d      0t0  TCP *:http-alt (LISTEN)
Let's do a test of port forwarding, we need to
vagrant ssh enter the virtual machine to install apache, and start it in virtual machine, then access the host port 8080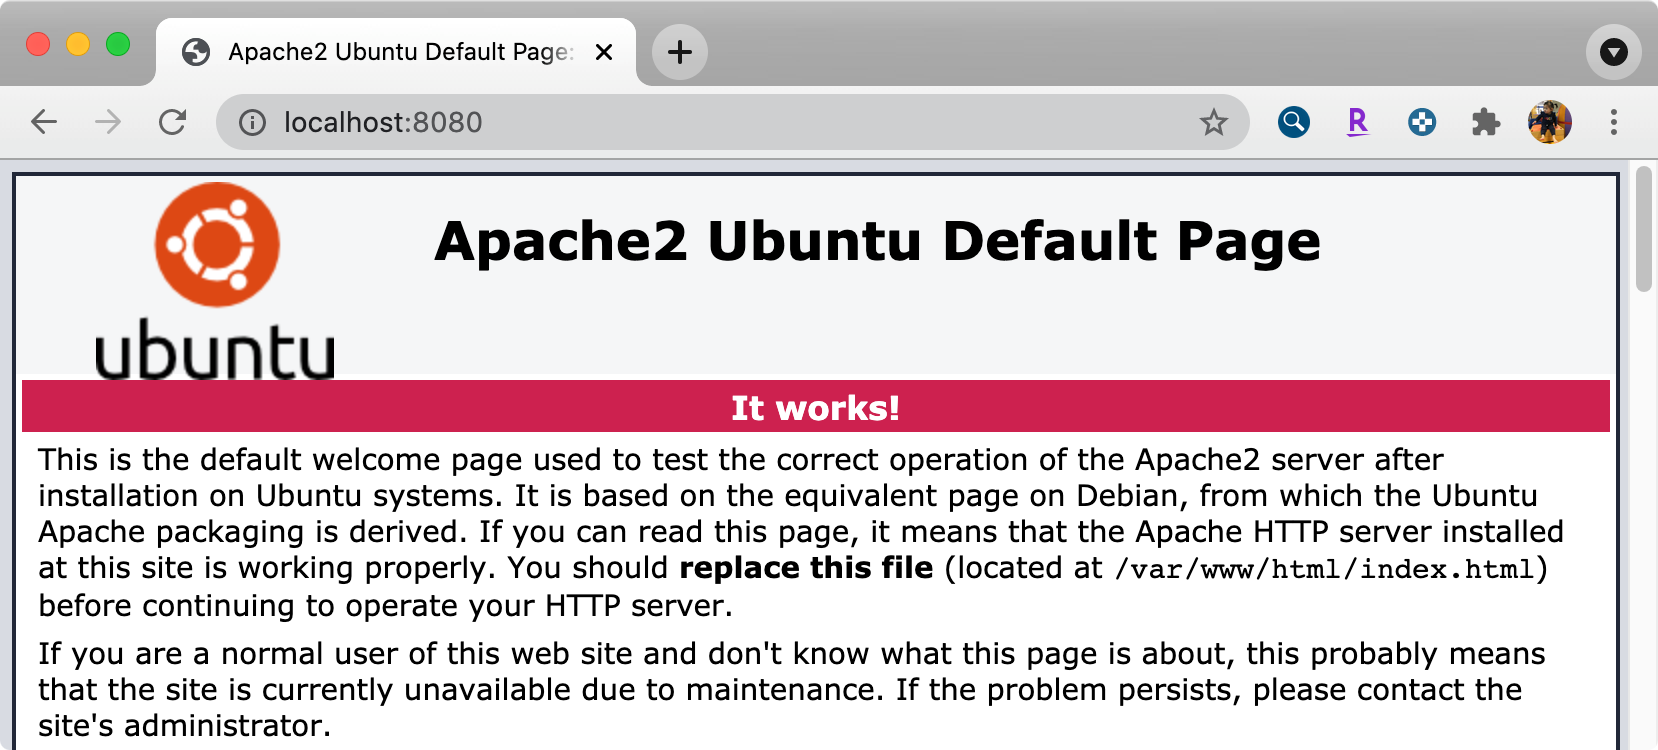 config.vm.network "forward_port", guest: <port>, host: <port> can appear multiple times in the Vagrantfile to configure multiple port mappings. Because it's a ruby function call, we can call it using named parameters.
Pre-installed software (provision)
If we need, we can manually install sofeware aftervagrant up, and vagrant ssh. But if we run vagrant destroy destroy the virtual machine, the vagrant up, we have to install the same software again. To avoid installing the sofeware every time, we can use the vagrant box with our wanted software, or after manually after installing the software, we can saved the virtual machine as a new box with command vagrant package --base name --output /path/to/name.box, --base namethe nameavailable VBoxManage list vms listed.if
--output parameter ommited, the new box will be saved in the current directory, the file name is package.box. Once we save the new box locally, we can it then vagrant box add /path/to/name.box.In addition to the above two approaches, provision is the better way to pre-install software, or other settings. Look at the configuration first
1Vagrant.configure("2") do |config|
2  config.vm.box = "ubuntu/focal64"
3
4  config.vm.provision "shell", inline: <<-SHELL
5    apt update
6    apt install -y apache2
7  SHELL
8end
The configuration here
config.vm.provision is executed only the first time we create a virtual machine, the future vagrant up will not execute it again. So, when we run vagrant destroy destroyed a vagrant virtual machine, next time, running vagrant up will re-create a new virtual machine and install Apache2. For an existing virtual machine, modify config.vm.provision, vagrant halt then vagrant up won't execute the commands in config.vm.provision.Unless run
vagrant provision to force execute the content of config.vm.provision. Or use vagrant [up|reload] --provision to provision at startup/reload.Besides using inline to execute scripts, provision can also execute external script files, or call Ansible, Chef, puppet, etc. For details, please see https://www.vagrantup.com/docs/provisioning .
Configure multiple virtual machines in a Vagrantfile
For each vagrant machine, we create a new folder and a separate Vagrantfile is not necessary. We could organize multiple related vagrant virtual machine in one singleVagrantfile 1Vagrant.configure("2") do |config|
2 config.vm.provision "shell", inline: "echo Hello"
3
4 config.vm.define "web" do |web|
5 web.vm.box = "generic/fedora33"
6 web.vm.provision :shell, inline: "dnf install httpd -y; systemctl start httpd.service"
7 end
8
9 config.vm.define "db" do |db|
10 db.vm.box = "ubuntu/focal64"
11 db.vm.provision :shell, inline: "apt install -y mysql-server"
12 end
13endThen
vagrant up, it will start both virtual machines displayed weband db when boot up, check the status1$ vagrant global-status
2id name provider state directory
3----------------------------------------------------------
4b638892 web virtualbox running /Users/yanbin/vagrant
5d5a0845 db virtualbox running /Users/yanbin/vagrantIf you want to control individually, add id or name, such as
vagrant up web, vagrant ssh db, and etc.link:
永久链接 https://yanbin.blog/english-vagrant-intro-config-commands/, 来自 隔叶黄莺 Yanbin's Blog
[版权声明]
本文采用 署名-非商业性使用-相同方式共享 4.0 国际 (CC BY-NC-SA 4.0) 进行许可。