用 grunt-contrib-connect 构建实时预览开发环境
本文基本是参照着 用Grunt与livereload构建实时预览的开发环境 实操了一遍,直接实现能实时预览文件列表,内容页面。不用刷新页面了,这比以前开发网页程序都简单。
这里要用到的 Grunt 插件有
grunt-contrib-connect, 用来充当一个静态文件服务器,本身集成了 livereload 功能
grunt-contrib-watch, 监视文件的改变,然后执行指定任务,这里用来刷新
以下是个辅助的插件
load-grunt-tasks, 省事的插件,有了这个可以不用写一堆的
参考的文档中提到了 time-grunt 插件,可用来显示每一个任务所花的时间和百分比,由于此示例中基本就 watch 任务占了百分百的时间。
下面是 Grunt 项目的两个基本的文件
1. package.json
运行
2. Gruntfile.js
现在我们配置好了一个静态文件 Web 服务器,运行命令
这是一个响应式设计的页面
 缩写浏览器宽度
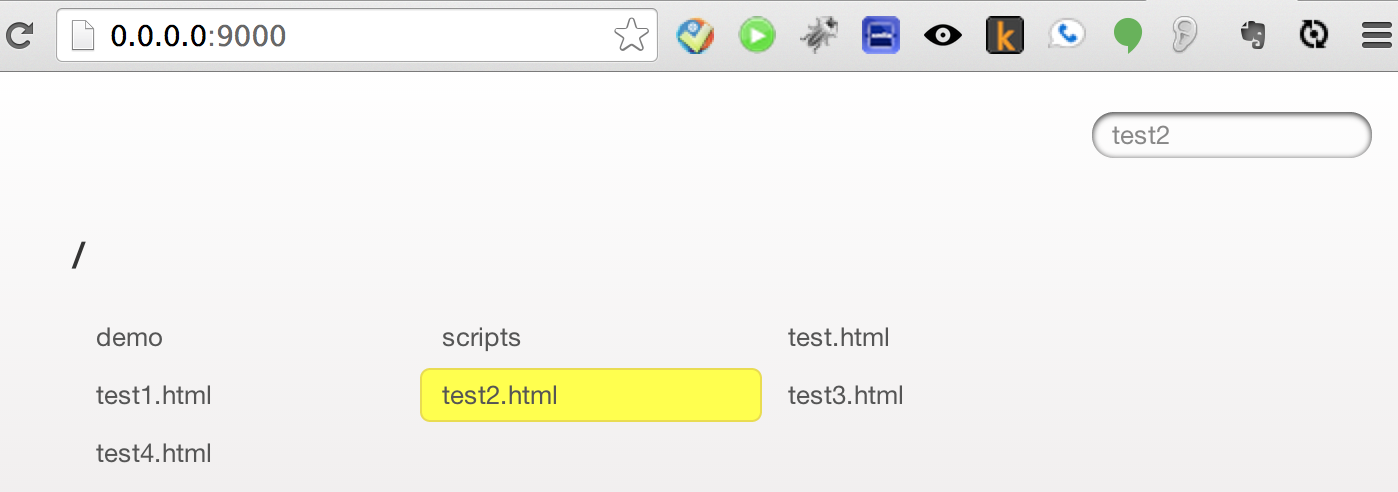
 这时候在 app 目录中增,删相关类型的文件都会实时反映在上面的 http://0.0.0.0:9000 页面上,也就是文件列表可以实时刷新。
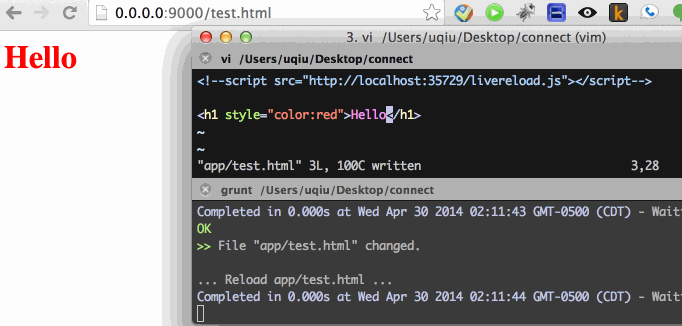
现在我们想要更极致的实时页面内容的预览,我们打开上面的某个页面,如 http://0.0.0.0:9000/test.html,然而我们来编辑 test.html 文件内容,来观察页面是不是能实时预览。
你也有可能在页面上看到实时的修改,因为页面中没有 body 标签,为能实时预览页面中需要有 body 标签,因为 livereload 会在 body 中加上通信的代码:
1. 手动在需要实时预览的页面里加上
注意相应的主机和端口号
2. 安装浏览器扩展,包括 Safari, Chrome 和 Firefox 的,点击链接 How do I install and use the browser extensions? 安装。这样就不用在页面上引入上面的脚本。
现在看实时的预览效果
 grunt-connect 还可以和 grunt-connect-proxy 结合来制作本地代理访问其他域名的 api 而不用处理跨域问题,有空再体验下 grunt-connect-proxy。
永久链接 https://yanbin.blog/grunt-contrib-connect-build-livereload-dev-env/, 来自 隔叶黄莺 Yanbin's Blog
grunt-connect 还可以和 grunt-connect-proxy 结合来制作本地代理访问其他域名的 api 而不用处理跨域问题,有空再体验下 grunt-connect-proxy。
永久链接 https://yanbin.blog/grunt-contrib-connect-build-livereload-dev-env/, 来自 隔叶黄莺 Yanbin's Blog
[版权声明] 本文采用 署名-非商业性使用-相同方式共享 4.0 国际 (CC BY-NC-SA 4.0) 进行许可。
这里要用到的 Grunt 插件有
grunt-contrib-connect, 用来充当一个静态文件服务器,本身集成了 livereload 功能
grunt-contrib-watch, 监视文件的改变,然后执行指定任务,这里用来刷新
grunt serve 打开的页面以下是个辅助的插件
load-grunt-tasks, 省事的插件,有了这个可以不用写一堆的
grunt.loadNpmTasks('xxx'),再多的任务只需要写一个 require('load-grunt-tasks')(grunt)。参考的文档中提到了 time-grunt 插件,可用来显示每一个任务所花的时间和百分比,由于此示例中基本就 watch 任务占了百分百的时间。
下面是 Grunt 项目的两个基本的文件
1. package.json
1{
2    "name": "test_connect",
3    "version": "0.0.1",
4    "devDependencies": {
5        "grunt-contrib-connect": "~0.6.0",
6        "grunt-contrib-watch": "~0.5.3",
7        "load-grunt-tasks": "~0.3.0"
8    }
9}
运行
npm install 下载安装上面的依赖2. Gruntfile.js
 1module.exports = function(grunt){
 2
 3    require('load-grunt-tasks')(grunt); //加载所有的任务
 4    //require('time-grunt')(grunt); 如果要使用 time-grunt 插件
 5
 6    grunt.initConfig({
 7        connect: {
 8            options: {
 9                port: 9000,
10                hostname: '*', //默认就是这个值,可配置为本机某个 IP,localhost 或域名
11                livereload: 35729  //声明给 watch 监听的端口
12            },
13
14            server: {
15                options: {
16                    open: true, //自动打开网页 http://
17                    base: [
18                        'app'  //主目录
19                    ]
20                }
21            }
22        },
23
24        watch: {
25            livereload: {
26                options: {
27                    livereload: '<%=connect.options.livereload%>'  //监听前面声明的端口  35729
28                },
29
30                files: [  //下面文件的改变就会实时刷新网页
31                    'app/*.html',
32                    'app/style/{,*/}*.css',
33                    'app/scripts/{,*/}*.js',
34                    'app/images/{,*/}*.{png,jpg}'
35                ]
36            }
37        }
38    });
39
40    grunt.registerTask('serve', [
41        'connect:server',
42        'watch'
43    ]);
44}
现在我们配置好了一个静态文件 Web 服务器,运行命令
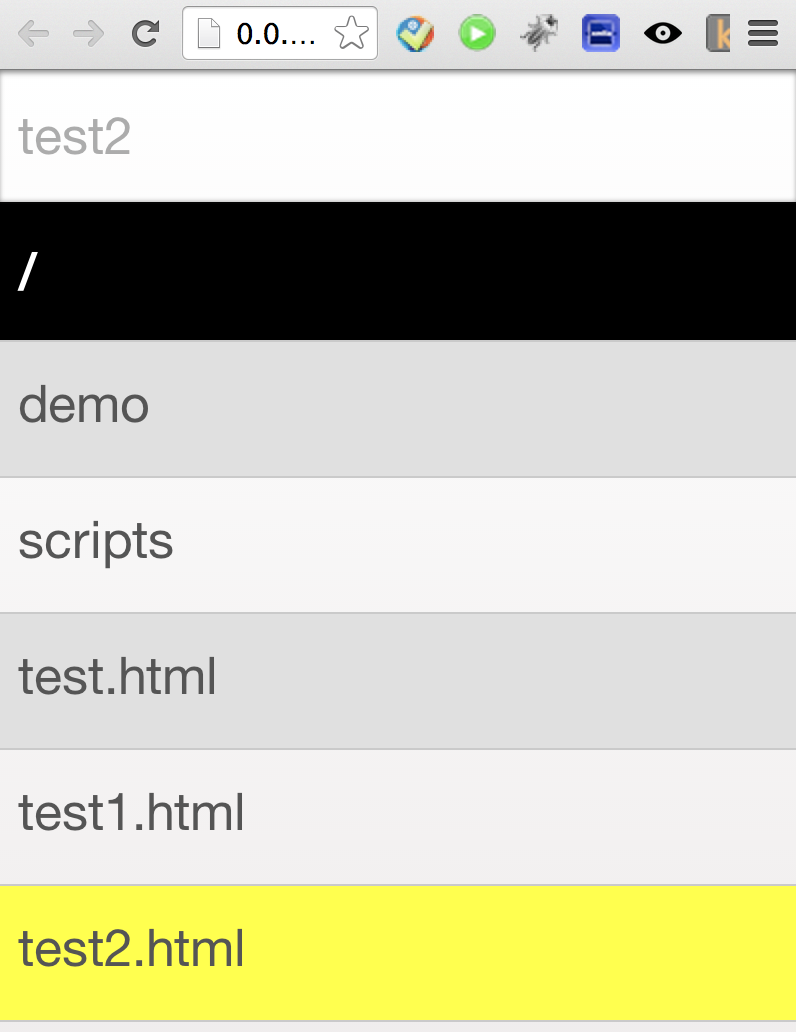
grunt serve会自动打开浏览器访问 http://0.0.0.0:9000, 然后有个 watch 一直在监听文件的改变。如果 app 目录下有 index.html 则浏览该文件,没有索引文件就显示文件目录列表。
这是一个响应式设计的页面
 缩写浏览器宽度
这时候在 app 目录中增,删相关类型的文件都会实时反映在上面的 http://0.0.0.0:9000 页面上,也就是文件列表可以实时刷新。
缩写浏览器宽度
这时候在 app 目录中增,删相关类型的文件都会实时反映在上面的 http://0.0.0.0:9000 页面上,也就是文件列表可以实时刷新。现在我们想要更极致的实时页面内容的预览,我们打开上面的某个页面,如 http://0.0.0.0:9000/test.html,然而我们来编辑 test.html 文件内容,来观察页面是不是能实时预览。
你也有可能在页面上看到实时的修改,因为页面中没有 body 标签,为能实时预览页面中需要有 body 标签,因为 livereload 会在 body 中加上通信的代码:
<script type="text/javascript">document.write('<script src="' + (location.protocol || 'http:') + '//' + (location.hostname || 'localhost') + ':35729/livereload.js?snipver=1" type="text/javascript"><\/script>')</script>如果有谁不加 body 标签也想能实时预览的话可以采用这里 https://github.com/gruntjs/grunt-contrib-watch#live-reloading 说的两种办法:
1. 手动在需要实时预览的页面里加上
1<script src="http://localhost:35729/livereload.js"></script>注意相应的主机和端口号
2. 安装浏览器扩展,包括 Safari, Chrome 和 Firefox 的,点击链接 How do I install and use the browser extensions? 安装。这样就不用在页面上引入上面的脚本。
现在看实时的预览效果
grunt-connect 还可以和 grunt-connect-proxy 结合来制作本地代理访问其他域名的 api 而不用处理跨域问题,有空再体验下 grunt-connect-proxy。
永久链接 https://yanbin.blog/grunt-contrib-connect-build-livereload-dev-env/, 来自 隔叶黄莺 Yanbin's Blog[版权声明]
本文采用 署名-非商业性使用-相同方式共享 4.0 国际 (CC BY-NC-SA 4.0) 进行许可。