从 Hibernate 到 iBatis,初次体验 SqlMap,领略另番 OR-Mapping
用Hibernate也有一段时间了,项目中也用过CMP以及.net的DataSet,也想体验一下iBatis的SqlMap方式的魅力了,以前总是看iBatis介绍一的文章,现在应是亲自动手心临其境的时候了。
 做这个实验基本是遵照 iBATIS SQL Maps 入门教程 中的例子做的,只是在原来的基础上还更简化了一些。
我用的开发工具是 Eclipse,如何建立你的工程和加入相应的 iBatis 包可不详叙。
iBatis的官网是 http://ibatis.apache.org/ ,可在这个网站上下载到需要的包, 我用的是2.1.5的版本,有三个jar包,分别是:ibatis-sqlmap-2.jar, ibatis-common-2.jar, ibatis-dao-2.jar, 最后注意加上你要用到的数据库驱动包,我在这个例子中用到的是 Oracle 数据库, JDBC 驱动包是 classes12.jar。
好啦,下面分六步介绍如何构建起一个最简单的IBatis应用程序
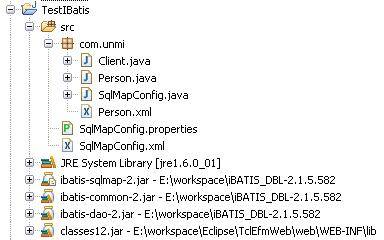
右边是下面几步创建文件的路径图,数据库表创建脚本就没列出来。
第一步:创建一个 测试数据库表,Person,SQL脚本
第二步:创建Java对应实体类, Person.java, 要有一个默认的构造函数,也就是符合JavaBean规范
第三步:创建SqlMap配置文件,相当于Hibernate的hibernate.cfg.xml配置文件,十分类似
第四步:创建SqlMap映射文件 Person.xml,相当于Hibernate的映射文件 *.hbm.xml,只是它的映射不靠POJO的属性到数据库字段的一一映射,靠的是Sql语句,所以谓之 SqlMap, 注意每条语句中参数的写法。
第五步:创建一个获取SqlMapClient的工厂类,相当于MyEclipse为Hibernate应用程序生成的HibernateSessionFactory类
第六步:终极体验,创建你的测试类 Client.java, 进行 CRUD 操作,SqlMapClient有如Hibernate的Session一般,仔细看看其中的方法吧。
补充:
2008-05-25 SqlMapClient 中有许多实用的方法。
iBatis 2.3.0 不再分 sqlmap/common/dao 多个包了,都放在一个包了
ibatis-2.3.0.677.jar
配置文件 SqlMapConfig.xml 的 DTD 是
<!DOCTYPE sqlMapConfig
PUBLIC "-//ibatis.apache.org//DTD SQL Map Config 2.0//EN"
"http://ibatis.apache.org/dtd/sql-map-config-2.dtd">
Map 映射文件的 DTD 是
<!DOCTYPE sqlMap
PUBLIC "-//ibatis.apache.org//DTD SQL Map 2.0//EN"
"http://ibatis.apache.org/dtd/sql-map-2.dtd"> 永久链接 https://yanbin.blog/hibernate-to-ibatis-or-mapping/, 来自 隔叶黄莺 Yanbin's Blog
[版权声明] 本文采用 署名-非商业性使用-相同方式共享 4.0 国际 (CC BY-NC-SA 4.0) 进行许可。
 做这个实验基本是遵照 iBATIS SQL Maps 入门教程 中的例子做的,只是在原来的基础上还更简化了一些。
我用的开发工具是 Eclipse,如何建立你的工程和加入相应的 iBatis 包可不详叙。
iBatis的官网是 http://ibatis.apache.org/ ,可在这个网站上下载到需要的包, 我用的是2.1.5的版本,有三个jar包,分别是:ibatis-sqlmap-2.jar, ibatis-common-2.jar, ibatis-dao-2.jar, 最后注意加上你要用到的数据库驱动包,我在这个例子中用到的是 Oracle 数据库, JDBC 驱动包是 classes12.jar。
好啦,下面分六步介绍如何构建起一个最简单的IBatis应用程序
右边是下面几步创建文件的路径图,数据库表创建脚本就没列出来。
第一步:创建一个 测试数据库表,Person,SQL脚本
1create table person(
2    id integer,
3    name varchar2(16),
4    passwd varchar2(16)
5)第二步:创建Java对应实体类, Person.java, 要有一个默认的构造函数,也就是符合JavaBean规范
 1package com.unmi;
 2
 3public class Person
 4{
 5    private Integer id;
 6    private String name;
 7    private String passwd;
 8
 9    public Person()
10    {
11
12    }
13
14    public Person(Integer id)
15    {
16        this.id = id;
17    }
18
19    public Integer getId()
20    {
21        return id;
22    }
23    public void setId(Integer id)
24    {
25        this.id = id;
26    }
27    public String getName()
28    {
29        return name;
30    }
31    public void setName(String name)
32    {
33        this.name = name;
34    }
35    public String getPasswd()
36    {
37        return passwd;
38    }
39    public void setPasswd(String passwd)
40    {
41        this.passwd = passwd;
42    }
43
44    public String toString()
45    {
46        return "Person[ID:"+id+",NAME:"+name+",PASSWD:"+passwd+"]";
47    }
48}第三步:创建SqlMap配置文件,相当于Hibernate的hibernate.cfg.xml配置文件,十分类似
 1<!DOCTYPE sqlMapConfig PUBLIC "-//iBATIS.com//DTD SQL Map Config 2.0//EN"
 2"http://www.ibatis.com/dtd/sql-map-config-2.dtd">
 3<sqlMapConfig>
 4
 5    <!-- SqlMap的环境属性配置 -->
 6    <settings cacheModelsEnabled="true" enhancementEnabled="true"
 7        lazyLoadingEnabled="true" maxRequests="32" maxSessions="10"
 8        maxTransactions="5" useStatementNamespaces="false" />
 9
10    <!-- 配置SqlMap的连接池属性,默认使用SimpleDataSource实现-->
11    <transactionManager type="JDBC">
12        <dataSource type="SIMPLE">
13            <property name="JDBC.Driver" value="oracle.jdbc.driver.OracleDriver" />
14            <property name="JDBC.ConnectionURL" value="jdbc:oracle:thin:@192.168.0.1:1521:test" />
15            <property name="JDBC.Username" value="scott" />
16            <property name="JDBC.Password" value="tiger" />
17        </dataSource>
18    </transactionManager>
19
20    <!-- SqlMap的映射文件 -->
21    <sqlMap resource="com/unmi/Person.xml" />
22</sqlMapConfig>
第四步:创建SqlMap映射文件 Person.xml,相当于Hibernate的映射文件 *.hbm.xml,只是它的映射不靠POJO的属性到数据库字段的一一映射,靠的是Sql语句,所以谓之 SqlMap, 注意每条语句中参数的写法。
 1<?xml version="1.0" encoding="UTF-8"?>
 2<!DOCTYPE sqlMap PUBLIC "-//iBATIS.com//DTD SQL Map 2.0//EN"
 3"http://www.ibatis.com/dtd/sql-map-2.dtd">
 4<sqlMap namespace="Person">
 5    <!-- 传入包装类型(Integer)参数,查询到结果集组装成一个Person对象返回 -->
 6    <select id="getPerson" parameterClass="int" resultClass="com.unmi.Person">
 7        SELECT ID as id, NAME as name, PASSWD as passwd
 8         FROM PERSON    WHERE ID = #value#
 9    </select><br/><br/>
10    <!-- 插入一条Person对应的记录到数据库中 -->
11    <insert id="insertPerson" parameterClass="com.unmi.Person">
12        INSERT INTO PERSON (ID, NAME, PASSWD) VALUES (#id#,#name#, #passwd#)
13    </insert><br/><br/>
14    <!-- 关联ID更新一条Person记录到数据库中 -->
15    <update id="updatePerson" parameterClass="com.unmi.Person">
16        UPDATE PERSON SET NAME = #name#, PASSWD = #passwd# WHERE ID = #id#
17    </update><br/><br/>
18    <!-- 根据ID从数据库中删除一条Person记录 -->
19    <delete id="deletePerson" parameterClass="com.unmi.Person">
20        DELETE PERSON WHERE ID = #id#
21    </delete>
22</sqlMap>第五步:创建一个获取SqlMapClient的工厂类,相当于MyEclipse为Hibernate应用程序生成的HibernateSessionFactory类
 1package com.unmi;
 2
 3import java.io.Reader;
 4
 5import com.ibatis.common.resources.Resources;
 6import com.ibatis.sqlmap.client.SqlMapClient;
 7import com.ibatis.sqlmap.client.SqlMapClientBuilder;
 8
 9public class SqlMapConfig
10{
11    private static final SqlMapClient sqlMap;
12    static
13    {
14        try
15        {
16            String resource = "SqlMapConfig.xml";
17            Reader reader = Resources.getResourceAsReader(resource);
18            sqlMap = SqlMapClientBuilder.buildSqlMapClient(reader);
19        }
20        catch (Exception e)
21        {
22            e.printStackTrace();
23            throw new RuntimeException("Error initializing MyAppSqlConfig class. Cause: " + e);
24        }
25    }
26
27    public static SqlMapClient getSqlMapInstance()
28    {
29        return sqlMap;
30    }
31}第六步:终极体验,创建你的测试类 Client.java, 进行 CRUD 操作,SqlMapClient有如Hibernate的Session一般,仔细看看其中的方法吧。
 1package com.unmi;
 2
 3import com.ibatis.sqlmap.client.SqlMapClient;
 4
 5public class Client
 6{
 7
 8    /** *//**
 9     * @param args
10     * @throws Exception
11     */
12    public static void main(String[] args) throws Exception
13    {
14        SqlMapClient sqlMap = SqlMapConfig.getSqlMapInstance(); // as coded above
15        Integer personPk = new Integer(1);
16        Person person = (Person) sqlMap.queryForObject("getPerson", personPk);
17        System.out.println(person);
18
19        person.setName("Unmi");
20        sqlMap.update("updatePerson",person);
21
22        person.setId(2);
23        sqlMap.insert("insertPerson",person);
24
25        sqlMap.delete("deletePerson", person);
26    }
27}
补充:
2008-05-25 SqlMapClient 中有许多实用的方法。
iBatis 2.3.0 不再分 sqlmap/common/dao 多个包了,都放在一个包了
ibatis-2.3.0.677.jar
配置文件 SqlMapConfig.xml 的 DTD 是
<!DOCTYPE sqlMapConfig
PUBLIC "-//ibatis.apache.org//DTD SQL Map Config 2.0//EN"
"http://ibatis.apache.org/dtd/sql-map-config-2.dtd">
Map 映射文件的 DTD 是
<!DOCTYPE sqlMap
PUBLIC "-//ibatis.apache.org//DTD SQL Map 2.0//EN"
"http://ibatis.apache.org/dtd/sql-map-2.dtd"> 永久链接 https://yanbin.blog/hibernate-to-ibatis-or-mapping/, 来自 隔叶黄莺 Yanbin's Blog
[版权声明]
 本文采用 署名-非商业性使用-相同方式共享 4.0 国际 (CC BY-NC-SA 4.0) 进行许可。