Lambda + API Gateway 创建需 API Key 验证的 API
希望在标题上尽量包含更多的信息,原本命题为: Lambda + API Gateway 创建需 API Key 验证的 API(Docker + Python + Terraform), 但是觉得太长了,于是只取了前半部份。仍然要在开头部分强调一下本文件打算要实现什么
目标明确,我们直冲到代码的目录结构来,项目目录为 api-gateway-demo, Github 上的链接为 api-gateway-demo. 后面详叙还会把其中每一个文件的内部给列出来
由于创建 Lambda 的时候需经指定 Docker 镜像的hash, 而非 tag 名称,所以执行分以下几步
也就是为什么要把其中三个 *.tf 文件放在一个子目录中去的缘故。也有人通过 Terraform 的
ecr.tf
main.tf
执行 terraform apply 后得到新建 ECR 的 url 如
app.py
其中用来处理两种类型的请求,分别是
由 resource 和 http_method 来路由请求到不同的方法,返回数据的格式特别要注意,必须是一个 API Gateway 能理解的格式,如上面的包含
requirements.txt
其中定义了本 Python 项目用到的第三方包(要是用到的话)
Dockerfile
基本镜像用 AWS 官方提供的,它为我们设定了下列内容
执行命令
lambda-api-gateway/iam.tf
在 Lambda 最基本的角色权限,能够在 CloudWatch 中创建 Log Group, Log Stream, 并往上写日志
lambda-api-gateway/lambda.tf
创建一个 Lambda 并关联相应的 IAM role 和 Docker 镜像
lambda-api-gateway/api-gateway.tf
终于来到本文最重要也是最复杂的地方了, 当然是最需要加以解释的,由后面的效果有助我们理解这一大段 Terraform 脚本。基本上就是创建一个使用 Docker 镜像的 Lambda, 在 API Gateway 中创建了一个 API
API 定义参照 REST API, 什么是资源,什么又是资源上的操作方法,然后把操作方法代理到相应的 Lambda,这一步叫做集成(Integration)。通过 API Gateway 想要调用 Lambda,需要在 Lambda 那一段加上相应的调用权限,最后通过使用计划(Usage Plan) 的方式把对资源的操作与 API Key 关联了起来。这一套建立起来之后,再最后就是部署到某个环境中去,API Gateway 就会为所定义的 API 生成一个 URL,开始使用了。
 可以在 API Gateway 的 Resources 里去测试这两个 API,但这儿会跳过 API key 的验证。所以应该找到 Stages 里 API 的 URL 来测试
 在这个页面我们找到 endpoint 是 https://q0dejwgby4.execute-api.us-east-1.amazonaws.com/stg/*, 用 curl 命令来测试下
不提供
 这也验证了 API Key 是生效了的,当我们对
 API Gateway 的 API Key 不仅仅是用来允不允许对某个资源的访问,还能用来限制对 API 的访问配额,所以是通过
最后别忘了 Lambda + API Gateway 中的 Lambda 这一主要劳动力,看看它发生了什么变化,这得上一张大图
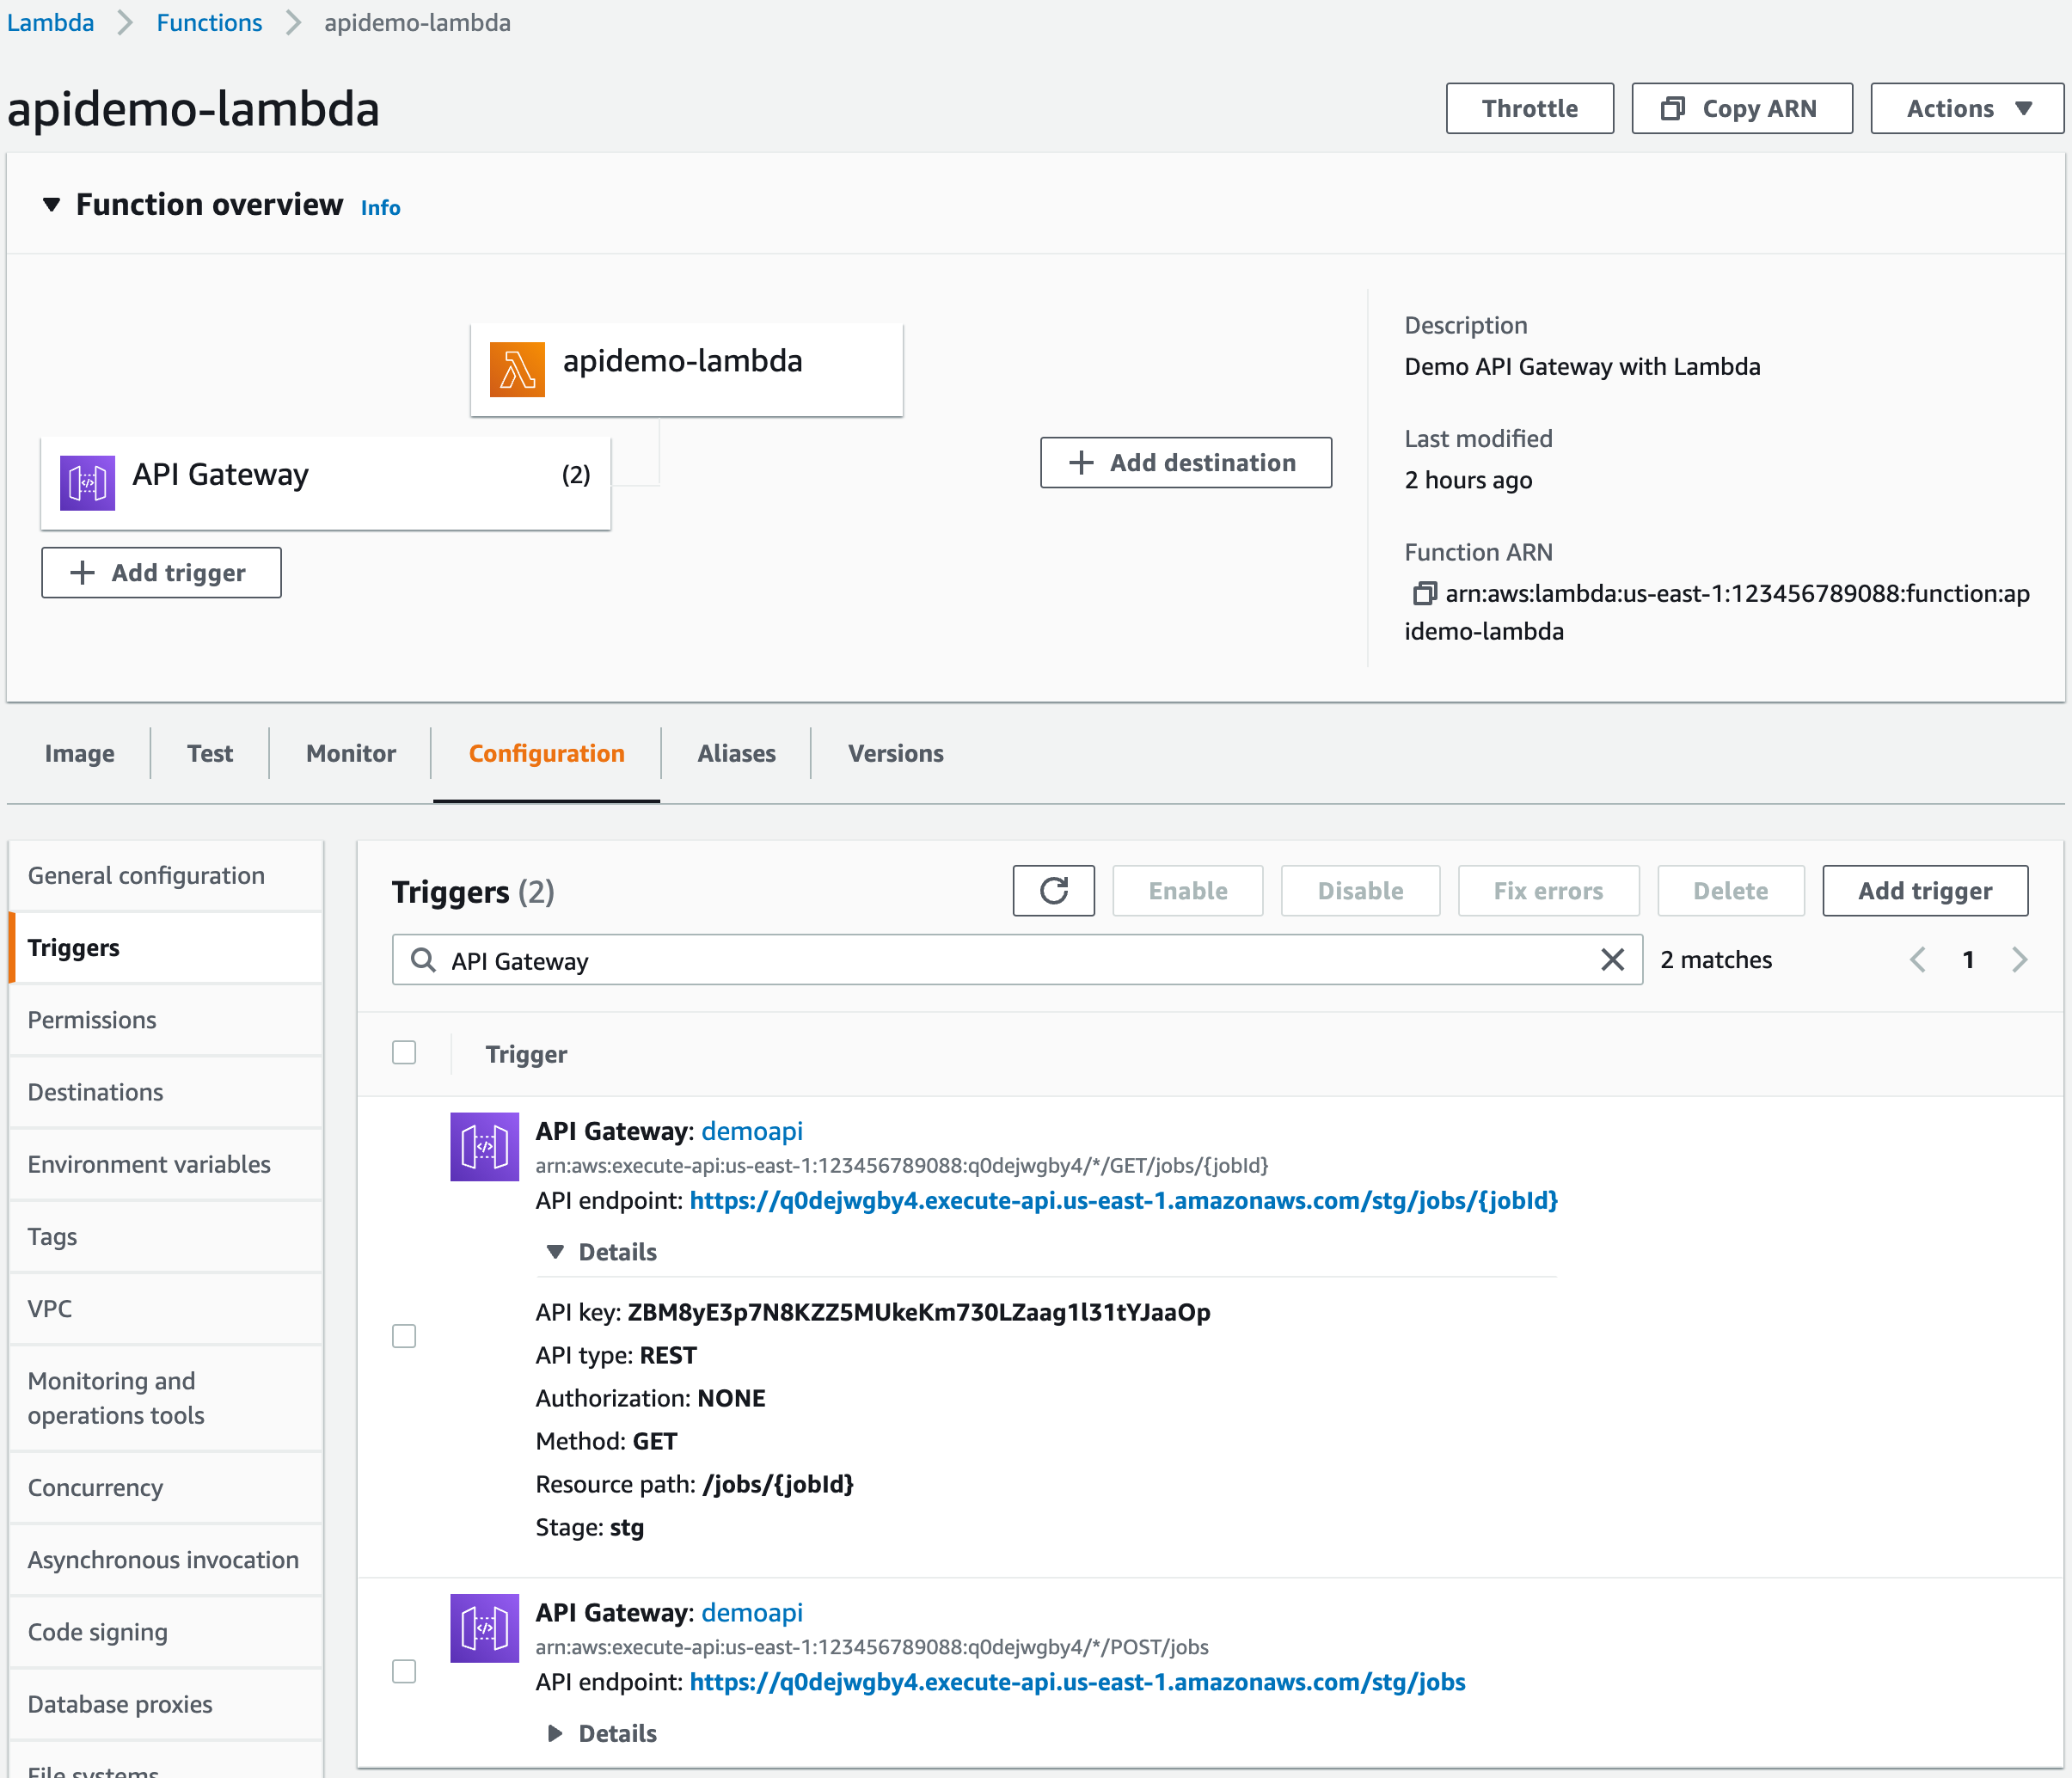 每一个 REST API 对应一个 Lambda 的触发器,并有相应的权限,同时 API Key 在这里也能看到,所以对像
如果在 API Gateway 的 Resource 中新加了一个 API, 也部署了,但在 Lambda 端未加上相应的权限,调用时也是得到 401: Forbidden
记得前面我们用 Terraform 生成的 API Gateway Resources 中,请求方法的
 而通过 AWS 控制台页面创建的一个请求方法的
 那么这有什么影响呢?我也不确定,反正
这两个一加,在执行 Terraform 时更容易出现依赖的问题。一个办法是这两个语句可以在后期补上,再执行 Terraform 脚本,或让它们去依赖
另外在 Lambda 中处理请求与响应时还有不少东西需要不断深入,比如说
Lambda + API Gateway 的
Mac OS X Yosemite and later:
[版权声明] 本文采用 署名-非商业性使用-相同方式共享 4.0 国际 (CC BY-NC-SA 4.0) 进行许可。
- 在 AWS 用 Lambda 和 API Gateway 创建 API
- 创建的 API 是 public 的,需要用 x-api-key 来验证
- Lambda 的实现代码打包在了一个 Docker 镜像中
- 整个 AWS 的基础架构(包括 ECR, Lambda, API Gateway 及权限等)是由 Terraform 脚本创建管理的
目标明确,我们直冲到代码的目录结构来,项目目录为 api-gateway-demo, Github 上的链接为 api-gateway-demo. 后面详叙还会把其中每一个文件的内部给列出来
 1api-gateway-demo
 2├── python
 3│   ├── Dockerfile
 4│   ├── app.py
 5│   └── requirements.txt
 6└── terraform
 7    ├── ecr.tf
 8    ├── lambda-api-gateway
 9    │   ├── api-gateway.tf
10    │   ├── iam.tf
11    │   └── lambda.tf
12    └── main.tf
由于创建 Lambda 的时候需经指定 Docker 镜像的hash, 而非 tag 名称,所以执行分以下几步
- Terraform 创建 ECR
- 创建 Docker 镜像并推送到上一步创建的 ECR 中
- 创建 Lambda 及 API Gateway 诸要素
也就是为什么要把其中三个 *.tf 文件放在一个子目录中去的缘故。也有人通过 Terraform 的
null_resource 配置 provisioner "local-exec" 在新建好 ECR 后自动创建 Docker 镜像及推送到 ECR 中去,但本文还是让事情更简单一些创建 ECR
需要进到terraform 目录,用到 ecr.tf 和 main.tf, 并把对模块 lambda-api-gateway 的引用用 count = 0 禁用掉。ecr.tf
1resource "aws_ecr_repository" "apidemo-lambda" {
2  name = "apidemo-lambda"
3}
4
5output ecr-url {
6  value = aws_ecr_repository.apidemo-lambda.repository_url
7}
main.tf
1provider "aws" {
2  region = "us-east-1"
3}
4
5module "lambda-api-gateway" {
6  count = 0
7  source = "./lambda-api-gateway"
8  ecr = aws_ecr_repository.apidemo-lambda
9}
执行 terraform apply 后得到新建 ECR 的 url 如
$ terraform apply --auto-approve
...... Outputs: ecr-url = "123456789088.dkr.ecr.us-east-1.amazonaws.com/apidemo-lambda"
创建并推着 Docker 镜像
进到python 目录, 先浏览一下其下的三个文件app.py
 1import json
 2import uuid
 3
 4
 5def build_response(body: object, status_code=200):
 6    return {
 7        'headers': { "Content-type": "application/json" },
 8        'statusCode': status_code,
 9        'body': json.dumps(body, indent=4) + '\n'
10    }
11
12
13def get_job_info(event):
14    job_id = event['pathParameters']['jobId']
15    return build_response({'message': f'job[{job_id}] is done'})
16
17
18def create_job(event):
19    job_name = json.loads(event['body'])['name']
20    job_id = str(uuid.uuid4())
21    return build_response({'message': f'job[{job_id}] submitted'}, 201)
22
23
24def handler(event, context):
25    resource = event['resource']
26    http_method = event['httpMethod']
27
28    if resource == '/jobs/{jobId}' and http_method == 'GET':
29        return get_job_info(event)
30    elif resource == '/jobs' and http_method == 'POST':
31        return create_job(event)
32    else:
33        return build_response({'message': 'Not found'}, 404)
其中用来处理两种类型的请求,分别是
- GET /jobs/{jobId}
- POST /jobs
由 resource 和 http_method 来路由请求到不同的方法,返回数据的格式特别要注意,必须是一个 API Gateway 能理解的格式,如上面的包含
header, statusCode, 和 body 的 Python 字典。API Gatewy 收到 Lambda 的返回,提取出相应的字段组装成一个 HTTP 响应包,如果 Lambda 端随意就可能见到 "malformed Lambda proxy response" 的问题。requirements.txt
1boto3其中定义了本 Python 项目用到的第三方包(要是用到的话)
Dockerfile
 1FROM public.ecr.aws/lambda/python:3.9
 2
 3RUN yum update -y && yum upgrade -y && rm -Rf /var/cache/yum
 4
 5COPY app.py ${LAMBDA_TASK_ROOT}
 6COPY requirements.txt  .
 7
 8RUN  pip3 install --no-cache-dir -r requirements.txt --target "${LAMBDA_TASK_ROOT}"
 9
10CMD [ "app.handler" ]
基本镜像用 AWS 官方提供的,它为我们设定了下列内容
- "WorkingDir": "/var/task"
- "Env": ["LAMBDA_TASK_ROOT"="/var/task"]
- "Entrypoint": ["/lambda-entrypoint.sh"] 我们的 app.handler 将作为它的参数
执行命令
$ aws ecr get-login-password --region us-east-1 | docker login --username AWS --password-stdin 123456789088.dkr.ecr.us-east-1.amazonaws.com注:关于创建 Lambda Docker 镜像及本地测试请参见:Creating Lambda container images, 此非本文的内容
Login Succeeded
$ docker build -t 123456789088.dkr.ecr.us-east-1.amazonaws.com/apidemo-lambda:1.0.0 .
$ docker push 123456789088.dkr.ecr.us-east-1.amazonaws.com/apidemo-lambda:1.0.0
创建 Lambda 及 API Gateway 基础设施
现在再回到terraform 目录,执行前需把 main.tf 中设置 count = 1 开启对模块 lambda-api-gateway 的调用。照旧,先看下其中三个文件的内容lambda-api-gateway/iam.tf
 1resource "aws_iam_role" "apidemo_lambda_role" {
 2  name               = "apidemo_lambda_role"
 3  assume_role_policy = <<EOF
 4{
 5  "Version": "2012-10-17",
 6  "Statement": [
 7    {
 8      "Action": "sts:AssumeRole",
 9      "Principal": {
10        "Service": "lambda.amazonaws.com"
11      },
12      "Effect": "Allow",
13      "Sid": ""
14    }
15  ]
16}
17EOF
18}
19
20resource aws_iam_role_policy_attachment attach-lambda_basic_access_execution_role {
21  role       = aws_iam_role.apidemo_lambda_role.id
22  policy_arn = data.aws_iam_policy.lambdaBasicExecutionRole.arn
23}
24
25
26data "aws_iam_policy" "lambdaBasicExecutionRole" {
27  name = "AWSLambdaBasicExecutionRole"
28}
在 Lambda 最基本的角色权限,能够在 CloudWatch 中创建 Log Group, Log Stream, 并往上写日志
lambda-api-gateway/lambda.tf
 1resource "aws_lambda_function" "apidemo-lambda" {
 2  function_name = "apidemo-lambda"
 3  description = "Demo API Gateway with Lambda"
 4  timeout       = 300
 5  role          = aws_iam_role.apidemo_lambda_role.arn
 6  package_type  = "Image"
 7  image_uri     = "${var.ecr.repository_url}@${data.aws_ecr_image.lambda_image.id}"
 8}
 9
10# this docker image must be present, or else can't create the Lambda function
11data aws_ecr_image lambda_image {
12  repository_name = var.ecr.name
13  image_tag       = var.image-tag
14}
15
16variable image-tag {
17  default = "1.0.0"
18}
19
20variable "ecr" {
21}
创建一个 Lambda 并关联相应的 IAM role 和 Docker 镜像
lambda-api-gateway/api-gateway.tf
 1resource "aws_api_gateway_rest_api" "demo-gateway-api" {
 2  name = "demoapi"
 3  api_key_source = "HEADER"
 4  description = "Define REST APIs for demo"
 5}
 6
 7resource "aws_api_gateway_api_key" "demoapi-apikey" {
 8  name = "demoapi-key"
 9}
10
11resource "aws_api_gateway_resource" "job_resource" {
12  rest_api_id = local.rest_api.id
13  parent_id   = local.rest_api.root_resource_id
14  path_part   = "jobs"
15}
16
17resource "aws_api_gateway_resource" "jobid_resource" {
18  parent_id   = aws_api_gateway_resource.job_resource.id
19  path_part   = "{jobId}"
20  rest_api_id = local.rest_api.id
21}
22
23resource "aws_api_gateway_method" "post_job" {
24  authorization = "NONE"
25  http_method   = "POST"
26  resource_id   = aws_api_gateway_resource.job_resource.id
27  rest_api_id   = local.rest_api.id
28  api_key_required = true
29}
30
31resource "aws_api_gateway_method" get_job_status {
32  http_method   = "GET"
33  resource_id   = aws_api_gateway_resource.jobid_resource.id
34  rest_api_id   = local.rest_api.id
35  authorization = "NONE"
36  api_key_required = true
37}
38
39resource aws_api_gateway_integration integration {
40  count = length(local.resource_methods)
41  rest_api_id = local.rest_api.id
42  resource_id = local.resource_methods[count.index].resource_id
43  http_method = local.resource_methods[count.index].http_method
44  integration_http_method = "POST"
45  type = "AWS_PROXY"
46  uri = aws_lambda_function.apidemo-lambda.invoke_arn
47}
48
49resource "aws_api_gateway_deployment" "latest" {
50  rest_api_id = local.rest_api.id
51  stage_name = "stg"
52  description = "Deploy driveapi to staging"
53  depends_on = [
54    aws_api_gateway_integration.integration[0],
55    aws_api_gateway_integration.integration[1]
56  ]
57}
58
59resource "aws_api_gateway_usage_plan" "demoapi_usage_plan" {
60  name = "demoapi-limit-access"
61
62  api_stages {
63    api_id = local.rest_api.id
64    stage  = "stg"
65  }
66  depends_on = [
67    aws_api_gateway_deployment.latest
68  ]
69}
70
71resource "aws_api_gateway_usage_plan_key" "plan_2_key" {
72  key_id        = aws_api_gateway_api_key.demoapi-apikey.id
73  key_type      = "API_KEY"
74  usage_plan_id = aws_api_gateway_usage_plan.demoapi_usage_plan.id
75}
76
77resource "aws_lambda_permission" "allow_api_gatewall" {
78  count = length(local.api_path_levels)
79  action        = "lambda:InvokeFunction"
80  function_name = aws_lambda_function.apidemo-lambda.function_name
81  principal     = "apigateway.amazonaws.com"
82  source_arn = "${local.rest_api.execution_arn}/${local.api_path_levels[count.index]}"
83}
84
85locals {
86  api_path_levels = [
87    "*/${aws_api_gateway_method.get_job_status.http_method}${aws_api_gateway_resource.jobid_resource.path}",
88    "*/${aws_api_gateway_method.post_job.http_method}${aws_api_gateway_resource.job_resource.path}"
89  ]
90
91  rest_api = aws_api_gateway_rest_api.demo-gateway-api
92
93  resource_methods = [
94    aws_api_gateway_method.get_job_status,
95    aws_api_gateway_method.post_job
96  ]
97}
终于来到本文最重要也是最复杂的地方了, 当然是最需要加以解释的,由后面的效果有助我们理解这一大段 Terraform 脚本。基本上就是创建一个使用 Docker 镜像的 Lambda, 在 API Gateway 中创建了一个 API
demoapi, 因为是 REST API, 相应的资源是 /jobs 和 /jobs/{jobId},并设置为 Lambda 的触发器,调用 API 需要在头上加上 x-api-key。API 定义参照 REST API, 什么是资源,什么又是资源上的操作方法,然后把操作方法代理到相应的 Lambda,这一步叫做集成(Integration)。通过 API Gateway 想要调用 Lambda,需要在 Lambda 那一段加上相应的调用权限,最后通过使用计划(Usage Plan) 的方式把对资源的操作与 API Key 关联了起来。这一套建立起来之后,再最后就是部署到某个环境中去,API Gateway 就会为所定义的 API 生成一个 URL,开始使用了。
最终效果及测试
执行terraform apply --auto-approve, 如果一切顺利的话(运气不好的话,terraform 执行中可能用依赖的问题,解决办法可多执行几次,或加上 depends_on),就可以开始调用前面定义的 APIs 了
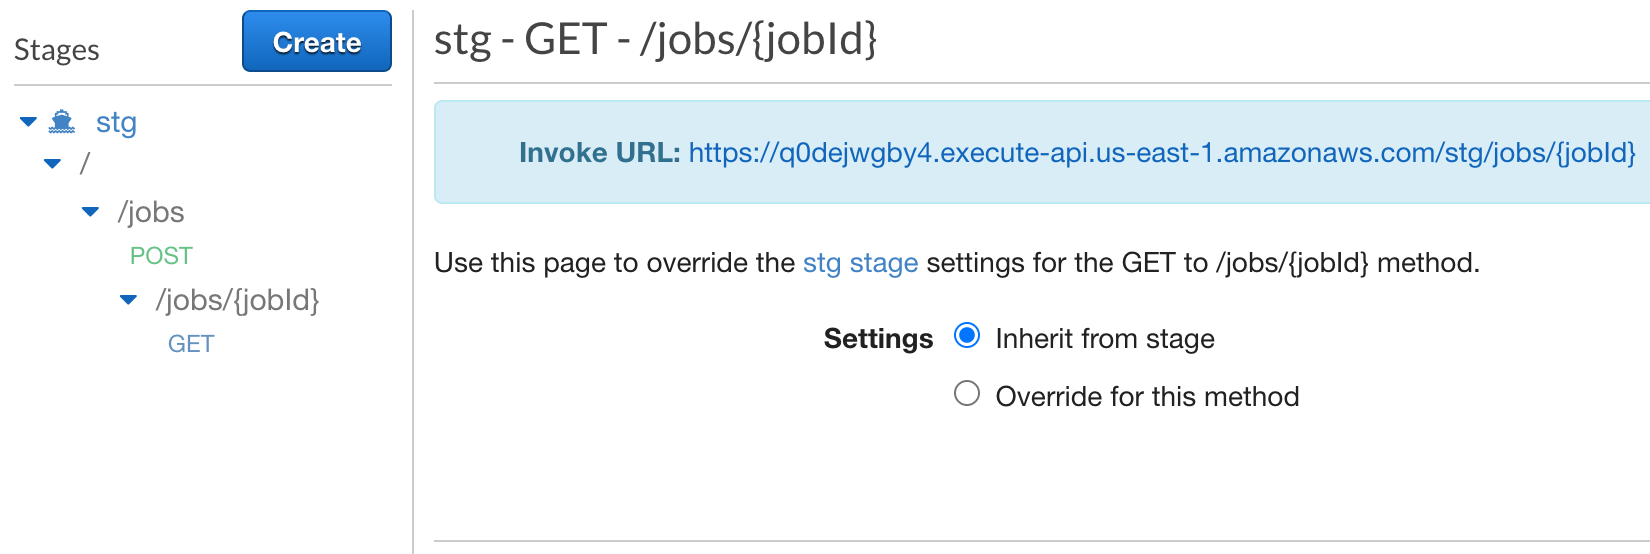
可以在 API Gateway 的 Resources 里去测试这两个 API,但这儿会跳过 API key 的验证。所以应该找到 Stages 里 API 的 URL 来测试
在这个页面我们找到 endpoint 是 https://q0dejwgby4.execute-api.us-east-1.amazonaws.com/stg/*, 用 curl 命令来测试下 1$ curl -i https://q0dejwgby4.execute-api.us-east-1.amazonaws.com/stg/jobs/12345
2HTTP/2 403
3content-type: application/json
4content-length: 23
5......
6
7{"message":"Forbidden"}%
8$
9$ curl -i -H "x-api-key:ZBM8yE3p7N8KZZ5MUkeKm730LZaag1l31tYJaaOp" \
10> https://q0dejwgby4.execute-api.us-east-1.amazonaws.com/stg/jobs/12345
11HTTP/2 200
12content-type: application/json
13content-length: 40
14......
15
16{
17 "message": "job[12345] is done"
18}
19$
20$ curl -i -X POST -H "Content-Type:application/json" \
21> https://q0dejwgby4.execute-api.us-east-1.amazonaws.com/stg/jobs --data '{"name": "new_job_xyz"}'
22HTTP/2 403
23content-type: application/json
24content-length: 23
25......
26
27{"message":"Forbidden"}%
28$
29$ curl -i -X POST -H "x-api-key:ZBM8yE3p7N8KZZ5MUkeKm730LZaag1l31tYJaaOp" -H "Content-Type:application/json" \
30> https://q0dejwgby4.execute-api.us-east-1.amazonaws.com/stg/jobs --data '{"name": "new_job_xyz"}'
31HTTP/2 201
32content-type: application/json
33content-length: 73
34......
35
36{
37 "message": "job[7ed815c9-27e6-4e87-833b-c484d0696a8c] submitted"
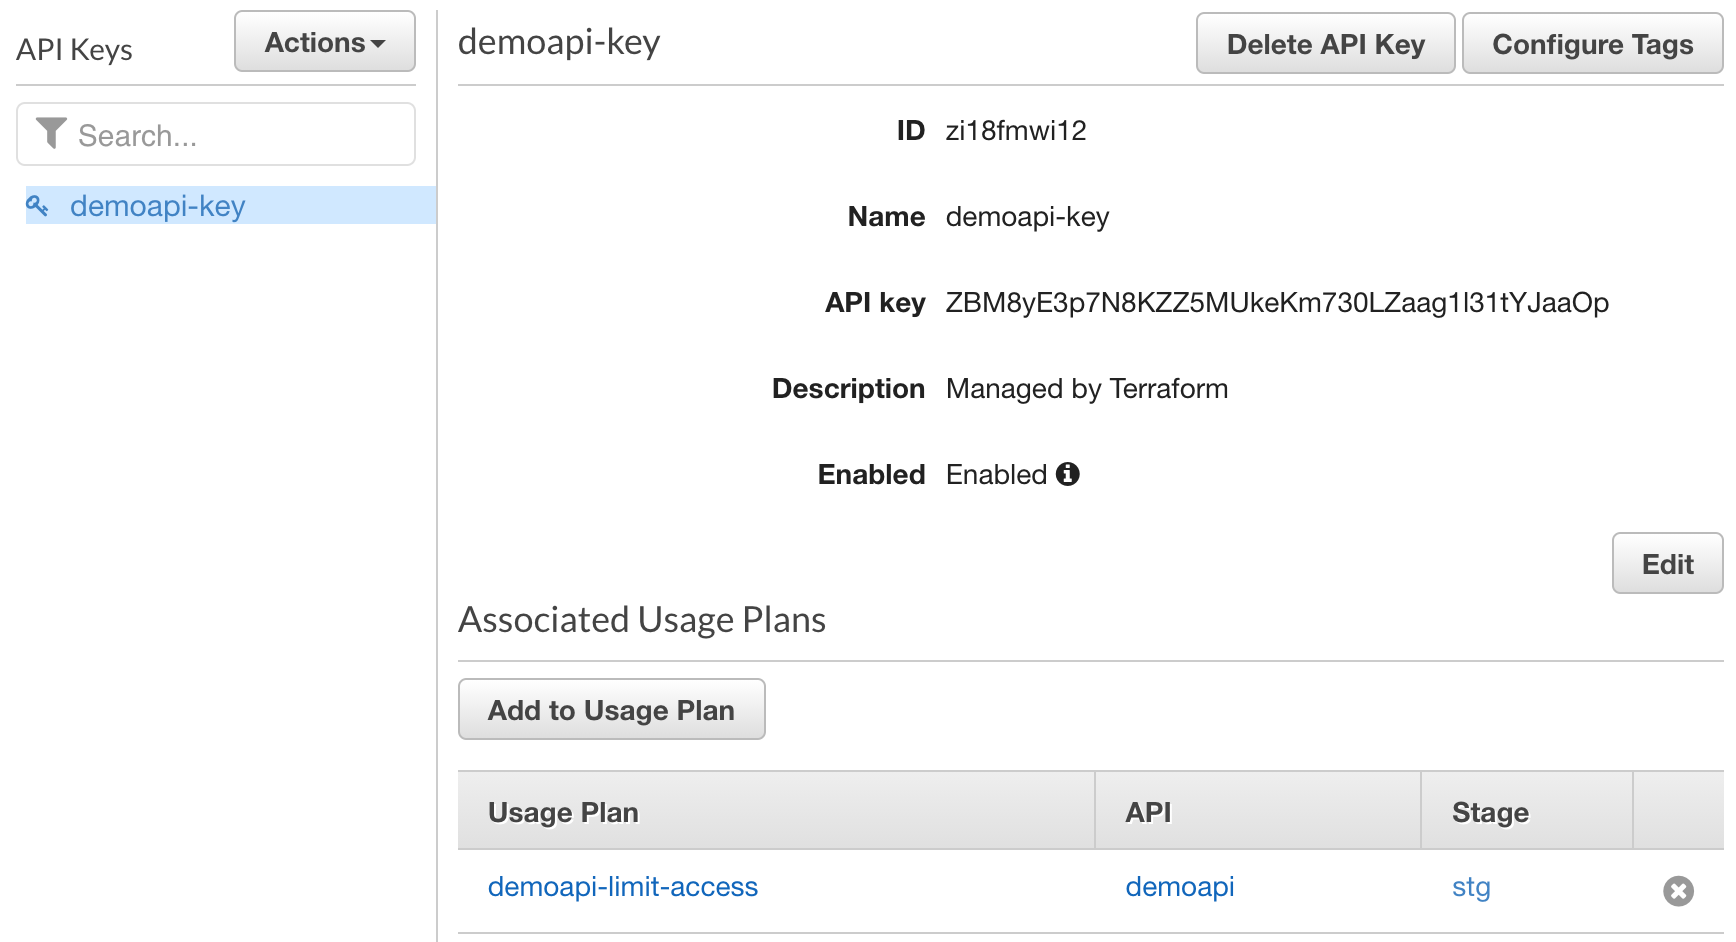
38}不提供
x-api-key 就不允许调用相应的 API, 得到 403: Forbidden 的消息。那么 x-api-key 从哪儿来的呢?我们前面自己定义的,可在 API Keys 里找到
这也验证了 API Key 是生效了的,当我们对 aws_api_gateway_method 设置了 api_key_required 时,相应的资源上就会标记为 API Key Required.
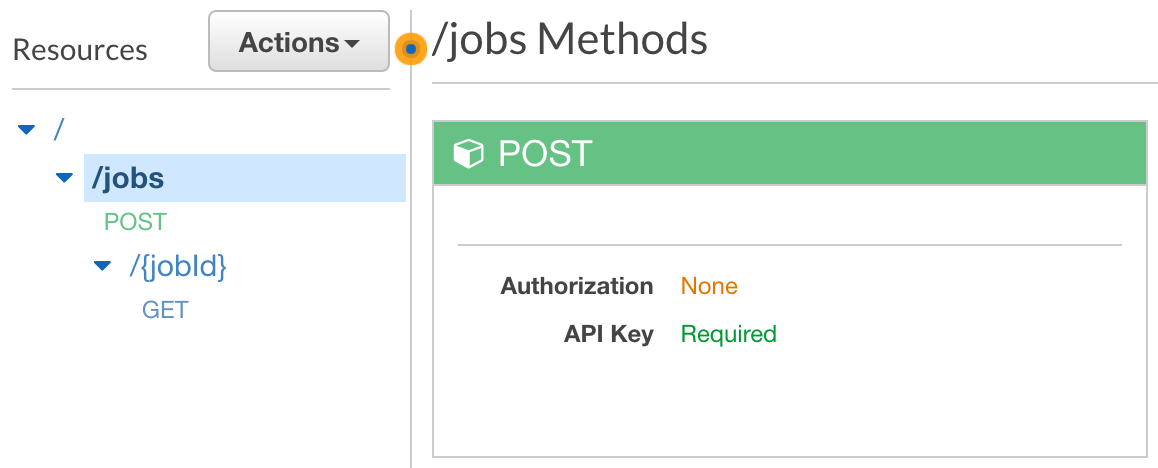
API Gateway 的 API Key 不仅仅是用来允不允许对某个资源的访问,还能用来限制对 API 的访问配额,所以是通过 aws_api_gateway_usage_plan 让 API 定义与 API Key 进行关联的。它可以控制对某个 API 一秒之内最多访问的次数,或一天(周) 之内最多访问多少次,前面的 Terraform 脚本中没有进行这样的配置限制。最后别忘了 Lambda + API Gateway 中的 Lambda 这一主要劳动力,看看它发生了什么变化,这得上一张大图
每一个 REST API 对应一个 Lambda 的触发器,并有相应的权限,同时 API Key 在这里也能看到,所以对像 POST /jobs 和 GET /jobs/{jobId} 可以使用不同的 API Key.如果在 API Gateway 的 Resource 中新加了一个 API, 也部署了,但在 Lambda 端未加上相应的权限,调用时也是得到 401: Forbidden
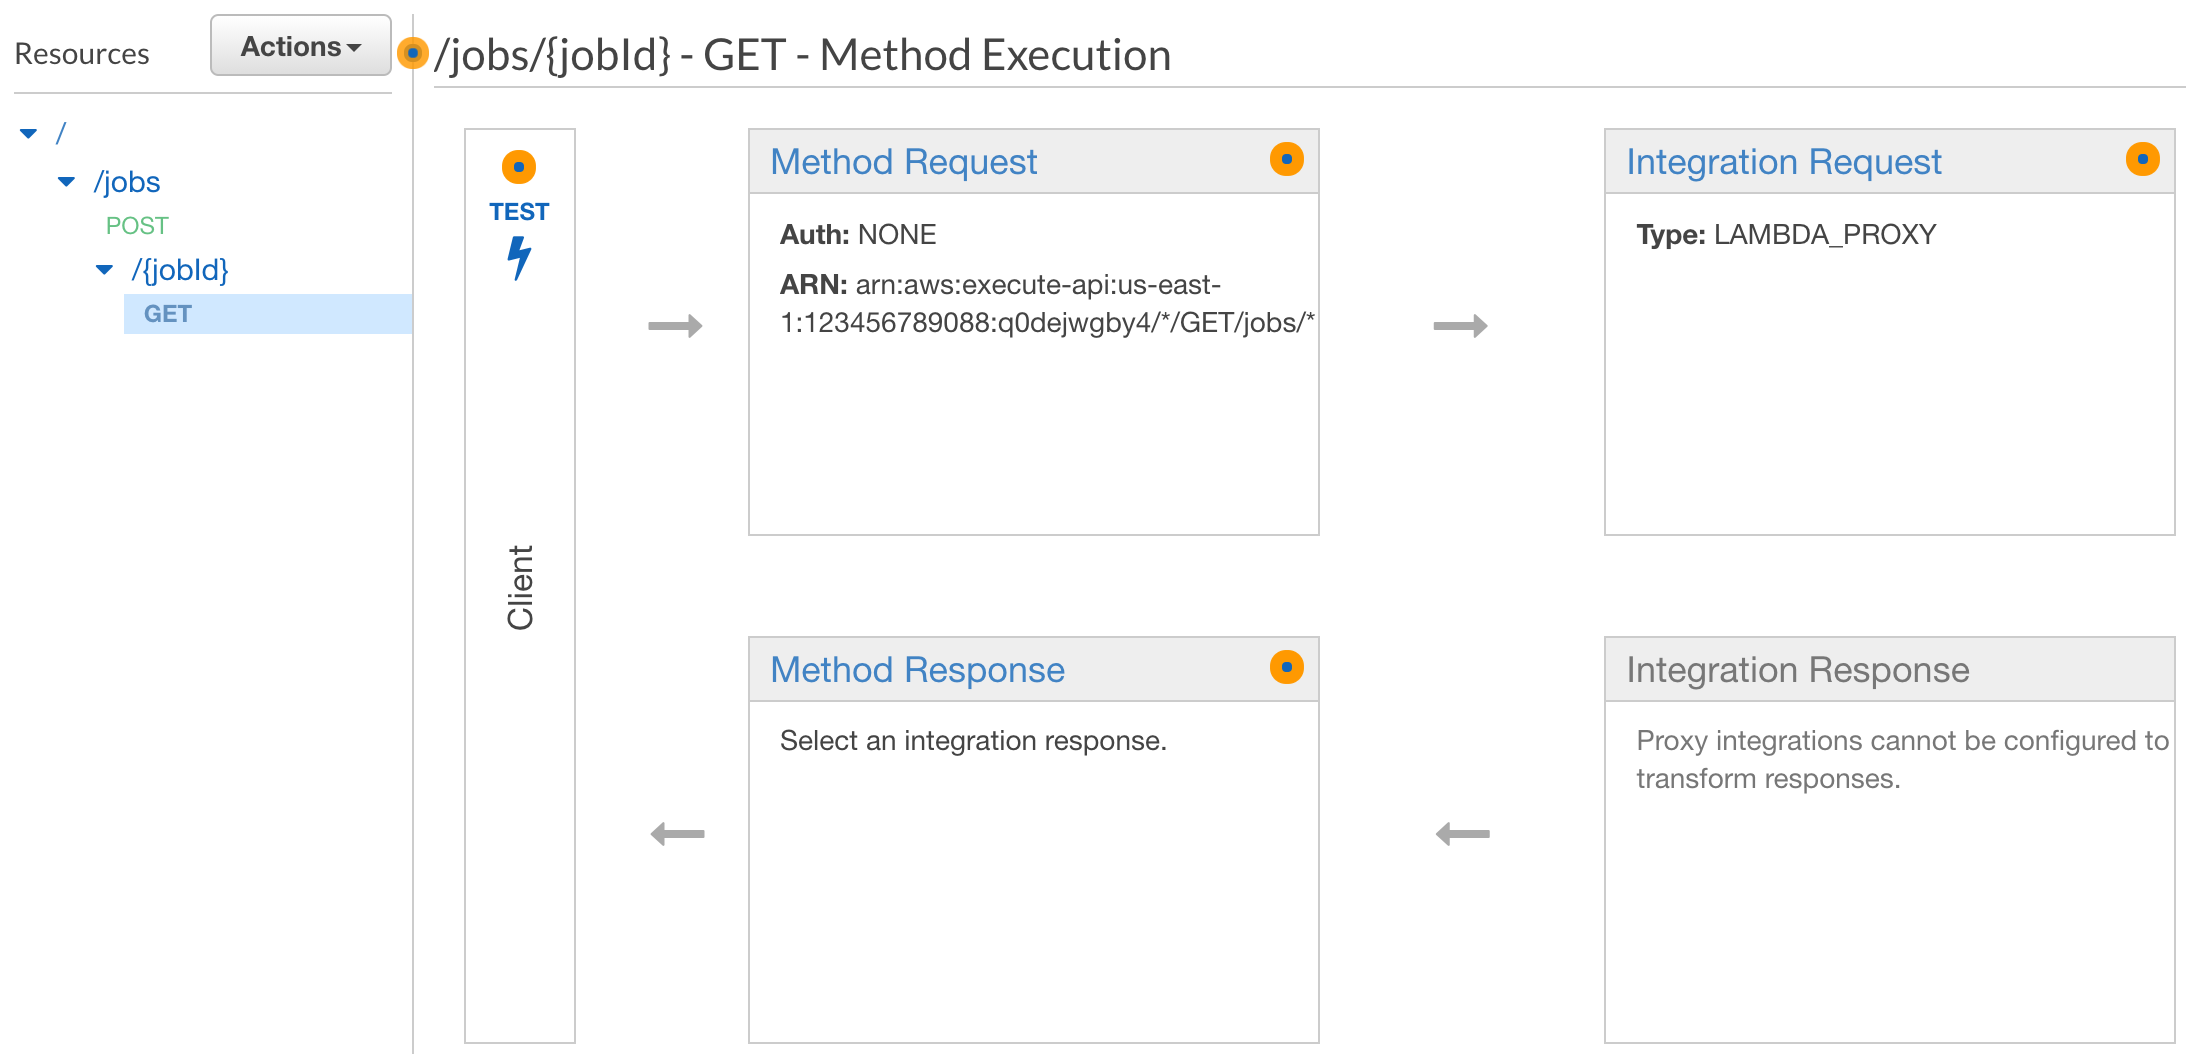
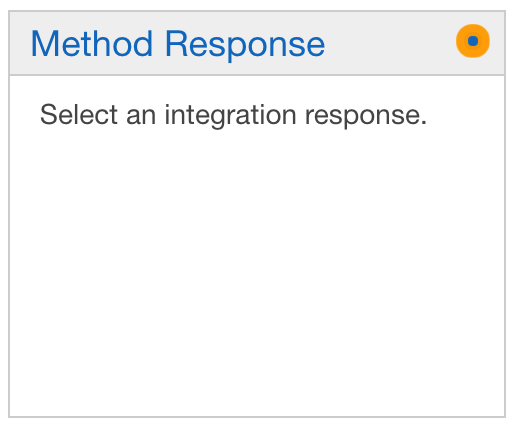
记得前面我们用 Terraform 生成的 API Gateway Resources 中,请求方法的
Method Response 显示为
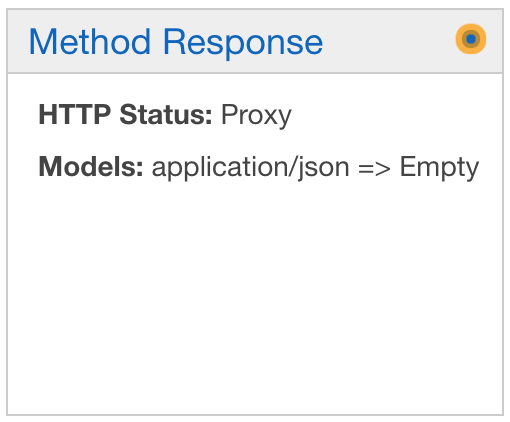
而通过 AWS 控制台页面创建的一个请求方法的 Method Response 有些不一样,是这样子的
那么这有什么影响呢?我也不确定,反正 Integration Request 那个卡片里的 Type 都是 LAMBDA_PROXY。之前碰过好像 Terraform 创建的 Resource 会出现 401: Forbidden 的情况,但后来又消失了。想要达成与 Web 控制台创建的一样效果的话,在 Terraform 中还要加上以下的 aws_api_gateway_method_response 和 aws_api_gateway_integration_response 两个声明 1resource "aws_api_gateway_method_response" "method_response" {
2 count = length(local.resource_methods)
3 rest_api_id = local.rest_api.id
4 resource_id = local.resource_methods[count.index].resource_id
5 http_method = local.resource_methods[count.index].http_method
6 status_code = "200"
7
8 response_models = {
9 "application/json" = "Empty"
10 }
11
12}
13
14resource "aws_api_gateway_integration_response" "integration_response" {
15 count = length(local.resource_methods)
16 rest_api_id = local.rest_api.id
17 resource_id = local.resource_methods[count.index].resource_id
18 http_method = local.resource_methods[count.index].http_method
19 status_code = "200"
20
21 response_templates = {
22 "application/json" = ""
23 }
24}这两个一加,在执行 Terraform 时更容易出现依赖的问题。一个办法是这两个语句可以在后期补上,再执行 Terraform 脚本,或让它们去依赖
aws_api_gateway_deployment。另外在 Lambda 中处理请求与响应时还有不少东西需要不断深入,比如说
- 像 /job/{jobId} 中 pathParameter 怎么从 event 中取
- 像 ?key1=value1 中的 queryParameter 怎么从 event 中取
- post body 如何从 event 中取,以及它与请求时的
Content-Type的关系 - post body 中如何获得 multipart/form-data 文件上传表单数据及文件内容
- 如何处理请求与响应数据的压缩,Content-Encoding, Accept-Encoding
- 如何进行文件下载,Content-Type: application/octet-stream, Content-Disposition: attachment; filename="abc.zip"
Lambda + API Gateway 的
{"message":"Forbidden"} 的情况很容易让人抓狂,其中有一个原因居然与本地 DNS 缓冲有关,必要时须清一下它Mac OS X Yosemite and later:
sudo killall -HUP mDNSResponderWindows:
ipconfig /flushdns链接:
- API GATEWAY INVOKING LAMBDA FUNCTION WITH TERRAFORM - LAMBDA CONTAINER
- Using AWS Lambda with API Gateway and Terraform
- Document how to use a LAMBDA_PROXY #10494
- How do I troubleshoot HTTP 403 Forbidden errors from API Gateway?
- How do I resolve API Gateway "malformed Lambda proxy response" errors or 502 status codes?
- Output format of a Lambda function for proxy integration
[版权声明]
本文采用 署名-非商业性使用-相同方式共享 4.0 国际 (CC BY-NC-SA 4.0) 进行许可。