学习并体验 JUnit 5 新特性
上一篇 JUnit 5 快速上手(从 JUnit 4 到 JUnit 5) 介绍了如何在一个项目中同时使用 JUnit 4 和 JUnit 5。现在来开始了解 JUnit 5 的新特性. 我们现在的项目基本是用 Maven 来管理依赖,在 Maven 项目中如何引入 JUnit 5 可以参考官方例子 junit5-maven-consumer. 我们知道 JUnit 5 包括三个模块,不用 JUnit 4 的话只要 Platform 和 Jupiter, 而 Jupiter Maven 模块本身依赖于 JUnit Platform, 因此应用 JUnit 5 的项目 Maven 配置就是
这样在当前的 IntelliJ IDEA(2017.2.4) 可以执行 JUnit 5 的测试用例。但要让 Maven 找到 JUnit 5 的测试用例,还得在
这是由于 JUnit 5 的 API 从包
IntelliJ IDEA 中的效果是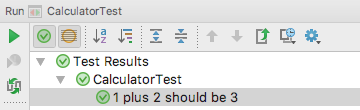 Maven 测试正常的情况下本来就不显示测试方法名称,即使将来 Maven 中能显示 @DisplayName 中的名称,估计出错的时候还得显示实际方法名。
然后在测试方法上就可直接用 @Remote 注解来代替 @Tag("remote") 的功效
进一步,可以定义包含了 @Tag 和 @Test 的元注解,那么测试用例可只用 @RemoteTest, 而不必 @Test 和 @Remote.
JUnit 5 断言有几个改进之处
这可以一定程度的提升测试代码的性能。
与其说是方便,还不如说是罗嗦,怎么都没有
JUnit 5 的 @Test 注解不再支持
@Test(expected = ArithmeticException.class) 和
@Rule public ExpectedException expectedEx= ExpectedException.none();
的改进的写法
同样要注意莫用 JUnit 5 的 @Test 与 JUnit 4 的 Assume 搭配使用,否则产生的是测试代码抛出 RuntimeException 异常那样的失败失败(不是断言失败),而非忽略,反之亦然。
在我们 JUnit 5 以前,以下代码是不受 JUnit 4 待见的,根本找不到要执行的测试用例
要求测试用例只能写在顶层类中。
 JUnit 5 用 @Nested 注解使用测试类的嵌套成为了可能。
IntelliJ IDEA 中的执行效果
 Maven 执行测试时会统计到每一个具体的测试方法,并且失败时能准确定位到错误
 嵌套测试提供了一种组织测试类的方式,不过我目前还未领悟到它的精髓所在。
JUnit 5 提供了方法来把生命周期由方法改为测试类,对于单个测试类可以直接使用注解
上面代码相当于把 JUnit 的执行行为由
变成了
这样前面两个测试用例输出的 this 就是同一个实例了,默认
另外,还可以全局修改 Lifecycle 为 PER_CLASS,两种方式
就是想不到有什么理由需要这样的全局默认行为的改动,这或会使得很多测试产生诡异的结果。
测试类的构造函数,或 @Test, @TestFactory, @BeforeEach, @AfterEach, @BeforeAll, 或 @AfterAll 注解的方法都可以接受参数,参数由 ParameterResolver 来解析,它本身是一个扩展,实现了
也就是说可接受的参数类型相应的为 TestInfo, TestReporter, RepetionInfo. 举个例子
输出如下
在 JUnit 5 之前可以用
有些 ParameterResolver 由扩展
那么重复测试的实际意义在哪里呢?
体验了一下好像没多大区别,不过还是让大家欣赏一下
首先需要引入库
IntelliJ IDEA 下的效果
 Maven 控制台下的效果
 其他特性如 测试模板,动态测试,扩展模型。扩展模型算是 JUnit 5 的大头戏,所以这里不展开来细讲。
前头细数了那么 8 个所谓的新特性,仔细与 JUnit 4 对比了下好像也没几个新鲜的东西。
参考:
永久链接 https://yanbin.blog/learn-junit-5-new-features/, 来自 隔叶黄莺 Yanbin's Blog
[版权声明] 本文采用 署名-非商业性使用-相同方式共享 4.0 国际 (CC BY-NC-SA 4.0) 进行许可。
1<dependency>
2    <groupId>org.junit.jupiter</groupId>
3    <artifactId>junit-jupiter-engine</artifactId>
4    <version>5.0.0</version>
5    <scope>test</scope>
6</dependency>
这样在当前的 IntelliJ IDEA(2017.2.4) 可以执行 JUnit 5 的测试用例。但要让 Maven 找到 JUnit 5 的测试用例,还得在
pom.xml 中加上 1<build>
2 <plugins>
3 <plugin>
4 <artifactId>maven-surefire-plugin</artifactId>
5 <version>2.19.1</version>
6 <dependencies>
7 <dependency>
8 <groupId>org.junit.platform</groupId>
9 <artifactId>junit-platform-surefire-provider</artifactId>
10 <version>1.0.0</version>
11 </dependency>
12 </dependencies>
13 </plugin>
14 </plugins>
15</build>这是由于 JUnit 5 的 API 从包
org.junit 变到了 org.junit.jupiter.api,而现在 maven-surefire-plugin 只能识别 org.junit.Test 标注的测试用例。一. JUnit 5 的注解
| JUnit 5 注解 | 相应 JUnit 4 中的注解 | 说明 |
| @Test | @Test | 在 JUnit 4, 5 混合的项目,特别注意包名. 如果是 JUnit 4 的 @Test, 那么下面的注解都会失效 |
| @DisplayName | 无 | 相当于 TestNG 中的 description 属性,测试类/方法的显示名称 让测试结果显示更友好, |
| @BeforeEach | @Before | 两个版本间是一一对应的,只是 JUnit 5 中的注解语义上更清晰 |
| @BeforeAll | @BeforeClass | |
| @AfterEach | @After | |
| @AfterAll | @AfterClass | |
| @Disabled | @Ignore | |
| @Tag | @Category | JUnit 4 中的 @Category 是一个试验性的注解 |
| @ExtendWith | @RunWith |
@DisplayName
显示测试类或方法的友好名称,目前在 IDEA 中有效,在 Maven 下没效果。例如下面的代码1@Test
2@DisplayName("1 plus 2 should be 3")
3public void onePlugTwoShouldBeThree() {
4 Calculator calc = new Calculator();
5 assertEquals(3, calc.add(1, 2));
6}IntelliJ IDEA 中的效果是
Maven 测试正常的情况下本来就不显示测试方法名称,即使将来 Maven 中能显示 @DisplayName 中的名称,估计出错的时候还得显示实际方法名。@Tag
它用来对测试进行分类,例如含有 @Tag("remote") 的测试用例在 Jenkins 上不应执行。但仅用字符串标识对书写时要求太高,有可能谁就写了一个 @Tag("Remote"). 一种办法就是用常量来代替字符串remote, 再就是用元注解1@Target({ ElementType.TYPE, ElementType.METHOD })
2@Retention(RetentionPolicy.RUNTIME)
3@Tag("remote")
4public @interface Remote {
5}然后在测试方法上就可直接用 @Remote 注解来代替 @Tag("remote") 的功效
1@Test
2@Remote
3public void testGetUser() {
4    //......
5}
进一步,可以定义包含了 @Tag 和 @Test 的元注解,那么测试用例可只用 @RemoteTest, 而不必 @Test 和 @Remote.
二. JUnit 5 断言
JUnit 5 的断言由 org.junit.jupiter.api.Assertitions 静态方法提供, 比以前稍微丰富些。无论是 JUnit 4 还是 JUnit 5 的 @Test 注解,断言方法是可以混用的。基本的断言方法没有多大变化,仍然是assertEquals 会让人傻傻分不清哪个是期望值,哪个是实际值。所以我继续坚持用 AssertJ 提供的流畅的断言方式,类型推断,根本不用记忆某个类型相应的 Matcher。 JUnit 5 断言有几个改进之处
1) 错误消息可由 Supplier<String> 函数提供
JUnit 5 断言方法的错误消息既可以以直接字符串,也能用 Supplier<String> 函数提供。函数提供消息字符串的作用是可以延迟计算,只在断言失败时执行 Supplier<String> 函数1public static void assertEquals(float expected, float actual, Supplier<String> messageSupplier) {
2 AssertEquals.assertEquals(expected, actual, messageSupplier);
3}1//不管成功与否,都会进行后面的字符串操作
2assertEquals(expected, actual, baseMessage + "wrong value " + actual);
3
4//只有在失败时才会进行后面的字符串操作
5assertEquals(expected, actual, () -> baseMessage + "wrong value " + actual);这可以一定程度的提升测试代码的性能。
2) assertAll 接受多个 org.junit.jupiter.api.Executable 函数提供与条件断言
1assertAll("Math",
2    () -> assertEquals(2, 1 + 1),
3    () -> assertTrue(1 > 0)
4);
与其说是方便,还不如说是罗嗦,怎么都没有
AssertJ 那种方法链的类 assertAll 操作方法1assertThat(actual).containsString("hello").containsString("world");3) assertThrows 方法断言异常(值得关注)
1@Test
2public void testDivide() {
3    Calculator calc = new Calculator();
4    ArithmeticException exception = Assertions.assertThrows(ArithmeticException.class, () -> calc.divide(1, 0));
5    assertEquals(exception.getMessage(), "/ by zero");
6}
JUnit 5 的 @Test 注解不再支持
expected 属性,这是综合了先前 JUnit 版本的@Test(expected = ArithmeticException.class) 和
@Rule public ExpectedException expectedEx= ExpectedException.none();
的改进的写法
三. JUnit 5 前置条件
这不是什么新东西,在 JUnit 4 中已有该特性,只是我之前未曾使用过。JUnit 4 中 assumeXxx() 方法在org.junit.Assume 中,JUnit 5 的 assumeXxx() 方法在 org.junit.jupiter.api.Assumptions 中。前置条件用于决定是否要进行后续的测试,所以它与断言的区别是,前置条件不满足不会使得测试失败,而是忽略该测试,效果是与 @Ignore 或 @Disabled 是一致的,我们可以称之为有条件的 @Ignore 或 @Disabled。同样要注意莫用 JUnit 5 的 @Test 与 JUnit 4 的 Assume 搭配使用,否则产生的是测试代码抛出 RuntimeException 异常那样的失败失败(不是断言失败),而非忽略,反之亦然。
四. 嵌套测试
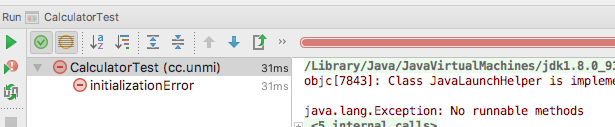
这是个新鲜玩艺,可以让我们在测试类中嵌套定义测试类,并且嵌套层次不限,内部测试类中也可以用 @BeforeEach 和 @AfterEach 等注解。在我们 JUnit 5 以前,以下代码是不受 JUnit 4 待见的,根本找不到要执行的测试用例
 1import org.junit.Test;
 2
 3public class CalculatorTest {
 4
 5    class OperatorTest {
 6
 7        @Test
 8        public void testFoo(){
 9        }
10    }
11}
要求测试用例只能写在顶层类中。
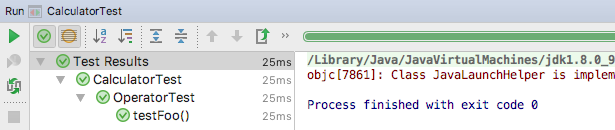
JUnit 5 用 @Nested 注解使用测试类的嵌套成为了可能。 1import org.junit.jupiter.api.Nested;
2import org.junit.jupiter.api.Test;
3
4public class CalculatorTest {
5
6 @Nested
7 class OperatorTest {
8
9 @Test
10 public void testFoo(){
11
12 }
13 }
14}IntelliJ IDEA 中的执行效果
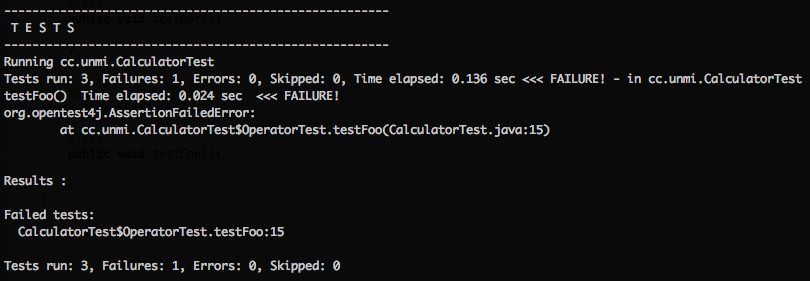
Maven 执行测试时会统计到每一个具体的测试方法,并且失败时能准确定位到错误
嵌套测试提供了一种组织测试类的方式,不过我目前还未领悟到它的精髓所在。五. 测试方法是一个独立生命周期
学习到这里才意识到我一直存在这么一个误区,以为 JUnit 是以测试类为一个生命周期的。比如在同一个类中多个测试方法使用了同一个实例变量的情况下,总会用一个@After 方法来复位该实例变量,现在才知道那是多余的, 错误的使用了 @After 。关于 JUnit 以测试方法为生命周期可参考我的一篇日志 JUnit 中是以测试方法为一个独立的生命周期JUnit 5 提供了方法来把生命周期由方法改为测试类,对于单个测试类可以直接使用注解
@TestInstance(Lifecycle.PER_CLASS), 默认是 PER_METHOD 1@TestInstance(TestInstance.Lifecycle.PER_CLASS)
2public class CalculatorTest {
3
4 @Test
5 public void test1() {
6 System.out.println(this);
7 }
8
9 @Test
10 public void test2() {
11 System.out.println(this);
12 }
13}上面代码相当于把 JUnit 的执行行为由
1new CalculatorTest().test1();
2new CalculatorTest().test2();
变成了
1CalculatorTest calculatorTest = new CalculatorTest();
2calculatorTest.test1();
3calculatorTest.test2();
这样前面两个测试用例输出的 this 就是同一个实例了,默认
PER_METHOD 时每个测试方法都属于各自不同的实例。cc.unmi.CalculatorTest@39c0f4a这时候,如果它们使用于实例变量就要特别注意用
cc.unmi.CalculatorTest@39c0f4a
@BeforeEach 或 @AfterEach 来复位。另外,还可以全局修改 Lifecycle 为 PER_CLASS,两种方式
- 系统属性 -Djunit.jupiter.testinstance.lifecycle.default=per_class
- classpath 下属性文件 junit-platform.properties (如 src/test/resoures 下), 加上内容
junit.jupiter.testinstance.lifecycle.default = per_class
就是想不到有什么理由需要这样的全局默认行为的改动,这或会使得很多测试产生诡异的结果。
六. 依赖注入
在 JUnit 5 之前,标准的测试类不能有非默认构造函数,测试方法不允许有参数。只是说标准的情况下,我曾经用 JMockit 时通过测试方法来注入 Mock 对象。测试类的构造函数,或 @Test, @TestFactory, @BeforeEach, @AfterEach, @BeforeAll, 或 @AfterAll 注解的方法都可以接受参数,参数由 ParameterResolver 来解析,它本身是一个扩展,实现了
Extension 接口,且目前有三个实现- TestInfoParameterResolver
- TestReporterParameterResolver
- RepetionInfoParameterResolver
也就是说可接受的参数类型相应的为 TestInfo, TestReporter, RepetionInfo. 举个例子
 1public class CalculatorTest {
 2
 3    public CalculatorTest(TestInfo testInfo) {
 4        System.out.println(testInfo.getTestClass().get());
 5    }
 6
 7    @Test
 8    @DisplayName("my test 1")
 9    public void test1(TestInfo testInfo) {
10        System.out.println(testInfo.getDisplayName());
11    }
12
13    @Test
14    public void test2(TestReporter testReporter) {
15        testReporter.publishEntry("a key", "a value");
16    }
17}
输出如下
class cc.unmi.CalculatorTestTestInfo 可以提供的信息有 DisplayName, Tags, TestClass, 和 TestMethod.
my test 1
class cc.unmi.CalculatorTest
timestamp = 2017-09-25T00:07:04.736, a key = a value
在 JUnit 5 之前可以用
TestName 这个 @Rule 来简单获取测试信息,JUnit 5 中没有了 @Rule 这个概念。有些 ParameterResolver 由扩展
@ExtendWith 引入了,如 MockitExtension 本身就实现了 ParameterResolver 接口。可以用下面的方式注入 Mock 对象 1@ExtendWith(MockitoExtension.class)
2public class MyMockitoTest {
3
4 @BeforeEach
5 public void init(@Mock Person person) {
6 when(person.getName()).thenReturn("Dilbert");
7 }
8
9 @Test
10 public simpleTestWithInjectedMock(@Mock Person person) {
11 assertEquals("Dilbert", person.getName());
12 }
13} 七. 重复测试
可用RepeatedTest(value = times, name = "{displayName} {currentRepetition} / {totalRepetitions}") 来定义重复次数,以及如何显示,name 为可选,可使用三个内置的变量。那么重复测试的实际意义在哪里呢?
八. 参数化测试
这个功能在 JUnit 4 中就已存在,RunWith(Parameterized.class),主要是提供输入与结果数据不太方便,所以曾跃跃欲试而最终放弃。到了 JUnit 5 中参数化测试反而移入到了实验中的功能,看过 C# 的同事大量用参数化测试,想看看 JUnit 5 的这一功能进化成怎样了。体验了一下好像没多大区别,不过还是让大家欣赏一下
首先需要引入库
org.junit.jupiter:junit-jupiter-params:5.0.0, 代码是 1public class CalculatorTest {
2
3 static Collection<Object[]> data() {
4 return Arrays.asList(new Object[][]{
5 {1, 2, 3},
6 {2, 2, 4},
7 {2, 3, 6},
8 {3, 5, 8},
9 });
10 }
11
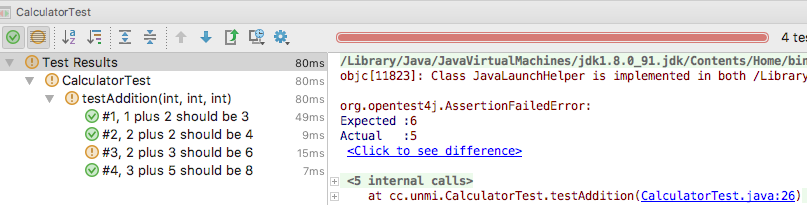
12 @ParameterizedTest(name = "#{index}, {0} plus {1} should be {2}")
13 @MethodSource(value = "data")
14 public void testAddition(int x, int y, int z) {
15 Calculator calculator = new Calculator();
16 assertEquals(z, calculator.add(x, y));
17 }
18}IntelliJ IDEA 下的效果
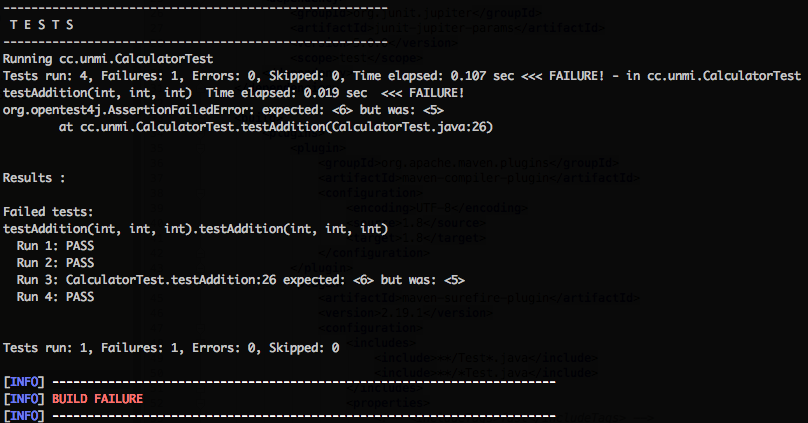
Maven 控制台下的效果
其他特性如 测试模板,动态测试,扩展模型。扩展模型算是 JUnit 5 的大头戏,所以这里不展开来细讲。前头细数了那么 8 个所谓的新特性,仔细与 JUnit 4 对比了下好像也没几个新鲜的东西。
- 碰上一个 DisplayName 可以让测试报告变漂亮的,可是 Maven 却视而不见。
- 还有些像 嵌套测试,重复测试 没想到有什么大用处。
- Assertions 没多大起色,我仍然亲赖于 AssertJ
- Assumptions, 参数化测试 以前也有。依赖注入 在非标准的 JUnit 4 中也用过
- Tag 用于过滤测试应该比 @Category 用起来方便些,特别是借助于元注解。@Category 必须指定类,而 Tag 指定字符串就行。
- 说到头,还是扩展最令人期待(尚未深入)
参考:
永久链接 https://yanbin.blog/learn-junit-5-new-features/, 来自 隔叶黄莺 Yanbin's Blog
[版权声明]
本文采用 署名-非商业性使用-相同方式共享 4.0 国际 (CC BY-NC-SA 4.0) 进行许可。