WordPress 升级到了 3.9,语法高亮按钮插件更新
WordPress 终于又迎来一次次版本号的升级,带来几个便捷之处,如直接拖拽图片进编辑器中,随意缩放旋转。同时把 TinyMCE 从 4.0.21.1 版,这直接造成了我之前的那个添加代码的自定义工具按钮歇菜了,弹不出选项来。见 语法加亮插件 SyntaxHighlighter 的好伴侣,轻便的 TinyMCE 工具按钮 中描述的那个自定义插件。所以要把该插件升级下,使之兼容 TinyMCE 4,TinyMCE 从 3 到 4 的改变还真不小,界面上看到多了行菜单条,它的 API 变得大了去。
本文参考了:
1. http://www.tinymce.com/wiki.php/API3:method.tinymce.Plugin.createControl
2. http://www.tinymce.com/wiki.php/api4:class.tinymce.Plugin
3. http://www.tinymce.com/tryit/menubutton.php
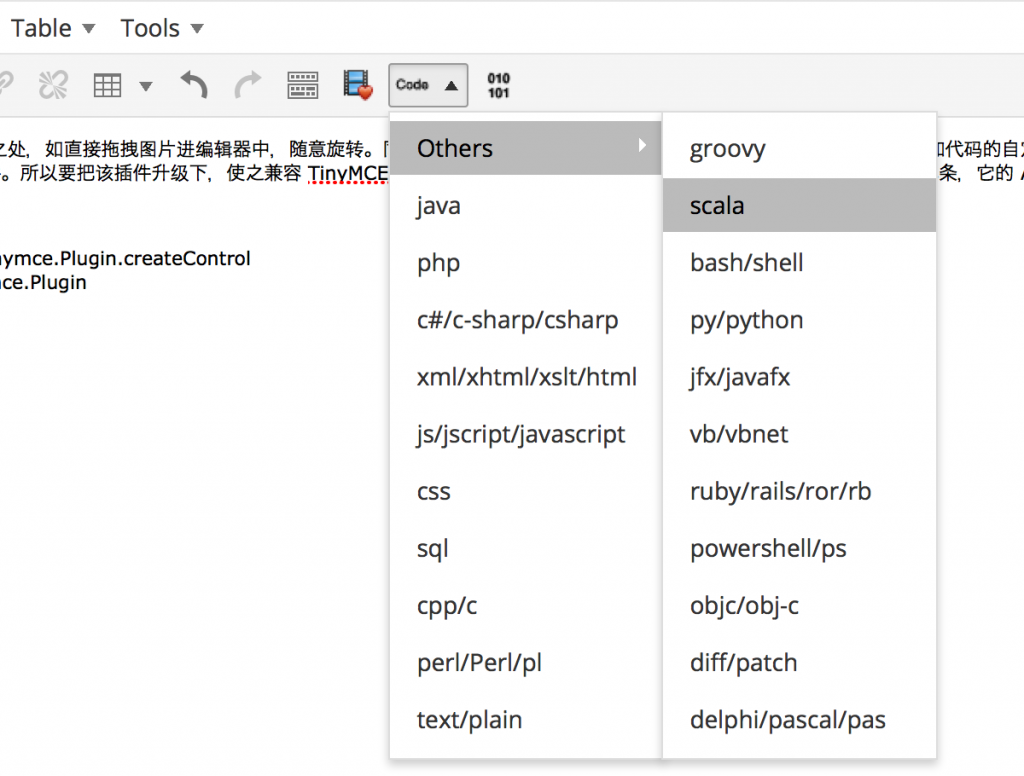
现在改成了一个带三角的 MenuButton,如图:
 关键性的代码修改如下:
老版本的 editor_plugin.js 中,支持 TinyMCE 3
新版本的 editor_plugin.js 中,支持 TinyMCE 4
d现在突然发现 WordPress 3.9 的编辑器中的字体好小啊,要改一改, WordPress 文件中准备了两种 skins 供选择,lightgray 和 wordpress,但是未看到哪里能选择 TinyMCE 的 skin. 默认是 lightgray 的,它所定义的字体大小是 11px, wordpress skin 的是 13px,应该要这个大小看得才舒服。
为 TinyMCE 编辑器加载样式文件的代码得改,不然的话,虽然样式是加载生效了,但是直接影响 WordPress3.9 中图片编辑功能,造成图片左上方的铅笔和删除按钮不会显示,并且图片在编辑器中总是左方显示。
WordPress3.9 之前加载样式文件的代码是:
在 WordPress3.9 中要改为
至此大功告成。 永久链接 https://yanbin.blog/upgrade-wordpress-3-9-with-syntax-button/, 来自 隔叶黄莺 Yanbin's Blog
[版权声明] 本文采用 署名-非商业性使用-相同方式共享 4.0 国际 (CC BY-NC-SA 4.0) 进行许可。
本文参考了:
1. http://www.tinymce.com/wiki.php/API3:method.tinymce.Plugin.createControl
2. http://www.tinymce.com/wiki.php/api4:class.tinymce.Plugin
3. http://www.tinymce.com/tryit/menubutton.php
现在改成了一个带三角的 MenuButton,如图:
 关键性的代码修改如下:
老版本的 editor_plugin.js 中,支持 TinyMCE 3
 1tinymce.create('tinymce.plugins.shtb', {
 2
 3    init : function(ed, url) {
 4        // Register the command so that it can be invoked by using tinyMCE.activeEditor.execCommand('mceExample');
 5
 6        // Register Syntax Highlighter Button
 7        ed.addButton('shtb', {
 8            title : 'Syntax Highlighter',
 9            cmd : 'shtb',
10            image : url + '/shtb_img.png'
11        });
12
13        // Add a node change handler, selects the button in the UI when a image is selected
14        ed.onNodeChange.add(function(ed, cm, n) {
15            cm.setActive('shtb', n.nodeName == 'IMG');
16        });
17    },
18
19    createControl: function(n, cm) {
20        switch (n) {
21            case 'shtb':
22                var c = cm.createMenuButton('unmienubutton', {
23                    title : 'Syntax Highlighter',
24                    image : g_url + '/shtb_img.png',
25                    icons : false
26                });
27
28                c.onRenderMenu.add(function(c, m) {
29                    var sub;
30
31                    sub = m.addMenu({title : 'Others'});
32
33                    for(var i=0;i<other_brushes.length;i++){
34                        sub.add({title : other_brushes[i], onclick : function() {
35                            insertShTag(this.title);
36                        }});
37                    }
38
39                    for(var i=0;i<common_brushes.length;i++){
40                        m.add({title : common_brushes[i], onclick : function() {
41                            insertShTag(this.title);
42                        }});
43                    }
44
45                });
46
47                // Return the new menu button instance
48                return c;
49        }
50
51        return null;
52    },
53});
新版本的 editor_plugin.js 中,支持 TinyMCE 4
 1tinymce.create('tinymce.plugins.shtb', {
 2
 3    //or init: function...., constructor
 4    shtb : function(editor, url) {
 5
 6        // Register Syntax Highlighter Button
 7        var mainMenu = [];
 8        var otherSubMenu = [];
 9
10        for(var i=0;i<other_brushes.length;i++){
11            otherSubMenu.push({text : other_brushes[i], onclick : function(e) {
12                insertShTag(e.target);
13            }});
14        }
15
16        mainMenu.push({text: 'Others', menu: otherSubMenu});
17
18        for(var i=0;i<common_brushes.length;i++){
19            mainMenu.push({text : common_brushes[i], onclick : function(e) {
20                insertShTag(e.target);
21            }});
22        }
23
24        editor.addButton('shtb', {
25            type: 'menubutton',
26            cmd:'shtb',
27            icon: 'btn_icon',
28            // text: 'C',
29            // image : url + '/shtb_img.png',
30            menu: mainMenu
31        });
32    },
33});
d现在突然发现 WordPress 3.9 的编辑器中的字体好小啊,要改一改, WordPress 文件中准备了两种 skins 供选择,lightgray 和 wordpress,但是未看到哪里能选择 TinyMCE 的 skin. 默认是 lightgray 的,它所定义的字体大小是 11px, wordpress skin 的是 13px,应该要这个大小看得才舒服。
为 TinyMCE 编辑器加载样式文件的代码得改,不然的话,虽然样式是加载生效了,但是直接影响 WordPress3.9 中图片编辑功能,造成图片左上方的铅笔和删除按钮不会显示,并且图片在编辑器中总是左方显示。
WordPress3.9 之前加载样式文件的代码是:
1function append_editor_css($css) {
2    return plugins_url('syntax-button/editor_style.css');
3}
4
5add_filter("mce_css", "append_editor_css”);
在 WordPress3.9 中要改为
1function append_editor_css($mce_css) {
2    if ( !empty( $mce_css ) )
3        $mce_css .= ',';
4    $mce_css .= plugins_url( 'editor_style.css', __FILE__ );
5    return $mce_css;
6}
7
8add_filter("mce_css", "append_editor_css”);
至此大功告成。 永久链接 https://yanbin.blog/upgrade-wordpress-3-9-with-syntax-button/, 来自 隔叶黄莺 Yanbin's Blog
[版权声明]
 本文采用 署名-非商业性使用-相同方式共享 4.0 国际 (CC BY-NC-SA 4.0) 进行许可。